7.3.2
User-Defined Conductivity Calibration
1. Rinse the main module sample cell three times with the desired conductivity standard. Fill the sample
cell with the standard.
2. Power on the SP-710 by pressing
. Allow 5–10 seconds for the SP-710 to stabilize.
3. Press
Calib
(
) as needed to highlight
Cond
in the selection menu.
4. Press
to launch the
COMBINED CALIBRATION
screen.
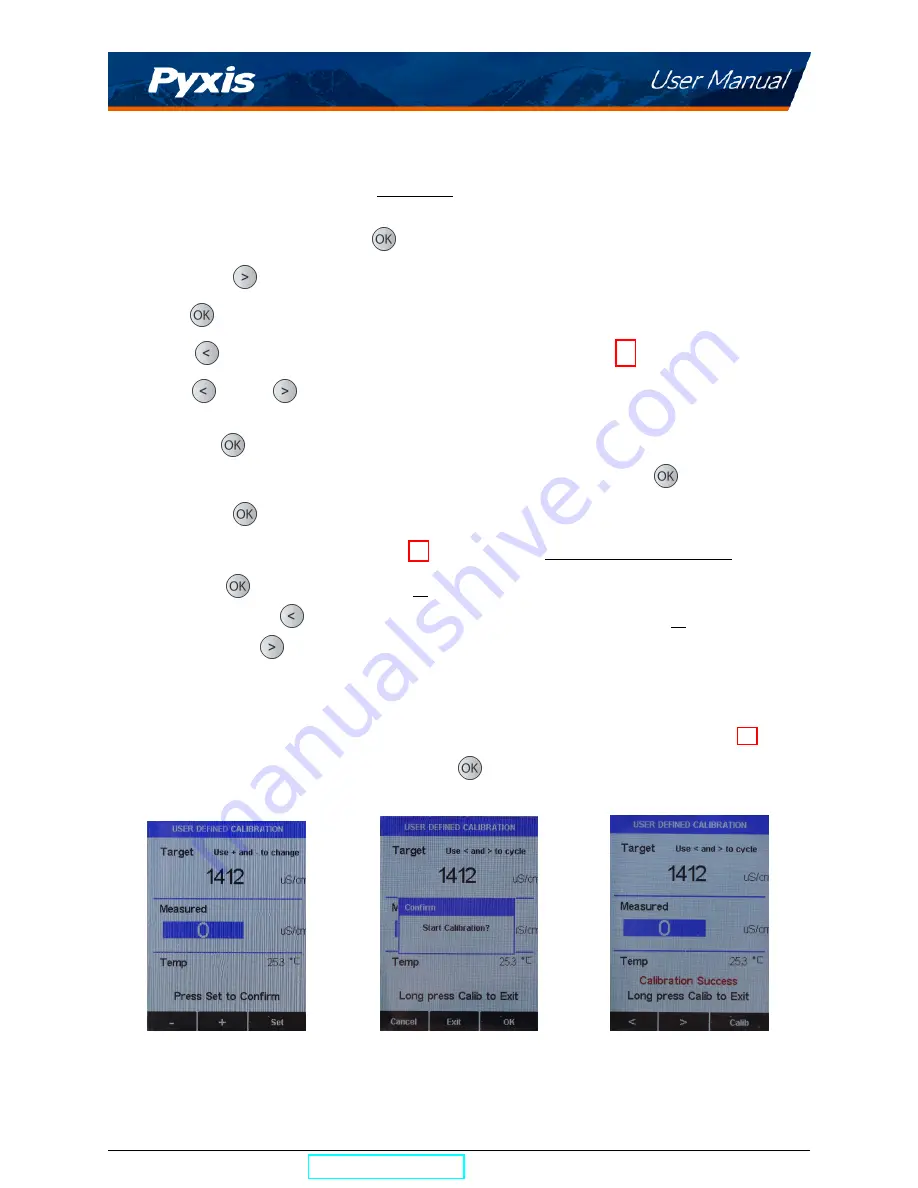
5. Press (
) to launch the
USER DEFINED CALIBRATION
screen (Figure 21).
6. Use
-
(
) and
+
(
) to adjust the target conductivity value as desired. Holding a key down scrolls
the values at a faster rate.
7. Press
Set
(
) to confirm the target conductivity value.
*
NOTE
*
To exit the calibration procedure entirely, long press
Calib
(
)
8. Press
Calib
(
) to confirm the specific conductivity calibration desired.
9. The display updates as shown in Figure 22 and the user can choose one of three options:
(a) Press
to start the calibration,
or
(b) Press
Cancel
(
) to return to the
USER DEFINED CALIBRATION
screen,
or
(c) Press
Exit
(
) to abandon calibration entirely.
10. Once calibration begins, the SP-710 reads the sample and displays the value in the
Measured
section.
A slight variance from the target is acceptable.
11. The message “
Calibration Success
” will appear towards the bottom of the display (Figure 23).
12. Calibration is now complete, long press
Calib
(
) to return to measurement mode.
Figure 21.
Figure 22.
Figure 23.
SP-710 User Manual
| +1 (866) 203-8397
18
Содержание 50352
Страница 1: ......


