background image

www.PyleUSA.com

4

ASSEMBLY

1. Loosen frame bracket bolts with supplied drum key, and open the drum stand  
     as shown below. Tighten bolts to secure once the stand is set into the position  
     pictured. (Do not over tighten)

2. Loosen pad bracket bolts and insert pads and module as shown below, tighten  
     bolts to secure. (Do not over tighten) Remove cymbal top nut and lower cymbal  
     onto holder, re-install nut to secure cymbal.

PTEDK50

CRASH

HI- HAT

SNARE

TOM1 TOM2

RIDE

TOM3

Содержание PTEDK50

Страница 1: ...PTEDK50 Electronic Drum Kit Compact Drumming Machine MIDI Computer Connection Quick Setup Roll Up Design Mac PC Compatible ...

Страница 2: ...pliances such as electric heaters or televisions Also avoid usingmulti plug adaptors since these can reduce sound quality cause operation errors and result in possible damage Turn Power OFF When Making Connections To avoid damage turn OFF the power switch and all related devices prior to connecting or disconnecting cables Handling and Transport Never apply excessive force to controls connectors an...

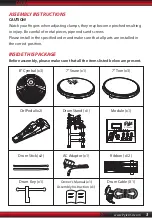
Страница 3: ...ease install in the specified order and make sure that all parts are installed in the correct position INSIDE THIS PACKAGE Before assembly please make sure that all the items listed below are present PTEDK50 Drum Key x1 Owner s Manual x1 Assembly Instruction x1 Drum Cable X1 Drum Stick x2 AC Adaptor x1 Ribbon x12 Ctrl Pedal x2 Drum Stand x1 Module x1 8 Cymbal x3 7 Snare x1 7 Tom x3 ...

Страница 4: ...bolts to secure once the stand is set into the position pictured Do not over tighten 2 Loosen pad bracket bolts and insert pads and module as shown below tighten bolts to secure Do not over tighten Remove cymbal top nut and lower cymbal onto holder re install nut to secure cymbal PTEDK50 CRASH HI HAT SNARE TOM1 TOM2 RIDE TOM3 ...
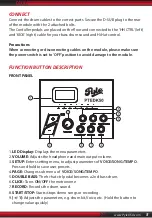
Страница 5: ...o OFF position to avoid damage to the module FUNCTION BUTTON DESCRIPTION FRONT PANEL 1 LED Display Displays the menu parameters 2 VOLUME Adjusts the headphone and main output volume 3 SETUP Enters setting menu to adjust parameters of VOICE SONG TEMPO Press and hold to save user presets 4 PAGE Changes sub menu of VOICE SONG TEMPO 5 DOUBLE BASS The hi hat ctrl pedal becomes a 2nd bass drum 6 CLICK T...

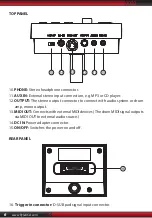
Страница 6: ...T The stereo output connector to connect with audio system or drum amp mono output 13 MIDI OUT Connects with external MIDI devices The drum MIDI signal outputs via MIDI OUT to external audio source 14 DC IN Power adapter connector 15 ON OFF Switches the power on and off REAR PANEL 16 Trigger in connector D SUB pad signal input connector ...

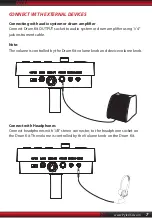
Страница 7: ...ocket to audio system or drum amplifier using 1 4 jack instrument cable Note The volume is controlled by the Drum Kit volume knob and device volume knob Connect with Headphones Connect headphones with 1 8 stereo connector to the headphone socket on the Drum Kit The volume is controlled by the Volume knob on the Drum Kit ...

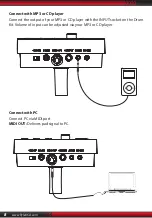
Страница 8: ...MP3 or CD player Connect the output of your MP3 or CD player with the INPUT socket on the Drum Kit Volume of input can be adjusted via your MP3 or CD player Connect with PC Connect PC via MIDI port MIDI OUT Delivers pad signal to PC ...

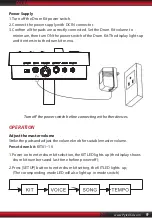
Страница 9: ...ers into the drum kit menu Turn off the power switch before connecting with other devices OPERATION Adjust the master volume Strike the pads and adjust the volume knob for suitable master volume Preset drum kit KIT01 10 1 Power on to enter drum kit selection the KIT LED lights up the display shows drum kit number saved last time before power off 2 Press SET UP button to enter drum kit setting the ...

Страница 10: ...select any drum kit as current drum kit VOICE The Drum Kit has 108 voices including the GM voices 1 Select voice you are playing This change will automatically save until the Drum Kit is switched off To permanently save this setting to a user drum kit please refer to the Saving Adjustments page 2 Adjust voice volume ...

Страница 11: ...adjustment the screen will show P 2 Press button to adjust the voice pan of the pad you are playing range 8 Left 8 Right This change will automatically save until the module is switched off To permanently save this setting to a user drum kit please refer to the Saving Adjustments SAVING ADJUSTMENTS When you are happy with your adjustments press and hold the SETUP button The screen will flash U01 y...

Страница 12: ... preset kits follow the steps above Note If you do not wish to save your settings after entering into save mode press any button other than SETUP and to exit save mode SONG SETTING 1 Selecting a Song 1 Press SET UP button to enter into song menu the SONG LED lights up 2 Press button to switch the song range 001 010 non cycle ...

Страница 13: ...to stop playing 3 Accompaniment Volume During playing user can adjust the volume of accompaniment and the drum sound 1 In song mode press PAGE button to enter into accompaniment volume setting Accompaniment the three LED shows AXX XX refers to accompaniment volume value Percussion the three LED shows DXX XX refers to drum volume value 2 Press button to switch the accompaniment volume 0 32 non cycl...

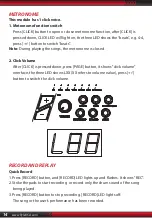
Страница 14: ...e is closed 2 Click Volume After CLICK is pressed down press PAGE button it shows click volume interface the three LED shows LXX XX refers to volume value press button to switch the click volume RECORD AND REPLAY Quick Record 1 Press RECORD button and RECORD LED lights up and flashes It shows REC 2 Strike the pads to start recording or record only the drum sound of the song being played 3 Press RE...

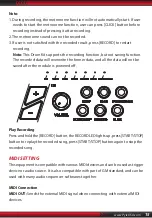
Страница 15: ...ion The recorded data will overwrite the former data and all the data will not be saved after the module is powered off Play Recording Press and hold the RECORD button the RECORD LED lights up press START STOP button to replay the recorded song press START STOP button again to stop the recorded song MIDI SETTING This equipment is compatible with various MIDI devices and can be used as trigger devi...

Страница 16: ...BLESHOOTING AUDIO SOURCE SPECIFICATION Max polyphony 32 Drum kits 10 preset drum kits KIT01 10 Voice 108 voices DRUMS PERCUSSION SFX Audio sequencer DEMO SONG 10 Recording realtime recording but can not be saved Tempo 30bpm 280bpm Display three LED red or green Connection Phone stereo out connector l 8 AUX IN stereo connector 1 8 Audio output connector 1 4 Llmono MIDI OUT Power supply DC 12V inter...

Страница 17: ...www PyleUSA com 17 DRUM KIT LIST VOICE LIST ...

Страница 18: ...www PyleUSA com 18 ...

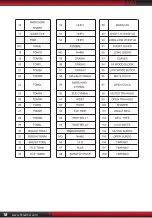
Страница 19: ...Bass Drum 1 1 KICK1 37 C 2 Side Stick 17 SRSTD 38 D2 Acoustic Snare 9 SNCOMBO3 39 D 2 Hand Clap 74 CLAP1 40 E2 ElectricSnare 15 ESN7 41 F2 Low Floor Tom 26 TOMMSTD 42 F 2 Closed Hi Hat 36 CHH3 43 G2 High Floor Tom 20 TOM8 44 G 2 Pedal Hi Hat 50 PHH2 45 A2 Low Tom 19 TOM1 46 A 2 Open Hi Hat 43 OHHSTD 47 B2 Low Mid Tom 28 TOM7 48 C3 Hi Mid Tom 18 TOM6 49 C 3 Crash Cymbal 1 55 CRSHSTD1 50 D3 High Tom...

Страница 20: ...go 86 LAGOGO1 69 A4 Cabasa 87 CABASA1 70 A 4 Maracas 88 MRCAS1 71 B4 Short Whistle 89 SWHSL1 72 C5 Long Whistle 90 LWHSL1 73 C 5 Short Guiro 91 SGUIRO 74 D5 Long Guiro 92 LGUIRO 75 D 5 Claves 93 CLV 76 E5 Hi Wood Block 94 HWBLK 77 F5 Low Wood Block 95 LWBLK 78 F 5 Mute Cuica 96 MCUICA 79 G5 Open Cuica 97 OCUICA 80 G 5 Mute Triangle 98 MTRNGL 81 A5 Open Triangle 99 OPNTRNGL 82 A 5 Shaker 100 SHAKER...

Страница 21: ... Touch Sensitivity Tom Toms Hi Hat Snare Bass Drums Crash Ride Cymbals Super Easy Simple USB Plug in Operation Includes 2 Digital Foot Pedal Controllers Front Panel Button Control Center Aux 3 5mm Input Jack Drum Along to Music via Connected Device Headphone Jack Tempo Volume Adjustable Compatible with Mac PC WHAT S IN THE BOX Electronic Drum Pad 2 Drum Foot Pedals Wall Power Adapter Audio Connect...

Страница 22: ...Questions Comments We are here to help Phone 1 718 535 1800 Email support pyleusa com ...

Отзывы: