background image

Menu Operation

13

Press

/

key to move the cursor to the item to be selected (item selected is highlighted in yellow). Press

key to enter

your selection and scan. After the scan is finished, the following menu will display. The channels found are automatically

saved as below:

Enter

An alo g Chan nels Fo und

Autoprogram Menu

NTSC Chann el 19

Digital Cha nnels Found

Not Found

Prog re ss(%)

1 2

2

0

When the channels are found, use

/

to add it to the channel list.

Press Enter button to display a channel list that you can select channel as below:

To Move

To Select

To Exit

Manual Channel Se t Menu

Ch 42 -1

ATSCdmo

Viewable

Ch 2 -0

Viewable

Ch 11 -0

Viewable

Ch 22 -0

Viewable

Ch 31 -0

Viewable

Ch 52 -0

Viewable

Ch 54 -0

Viewable

Ch 66 -0

Viewable

Ch 68 -0

Viewable

Allows you to name the channel that is selected. Use

/

to move the cursor and use

/

to input the name and then

press Menu or Enter to return or exit as following:

Channel Labels Menu

To Move

To Change

To Exit

Ch 42-1

ATSC dmo

To select language of the OSD such as English/ French and Spain

Enter

M enu

Enter

M e nu

Содержание PTC20LD

Страница 1: ...Model PTC20L D 16 10 DIGITAL LCD TV Monitor OPERATING MANUAL 19 Hi Definition LCD Flat Panel TV w Built in DVD Player ...

Страница 2: ...s VGA menu options YPbPr menu options HDMI menu options Contents SAFETY PRECAUTIONS 2 FRONT BACK CONNECTIONS OF LCD 3 TV INSTALLATION GUIDE 4 1 PREFACE 3 3 5 4 1 CONNECTION ANTENNAS 4 2 AV VIDEO INPUT DRAWING 4 3 S VIDEO INPUT DRAWING 4 4 PC VGA CONNEXION DRAWING 7 7 7 8 5 9 9 9 10 10 10 11 11 12 14 16 17 17 6 7 REMOTE CONTROLS SETUP 1 22 A Remote control instructions B Battery Usage Caution 20 AC...

Страница 3: ...ECIFICATIONS 32 33 THE DVD SETUP MENU SYSTEM 8 Contents 2 25 8 2 3 Dolby Digital Setup 8 2 4 Video Setup 8 2 5 Preference Setup 26 28 8 1 Basic Operation 8 2 DVD Setup Mode 8 2 1 General Setup 8 2 2 8 2 2 Speaker Setup Page 23 25 23 23 ...

Страница 4: ...a stable surface Do not use the monitor with others fixations than those provided or suggested by the manufacturer Do not place any material on the monitor Do not block or cover the ventilation openings on the monitor If you have a wall mount check that it is steady The monitor must be plugged with a tension source of 110 volts and 60 Hz Power cord and cables must be properly routed and protected ...

Страница 5: ...use solvents or liquids to clean the monitor Only clean the monitor with a soft and dry cloth In case of troubleshooting do not use spare parts other than those suggested by the manufacturer Using inadequate spare parts can lead to electric shocks short circuits fire or other incidents Departure in holidays Unplug the LCD during lighting storms or when unused for long periods of time ...

Страница 6: ...5 Back View and Control Connections IR ON OFF LED HDMI 13 11 10 9 8 7 6 5 3 2 1 VGA Y Pb Pr DC IN R IN RF IN S VIDEO PC AUDIO 4 V IN PHONE L IN 12 1 2 3 4 5 6 7 8 9 10 11 12 13 RF IN VGA PC AUDIO Y Pb Pr PHONE S VIDEO HDMI DC IN V IN R IN L IN ...

Страница 7: ...6 Side View DVD Player Control Disc Slot inside Label side toward user DVD Function Keys EJECT DISK BUTTON PLAY PAUSE ...

Страница 8: ...fter installation insert the 75 ohm antenna plug into the antenna jack as shown In case of signal of closed circuit TV CONNECTION ANTENNAS 75 OHM ANTENNA PLUG POWER PLUG OF ANTENNA AMPLIFIER OUTDOOR ANTENNA AMPLIFIER VHF ANTENNA VHF ANTENNA INDOOR ANTENNA AMPLIFIER VIDEO CONNECTION S VIDEO CONNECTION HDMI VGA Y Pb Pr DC IN R IN RF IN S VIDEO PC AUDIO V IN PHONE L IN HDMI VGA Y Pb Pr DC IN R IN RF ...

Страница 9: ...8 PCINPUT CONNECTION VGA PC AUDIO HDMI VGA Y Pb Pr DC IN R IN RF IN S VIDEO PC A UDIO V IN PHONE L IN ...

Страница 10: ...s off LCD TV completely Press to display the main menu Press repeatedly to select the Use and to select ress and button to select your desired language MENU SET MENU LANGUAGE P When you are satisfied with your choice press the to exit MENU Audio Setup Feature To Move To Select To Exit Tuning Band DTV Signal Auto Ch Search Add On Ch Search Manual Ch Set Channel Labels Air Picture Menu Language Engl...

Страница 11: ...de Audio Setup Feature To Move To Select To Exit Audio Mode Audio Language Bass 30 Treble 30 Balance 0 Digital Audio Output Voice Picture English PCM Audio Setup Feature To Move To Select To Exit Tuning Band DTV Signal Auto Ch Search Add On Ch Search Manual Ch Set Channel Labels Air Picture Menu Language English Audio Setup Feature To Move To Select To Exit Time Set Sleep Timer Advanced Video Menu...

Страница 12: ...use to adjust the sharpness level of picture 1 Use to select what you want to adjust in the menu Picture Picture Audio Setup Feature To Move To Select To Exit Picture Mode Contrast 50 Brightness Sharpness Color Tint Aspect Ratio User Wide Select the type of picture which best corresponds to your viewing requirements by selecting Picture Mode in PICTURE menu You may select the picture mode directly...

Страница 13: ...Audio Language Bass 30 Treble 30 Balance 0 Digital Audio Output Voice Picture English PCM You can select the type of sound which best corresponds to your listening requirements by selecting Sound in SOUND menu You may select the sound mode directly by pressing the SMODE button on the remote control Press to select one of the audio language such as English French and Spain but the condition is that...

Страница 14: ... to the channel list Press Enter button to display a channel list that you can select channel as below To Move To Select To Exit Manual Channel Set Menu Ch 42 1 ATSCdmo Viewable Ch 2 0 Viewable Ch 11 0 Viewable Ch 22 0 Viewable Ch 31 0 Viewable Ch 52 0 Viewable Ch 54 0 Viewable Ch 66 0 Viewable Ch 68 0 Viewable Allows you to name the channel that is selected Use to move the cursor and use to input...

Страница 15: ...2 00 AM 2006 You can select one of auto and manual to set the time When selected auto the item of year date and time will be disabled and can not to adjust When select the manual mode you can press and to set the corresponding functions Press to select the time zone such as Pacific Alaska Hawaii Eastern Central Mountain Press to select the amount of time before your TV turn off automatically and p...

Страница 16: ...t the number of 0 9 as below and you can change the password when you input the new one twice Enter Old Password Press Enter to enter the sub menu and then uses the 0 9 to enter the correct password This item allows you to set the closed caption and press Enter to enter Closed Caption Options menu as below To Move To Select To Exit Size Digital Closed Caption Style Font Text Color Automatic Automa...

Страница 17: ...t Shadow Edge Color press to select one of the Black White Red Green Blue Yellow Magenta Cyan Enter Enter Enter Enter Enter Enter Enter Enter Audio Setup Feature To Move To Select To Exit Time Set Sleep Timer Advanced Video Menu Picture Off VGA Set 3 When you are satisfied with your adjustment press to exit the main menu MENU 2 Press and button to adjust 1 Use to select what you want to adjust in ...

Страница 18: ...justs the available options for the best viewing configuration Press Enter to do preset that can return to the factory setting Audio Setup Feature To Move To Select To Exit Time Set Sleep Timer Advanced Video Menu Picture Off Component Set 3 When you are satisfied with your adjustment press to exit the main menu MENU 2 Press and button to adjust 1 Use to select what you want to adjust in the menu ...

Страница 19: ... set the time the TV will display Press to select the amount of time before your TV turn off automatically and press the Enter that can select the 30 min 60min 90min and OFF Press Enter to enter the advance video menu To Move To Change To Exit Menu On Advanced Video Menu Noise Reduction Spatial Noise Reduction Speckle Noise Reduction Temporal Color Temperature 3D Y C Normal On On On Enter Menu ...

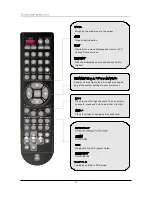
Страница 20: ...eo1 Video2 Video3 Video4 Video5 Video6 Press repeatedly to cycle through the available video picture modes Press to cycle through the different sound settings Audio selection button Lets you select amount of time before your TV turn itself off automatically Press 0 9 to select a TV channel directly when you are watching TV The channel change after 2 seco nds Press this button to enter a program nu...

Страница 21: ...wing from any menu Press to display the source and channel s info rmation Allows you to navigate the on screen menus and adjust the system settings to your preference Press to scan through channels To scan quickly channels press and hold down either button Press to increase decrease the sound level DVD ZOOM Display Electronic Program Guide DVD DISPLAY To display subtitle in DVD mode ...

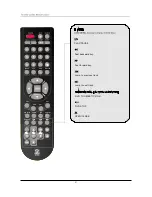
Страница 22: ...21 MTS MENU CCD EXIT DISPLAY D DISPLAY VOL VOL CH CH DVD SETUP ZOOM EPG Jump to next track Jump to previous track DVD THUMB STICK OK DVD STOP Fast backward key Fast forward key PLAY PAUSE OPEN CLOSE ...

Страница 23: ...c Replace the battery cover 1 Install all batteries correctly and as marked on the remote control 2 Do not mix batteries OLD and NEW or CARBON and ALKALINE etc Remove batteries when the remote is not used for a long time To prevent battery leakage which may result in bodily injury or damage to the remote ACCESSORIES 1 Adapter Plug 2 One Remote Control 3 2 Batteries 1 5V 4 One User Manual ...

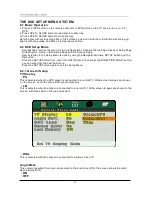
Страница 24: ... Setup Video Setup Page and Preference Page Item selection in the Setup Menu is done by using the Navigation Arrows SETUP button and the OK button Press the SETUP button first enter into SETUP menu then press the DIRECTION RIGHT button you can enter into the next Sub menu Press the SETUP button again to exit the Setup Menu This is selected when the DVD player is connected to a normal TV Wide scree...

Страница 25: ... This is used to select the OSD language Start the screen saver the screen saver image will appear when the player stops or the picture is frozen for a few minutes This saver can keep the screen from being damaged Start the screen saver Remove the screen saver ...

Страница 26: ... channel soundtrack the output signal will be incorporated to left and right channel A disc recorded multi channel soundtrack The output signal will be incorporated to stereo 8 2 3 Dolby Digital Setup Dual Mono This is used to select the Stereo L MONO R MONO and MIX MONO ...

Страница 27: ...pness High Medium Low This option is used to set the compression ratio in order to control the sound Vume contrast This option is used to set the sharpness level of the sharpness of the video output 8 2 4 Video Setup ...

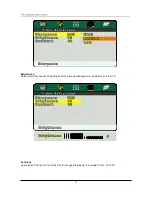
Страница 28: ...27 Contrast User can set the level of contrast for the image displayed It is ranged from 16 to 16 Brightness User can set the level of brightness for the image displayed is ranged from 20 to 20 ...

Страница 29: ... enter Preference Page This is selected when the player is connected to an PAL System TV The player will set the TV system according to the disc in the tray This is selected when the player is connected to a NTSC System TV STOP TV Type PAL MULTI NTSC ...

Страница 30: ... Japanese German Duch Italian If a language listed below is recorded on the disc you can play the sound in such language If not the language recorded will be used If a language listed below is recorded on the disc you set the subtitle to be displayed in such language If not the language recorded will be used ...

Страница 31: ...ow is record on the disc you can set the Menu to be displayed in such language If not the language recorded will be used When playing disc with parental lock function you may select an Age Control Grade according to grade of disc and your own preference For example if PG is selected DVD Video disc rated higher than the PG grade cannot be played ...

Страница 32: ...e original factory setting by choose RESET and press OK button Password NOTE Default password is 3308 User can change the password that is required when the user wants to change the Age Control Grade in the Parental Lock function ...

Страница 33: ... or appliances May be the result of an electrical wave disturb from other TV Computer and Game machine or Radio The cables of the antenna are not correctly plugged in Please check the batteries order and alignment Check that the IR of the remote control is not hidden by something Even if the display image is correct the noise may come from an unsteady fixation of the panel Make sure that you have ...

Страница 34: ...0Vp p 3db C 0 3Vp p 3db This manual is only for your reference any change to the design and specification will not be advised Standard antenna socket 75Ω R L200mVrms max3 0vp p 20 kRCA Ω Video 0vp p75 RCA 1 Ω Disc Physical Format DVD Video Output Format Video Decompression DVD CD VCD MP3 JPEG CD R CD RW NTSC MPEG 2 ISO IEC 13818 MPEG 1 JPEG 19 Inch 1440 900 400cd 500 1 160 135 16 10 16 2M 640 480 ...

Отзывы: