

2
3
www.PyleUSA.com
www.PyleUSA.com
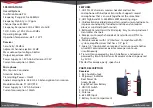
Belt Pack Transmitter
1. Antenna
2. Power Indicator
3. ON-OFF Switch
4. MIC IN jack
5. LED Display
6. Channel Select Switch
7. Battery Cover/Compartment
8. Lavalier MIC
9. Headset MIC
OPERATION
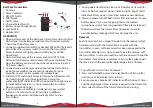
1. Open battery cover of the belt pack transmitter and install 2pcs
AA batteries into battery compartment with correct polarity.
Then close the battery cover.
2. Connect supplied lavalier MIC or headset MIC to MIC IN jack of
transmitter. Press power switch to turn on the transmitter.
Power indicator will light green and LED display will be
illuminated.
3. Open battery cover of the receiver and install 2PCS AAA
batteries into battery compartment with correct polarity. Then
close the battery cover or connect the receiver to external 5V
DC power supply.
4. Connect receiver 6.35mm audio output connector to MIC in
jack of your amplifier, mixer or active speaker. Set your
amplifier, mixer or active speaker to suitable level.
5. Slide ON/OFF switch of receiver to ON position. Receiver will
start searching transmitting signal from transmitter
automatically. RF indicator will flash once and then light green
to indicate that receiver is synchronized with transmitter.
Now you are ready to go!
6. If you want to use multisets simultaneously, press select
button on transmitter to set transmitters in different
frequencies. Receivers will automatically SYNC to their
transmitters.
7. During operation if battery icon in LED display of transmitter
starts to flash or receiver power indicator lights bright red, it
indicates battery power is low. Please replace new batteries.
8. After use please turn off both transmitter and receiver to save
battery power. If you are not going to use the wireless
microphone system for a long period of time please take out
the batteries from the transmitter and receiver to avoid
possible battery leakage which may damage the unit.
Remarks
Each transmitter has a unique ID code. Only the receiver which
has been paired with the transmitter can work with the
transmitter. In each set the receiver has been pre-paired to the
transmitter already. Users do not need to pair the receiver with
the transmitter. In case you need to use the receiver with another
transmitter ( for example, replacement transmitter), please pair
the receiver with the transmitter before operation as below.
1. Turn off both transmitter and receiver.
2. Press and hold both power and select button of transmitter
until you see LED display starts to flash.
3. Turn on receiver. Receiver RF indicator will flash about 3 times
and then light green. Now receiver is paired to the transmitter.
4. Press select button of the transmitter to finish pairing.
8
9
Содержание PDWM12UH
Страница 1: ...PDWM12UH UHF PLL 32CH Wireless Receiver...