background image


  Print an object 

1. Required knowledge:   
①Check for the presence of SD card 
②Operations to print 
2. Operation sequence: 
1) To print an object 

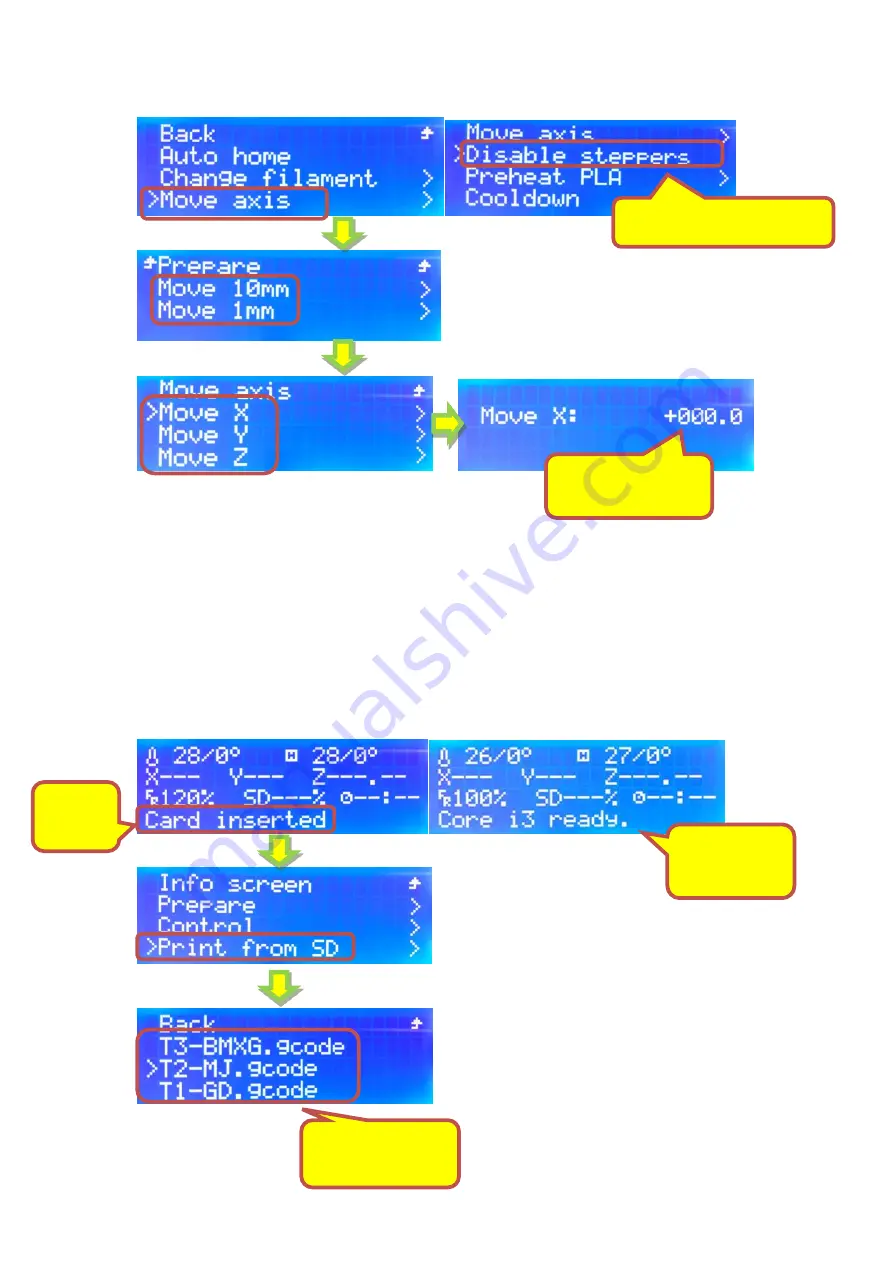
Info screen -- "Print from SD" -- "select a G-CODE file"   


Illustration 


Turn  the  knob  to 
define a location.   

Disable stepper motor.   

SD  card 
inserted 

SD  card  not 
inserted 

Click  to  select  a 
file.   

Содержание Core I3

Страница 1: ...position 3 Load unload filament 4 Adjust print parameters 1 Nozzle temperature 2 Bed temperature 3 Cooler fan speed 4 Printing speed 5 Pre heat 6 Cool down 5 Control of Motions 1 Move the nozzle platform along X Y Z 2 Lock Unlock stepper motors 6 Print an object 7 Adjust Z motion smoothness ...

Страница 2: ...ayed information and the control knob Control knob Turn it to select and click to enter Control knob Nozzle temperature actual set Bed temperature actual set Time spent hours minutes Status of printer Percentage of the finished Print speed Current X Y Z positions Click to enter the info screen Click to enter the previous menu ...

Страница 3: ...e position X 0 Nozzle is at the leftmost position Y 0 Platform is at the farthest position Z 0 Nozzle is at the lowest position 3 Reasons to send to home positions Need to do so before leveling the bed Return nozzle and bed to origin 4 Operation sequence Info screen Prepare Auto home Illustration ...

Страница 4: ...le Unload filament To retreat filament from extruder and nozzle 2 Operation sequence Info screen Prepare Change filament Load filament Unload filament Illustration Nozzle temperature set temperature load unload filament cannot start until nozzle temperature reaches the set value ...

Страница 5: ...l heating stop 2 Operation sequence 1 Nozzle temperature bed temperature cooling fan Info screen Control Temperature Nozzle Bed Fan speed 2 Print speed Info screen Control Print settings Print speed Illustration You can adjust the set temperature by turning the knob Unload load can be done now when heating is finished Click to stop the operation ...

Страница 6: ...nfo screen Prepare Preheat PLA Preheat PLA Preheat PLA Bed 4 Cool down Info screen Prepare Cool down Illustration Click on one then turn the knob to adjust the fan speed Turn the knob to adjust print speed Cool down ...

Страница 7: ...E motion indicates the extruder motor to move it the nozzle temperature must be over 175 C 3 Operation sequence 1 Move X Y Z Info screen Prepare Move axis Move 10mm Move 1mm Move X Move Y Move Z Move E 2 Disable stepper motors Info screen Prepare Disable steppers Illustration 190 is set automatically for nozzle temperature 40 C is set automatically for bed temperature ...

Страница 8: ...esence of SD card Operations to print 2 Operation sequence 1 To print an object Info screen Print from SD select a G CODE file Illustration Turn the knob to define a location Disable stepper motor SD card inserted SD card not inserted Click to select a file ...

Страница 9: ...ppearing on printed objects can be improved by doing so This function will result in 3 full nozzle circles up and down we recommend repeating the operation more than once for better result 3 Attention Those 6 screws to fix Z motion parts must be loosened before using the function please watch our instruction video for how to loosen the screws 4 Operation sequence 1 Info screen Prepare Adjust Z axi...

Отзывы: