background image

PureAire Monitoring Systems, Inc. 

1.2 Component Identification 

1.2.1  Front View Exterior 

1.

Digital Display

 — 3-digit backlit LCD digital display for showing the

oxygen levels in percent.

2.

Joystick

 — Used for selecting and adjusting the built-in menus.

3.

Cable Port

 — This is the opening in the transmitter housing for connecting

the 4-20 mA output and 24 VDC power cable.

4.

CO

2

 Sensor

— A NDIR sensor housed inside the cell protector.

5.

Transmitter Cover

 — A removable cover that protects the interior of the

transmitter.

6.

Transmitter Cover Fasteners

 — There are 4 captive screws secure the

transmitter cover in place.

7.

Electronics


Fasteners

 — These captive screws secure the electronics to the

enclosure

8.

Mounting Feet 

— There are 4 feet used to mount the oxygen monitor to a

wall or other flat surface.

9.

Alarm Indicators

 — 3 multicolored LED indicators for showing:

Alarm level 1, CO

2

     Orange LED 

Alarm level 2, CO

2

     Red LED 

Fault Alarm          

Yellow LED 

10.

Audio Horn

 — This built-in horn is a 90dB high pitched audio sound will

activate when CO

2

 levels go above the selected alarm threshold.  The audio

alarm is non-latching and will automatically turn off when the alarm

condition clears.

NOTE

:


The audio alarm is an immediate alarm. Alarm levels must recover 


to safe levels before the horn turns off.  There is no audible alarm delay 

function available.   


Содержание 99174

Страница 1: ...reAire CO2 Monitor Instruction Manual Part Number 99174 CO2 range 0 50 000ppm 1140 Ensell Road Lake Zurich Illinois 60047 Phone 847 726 6000 Fax 847 726 6051 Toll Free 888 788 8050 pureairemonitoring com ...

Страница 2: ...cts and commitment to service will satisfy your specific monitoring needs now and in the future Our growth is a result of our total commitment to supporting our customers We are available 24 hours a day 7 days a week to help you when you need us Our 24 hour Emergency phone number is 1 847 420 3814 We can provide field service preventative maintenance programs and training to your technicians in th...

Страница 3: ...onitor a Do not expose the monitor to flow rates that exceed liter per minute 500 cc per minute flow b Expose the monitor to span gas blends that consist of Oxygen Nitrogen or Carbon Dioxide only Do Not expose the monitor to any combustible gas i e Methane Hydrogen etc 5 Do not expose the CO2 monitor to silicone compounds They can cause a loss of sensitivity 6 Do not expose the monitor to high flo...

Страница 4: ...4 4 3 Routine Maintenance Schedule 15 4 4 Loss of Power Indicator 15 4 5 Alarm Reset 15 5 CO2 Monitor Programming 16 5 1 Joystick Operation 16 5 2 Program Flowchart 17 5 3 Entering the Password 21 5 4 Changing the User Password 22 5 5 Entering the Menus 25 5 5 1 Set Formats 26 5 5 2 Set Alarm Threshold Polarity 29 5 5 3 Set Latching 30 5 5 4 Resetting a Latching Alarm 32 5 5 5 Set Alarm Delay 32 5...

Страница 5: ... the CO2 Monitor does not drift or loose sensitivity when the weather or temperature changes The electronics are housed in a Nema 3 housing Each system consists of a long life NDIR sensor cell and three wire transmitter The CO2 monitor may be used as a stand alone gas detector linked to optional PureAire single and multipoint controllers or connected to your own centralized control and surveillanc...

Страница 6: ...cure the transmitter cover in place 7 Electronics Fasteners These captive screws secure the electronics to the enclosure 8 Mounting Feet There are 4 feet used to mount the oxygen monitor to a wall or other flat surface 9 Alarm Indicators 3 multicolored LED indicators for showing Alarm level 1 CO2 Orange LED Alarm level 2 CO2 Red LED Fault Alarm Yellow LED 10 Audio Horn This built in horn is a 90dB...

Страница 7: ...PureAire Monitoring Systems Inc 6 1 2 2 Front View Exterior 1 2 3 Side View Exterior with Audio Alarm 8 2 7 8 3 1 7 4 AL 2 Fault AL1 10 ...

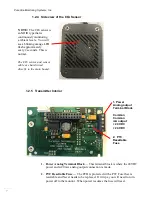
Страница 8: ...s resettable and Never needs to be replaced If it trips you will need to turn power off to the monitor When power resumes the fuse will reset NOTE The CO2 sensor is an NDIR type that is continuously monitoring ambient levels You will see a blinking orange LED flash approximately every 2 seconds This is normal The CO2 sensor and sensor cable are hard wired directly to the main board 1 Power Analog ...

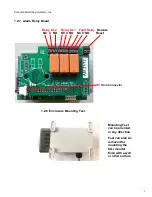
Страница 9: ...oard 1 2 8 Enclosure Mounting Feet Relay AL2 Relay AL1 Fault Relay Remote NC C NO NC C NO NC C NO Reset Horn Connector Mounting Feet can be oriented in any direction Feet can also be removed for mounting the CO2 monitor flush with a wall or other surface ...

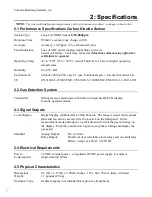
Страница 10: ...EN61010 1 3 2013 LVD 2 2 Gas Detection System Transmitter Microprocessor electronics with built in 3 digit backlit LCD display Joystick operated menus 2 3 Signal Outputs Local Display Digital display calibrated for Carbon Dioxide The range is stated on the model label and can also be accessed via the joystick on the front panel In the measurement mode pushing the joystick down will scroll the gas ...

Страница 11: ... Non latching Audio Non latching Do you want the alarm to automatically reset non latching or do you want to manually reset the alarm latching Alarm Delay Alarm 5 seconds Displayed as 05 How long do you want to wait until the alarms activate Zero Suppression 0 0 This function is Not Enabled on the CO2 monitor Set Alarm Thresholds Alarm 1 5 000ppm Alarm 2 10 000ppm At what level do you want to alar...

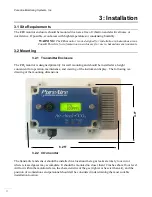
Страница 12: ...monitor is designed primarily for wall mounting and should be installed at a height convenient for operation maintenance and viewing of the instrument display The following is a drawing of the mounting dimensions 3 2 2 CO2 monitor The transmitter and sensor should be installed in a location where gas leaks are likely to occur or where released gases may accumulate It should be mounted no closer th...

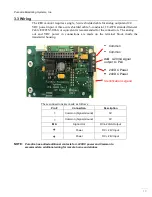
Страница 13: ...d VDC power in connections are made on the terminal block inside the transmitter housing These connections are made as follows Pin Connection Description Common Signal Ground 0V Common Signal Ground 0V MA Signal Out DC 4 20mA Output Power DC 24V Input Power DC 24V Input NOTE PureAire has added additional contacts for 24VDC power and Common to accommodate additional wiring for remote horns and stro...

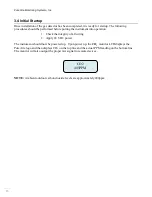
Страница 14: ...ment into operation 1 Check the integrity of all wiring 2 Apply 24 VDC power The instrument should now be powered up Upon power up the CO2 monitor LCD displays the PureAire logo and then displays CO2 on the top line and the actual PPM reading on the bottom line The monitor will also output the proper mA signal to remote devices NOTE Ambient outdoor carbon dioxide levels are approximately 400ppm CO...

Страница 15: ...Analog output drops to 0 mA CO2 Cell complete failure Fault code 128 Analog output drops to 2 mA EEPROM Fault 08 Analog output drops to 2mA Fault Relay activates CO2 sensor not responding Fault code F01 Analog output drops to 2mA Fault Relay activates 4 3 Routine Maintenance Schedule Continuous gas detection systems depended upon to measure and detect hazardous gas leaks in the workplace requires ...

Страница 16: ...0mA The LCD display will also display a blank screen 4 5 Alarm Reset It the CO2 monitor is supplied with individual alarm relays Whenever the monitor s alarms are activated the built in alarm relays panel mounted LED s and audio horn will also activate When the relay settings are non latching the alarm relays LEDs and horn will automatically reset If the relay settings are latching then a manual r...

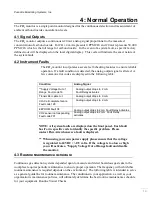
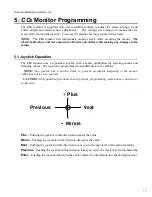
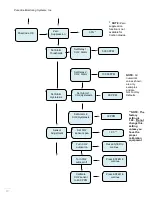
Страница 17: ... a center pushbutton for selecting menus and changing values The joystick is programmed to standard protocol as follows NOTE The joystick has a built in delay to prevent accidental tampering of the menus deliberate entries are required CAUTION Only qualified personnel should perform programming maintenance and sensor verification Plus Minus Previous Next Plus Pushing the joystick in this direction...

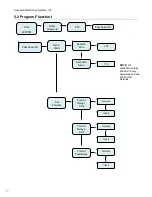
Страница 18: ... 400PPM Enter Password 557 Invert Invert Format Fault Relay Normal Invert NOTE All numerical values shown are only examples and are not Factory Defaults PassCode OK Set 4 20mA Set 4mA Zero 157 Set 20mA Span 115 Set Formats Format Relay 2 CO2 Format Relay 1 CO2 Normal Normal ...

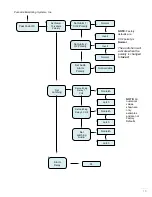
Страница 19: ...2 Polarity Normal Set Alarm 2 O2 Polarity Invert Normal Alarm Delay Set Audio Alarm Polarity PassCode OK Set Latching Set Latching Relay 1 CO2 Nonlatch Latch Latch NOTE All numerical values shown are only examples and are not Factory Defaults Latch NOTE Factory defaults are CO2 polarity is Normal The audio horn will activate when the polarity is changed to Invert ...

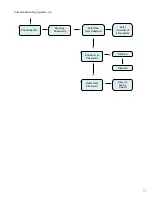
Страница 20: ...ssCode OK NOTE Zero suppression function is not available for Carbon dioxide Set Alarm 1 CO2 Hysteresis NOTE The factory setting is 1 00 Do not change this setting unless you have the proper calibration equipment 00 PPM Set Alarm 2 CO2 Hysteresis 00 PPM Set Alarm Hysteresis NOTE All numerical values shown are only examples and are Not Factory Defaults Turn CO2 autocal on Press ENTER to continue Tu...

Страница 21: ...PureAire Monitoring Systems Inc 20 PassCode OK Manage Passwords Enter New User Password Enter minimum of 2 characters Enable User Password Enabled Disabled Reset User Password Reset to Factory Default ...

Страница 22: ...is an alphanumeric display and toggles from A through Z followed by 0 to 9 The character to be entered will flash 4 Push the joystick again to the right to select the second entry Push the joystick up or down to select the second digit The character being entered will flash and the first character entered will remain lit 5 Push the joystick again to the right to select the third entry Push the joy...

Страница 23: ...oll on the first line of the digital display 3 Push the joystick to the right to enter the input screen The letter A will appear and flash NOTE The display has characters that start with A through Z and 0 through 9 Pushing the joystick up or down will permit you to scroll through the alphanumeric characters 4 Push the joystick up or down to enter the first digit The display is an alphanumeric disp...

Страница 24: ...s an alphanumeric display and toggles from A through Z followed by 0 to 9 The character to be entered will flash 10 Push the joystick again to the right to select the second entry Push the joystick up or down to select the second digit The character being entered will flash and the first character entered will remain lit 11 Push the joystick again to the right to select the third entry Push the jo...

Страница 25: ...ay the status If enabled it will display Enabled Push the joystick up or down to change the status Once enabled or disabled is selected Push the joystick in like a doorbell to enter the new status If correctly entered the Display will scroll Enable User Password 5 4 2 Reset User Password This menu permits you to reset the password back to 557 as set at the factory Push the joystick right to displa...

Страница 26: ...or more information From this main menu pushing the joystick to the right will select the sub menu and the digital display will scroll the following This is the menu at which to adjust the 4mA output being sent from the CO2 Monitor To change this value push the joystick right to display the 4 mA setting The display will indicate a value between 0 and 255 counts Pushing the joystick up increases th...

Страница 27: ...to adjust the relay states for the gas alarm relays and the individual instrument fault relay Push the joystick down to access the next main menu Set Formats The display will scroll the following This menu will permit the setting of the two alarm relays and the fault relay settings from normally de energized state Normal to normally energized state Inverted From this main menu pushing the joystick...

Страница 28: ...g To change this value push the joystick right to display the relay state The display will Indicate NORMAL This is the factory default state for the alarm relay Pushing the joystick down will change the relay state from NORMAL to INVERT NOTE When the CO2 relay state is changed to INVERT the Red alarm LED will illuminate After entering the relay state push the joystick left to enter the setting The...

Страница 29: ...the fault relay Pushing the joystick down will change the relay state from NORMAL to INVERT NOTE When the Fault relay state is changed to INVERT the Yellow alarm LED will illuminate After entering the relay state push the joystick left to enter the setting The display will scroll the following Push the joystick left again to get back to the next menu The display will scroll the following Format Fa...

Страница 30: ...s will scroll on the digital display Push the joystick right to access the first sub menu Set Alarm 1 CO2 Polarity will scroll on the display This is the menu at which to adjust the CO2 alarm polarity state on the CO2 Monitor To change this value push the joystick right to display the relay state The display will Indicate NORMAL Pushing the joystick down will change the relay state from NORMAL to ...

Страница 31: ...2 monitor 5 5 3 Set Latching This is the menu at which to adjust the relay alarm state for the CO2 alarm relays and the individual instrument fault relay The selection permits setting the relays to a latching or non latching state In a latching state the relay will remain activated until the user manually selects the Enter Key In a non latching state the alarm relay will automatically reset once t...

Страница 32: ...following Push the joystick down to access the next sub menu Set Latching Relay 2 CO2 will scroll on the display This is the menu at which to adjust the second CO2 alarm relay state on the CO2 Monitor To change this value push the joystick right to display the relay state The display will Indicate NONLATCH Pushing the joystick down will change the relay state from NONLATCH to LATCHING After enteri...

Страница 33: ...a Latching Alarm To reset a latching alarm relay you must enter the password correctly and then push the joystick down to enter the reset command The CO2 monitor also has an internal 2 pin terminal block for connecting a remote reset switch See Alarm Relay board section 1 2 7 5 5 5 Set Alarm Delay Push the joystick down to access the next main menu Alarm Delay The display will scroll the following...

Страница 34: ...rms 1 and 2 There is no delay for the fault relay Any system fault will immediately activate the Fault Relay 5 5 6 Set Zero Suppression This function not used on the CO2 monitor It is only used to decrease the sensitivity of selected toxic and corrosive gas sensors It is totally disabled in the Dual monitor 5 5 7 Set Alarm Thresholds This main menu will permit adjusting the Carbon Dioxide ppm leve...

Страница 35: ... Alarm Threshold will scroll on the digital display This is the gas concentration at which the second CO2 level must be displaying to activate the alarm To change the displayed value push the joystick to the right to display the CO2 level alarm setting The display will indicate a value between 0 and 50 000 ppm Pushing the joystick up increases the value and pushing the joystick down decreases the ...

Страница 36: ...ose at 5 000ppm level and to reopen again at 5 050 ppm you will set the Alarm Threshold at 5000ppm and set the hysteresis value at 50ppm Average Alarm set point 5 000 set the Hysteresis to 50ppm Valve Off 5 050ppm To access this menu push the joystick down to display the Set Alarm Hysteresis menu This will scroll on the digital display Push the joystick right to access the Set Alarm 1 CO2 Hysteres...

Страница 37: ... hysteresis value is selected 5 5 9 Auto Calibrate feature for CO2 NDIR sensor The CO2 sensor is set to automatically calibrate itself to the ambient carbon dioxide level on earth The ambient CO2 level is 400 PPM The CO2 monitor has a menu that permits you to activate this feature by turning on this feature If the CO2 monitor is not exposed to constant high levels of CO2 the sensor will automatica...

Страница 38: ...ck to 400PPM which is the ambient level on earth NOTE DO NOT use the auto calibration feature if you are monitoring continuous levels of CO2 for control of grow rooms The monitor needs to be in ambient levels for the autocal feature to operate properly You can also disable or turn off the auto calibration feature If the CO2 monitor is exposed to constant high levels of CO2 the user MUST inhibit tu...

Страница 39: ...l to activate the autocal feature The CO2 alarm horn will activate momentarily The auto calibration feature has now been disabled You can now manually calibrate the CO2 sensor to ambient 400 PPM one demand Refer to section 6 3 Sensor calibration CO2 5 5 10 Main Operation Mode To select the main menu from any sub menu push the joystick left until the Main Menu appears The digital display will indic...

Страница 40: ...r spaces that are unoccupied during the evening If the monitor is constantly exposed to elevated levels of CO2 for example in an agricultural growing room the auto calibration feature should be inhibited turned off and a manual calibration preformed approximately every six months See Section 5 5 11 to turn off the autocal feature CAUTION DO NOT ADJUST the CO2 sensor unless you are certain that the...

Страница 41: ...CO2 monitor to an exact 400ppm value DO NOT ADJUST the CO2 sensor unless you are certain that the CO2 level has returned to normal ambient conditions such as in an outdoor environment or spaces that are unoccupied Be careful to not breath near the sensor because a person can exhale very high concentrations 30 000PPM of CO2 To perform a manual adjustment of the CO2 sensor to an exact 400PPM use the...

Страница 42: ...stems Inc 41 Push the joystick in like a doorbell to set the reading to 400PPM You have now reset the CO2 sensor to 400PPM To exit the calibration menu push the joystick left four times to display the monitoring mode CO2 400 ...

Страница 43: ...ix How to connect a Horn and Strobe to the CO2 monitor This drawing shows how to connect a remote Horn and strobe to PureAire s CO2 monitor with the Alarm relay 1 set to a Normally Open position Note Federal Signal Horn Strobe or equivalent 24VDC ...

Страница 44: ...24 VAC or 24 VDC if possible Externally powered COM N O To external voltage source 24 VAC or 24 VAC 2 amps max Relay 1 or Relay 2 Terminal Strip External relay coil Relay coil voltage rating must match external voltage source External relay using internal 24 VDC power supply COM N O Relay 1 or Relay 2 Terminal Strip 24 VDC 24 VDC External 24 VDC relay coil Install 1N4004 or similar diode across co...

Страница 45: ...PureAire Monitoring Systems Inc 44 How to convert 4 20mA current output to a 1 5 VDC voltage output PureAire CO2 Monitor 4 20mA output User PLC input Attach 250 ohm resistor to the PLC or device input ...

Отзывы: