background image

3

  Setting  up

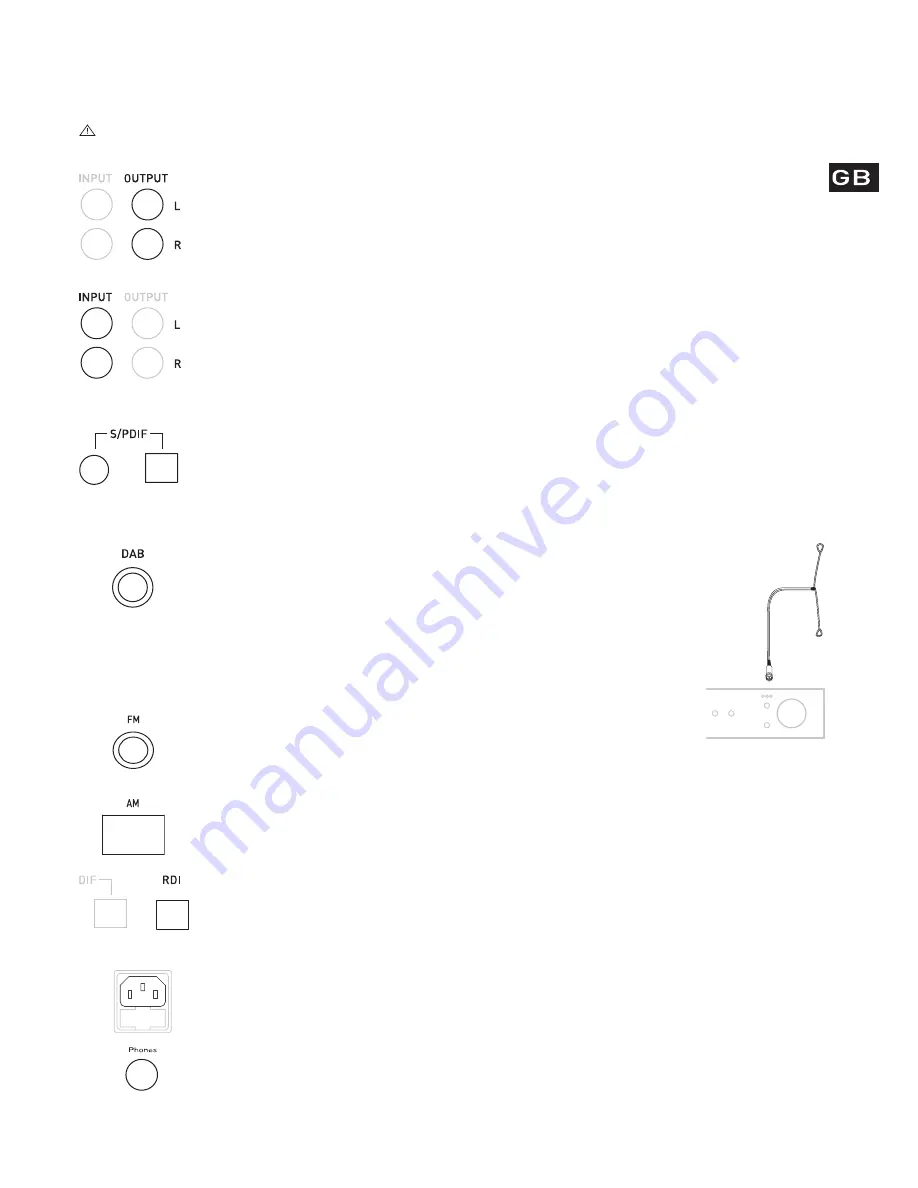
This section provides information on connecting your DRX-702ES to your hi-fi and connecting your aerial. 

   Before connecting other devices to your DRX-702ES, switch both devices off. This helps prevent electrical charge damage.

You may also want to peel off the  protective film from the LCD display panel at this stage. 

       Connecting  to  your  amplifier

To get sound from your DRX-702ES you need to connect it to an amplifier. This may be a stand alone unit or it may be 
built into your existing hi-fi system or powered speakers. Connect the (

L

)eft and (

R

) ight 

OUTPUT

 sockets to the Tuner-in 

sockets on the back of your amplifier using the supplied stereo phono ca ble.

Note

 You can also use 

S/PDIF

 or 

BALANCED OUTPUT 

if your amplifier has the appropriate connectors, see below.

Connecting to an auxiliary source

If you have a  CD player, or other auxiliary device, you can connect it through your DRX-702ES to reduce the number 
of connections to your amplifier. The auxiliary device output will then be passed through the analogue outputs to your 
amplifier when your DRX-702ES is switched to standby or off.

Connect the (

L

)eft and (

R

) ight 

INPUT

 sockets to the output sockets on the back of your auxiliary device using a stereo 

phono  cab l e.

Connecting to digital devices

Your DRX-702ES can provide digital audio output (DAB only) for connection to the digital input on your amplifier or 
digital devices suc h as MiniDi scs, CD-R s or DAT recorders.

Connect the coaxial 

S/PDIF

 or the opt ical 

S/PDIF

 socket to the digital-in socket on your digital device using a suitable 

cable. Connecting cables are available from PURE Digital, see 

Accessories

,


page 1 1.

Connecting to an external DAB dec oder

The 

RDI

 (Receiver Data Interface) optical connector provides access to raw DAB multiplex data. This may be used in the 

future to connect to an external decoder or computer for access to extra services. These services may not currently be 
available in your a rea.

Connecting the aerials

You need to connect either the supplied aerials or alternatives to receive radio transmissions.

Connecting the  DAB aerial

1.    Screw the aerial plug onto  the F- type 

DAB 

connector.

2.    For the best reception, if using the indoor aerial supplied, attach the aerial horizontally to a wall using 

some adhesive tape and extend the arms on the end of the aerial wire vertically into a ‘T’ 
shape on its side, as illustrat e d.

Connecting the  FM aerial

1.    Push the aerial plug onto the 

FM

 connector

2.    For the best reception, if using the indoor aerial supplied, attach the aerial vertically to a wall using some adhesive 

tape.

Connecting the  AM loop aerial

1.    Hold down the 

AM

 spring connectors and insert the bare ends of the wire into the clips.

2.    Clip the loop antenna into the base and stand the aerial on or behind your unit

Connecting to the power supply

Once all audio connections are complete, as described above, connect the power cable to  the power socket on the rear 
panel of your DRX-702ES and the other end to a wall power outlet.

 Connecting to headphones

 The   

Phones

 socket on the front panel of your DRX-702ES enables you to plug in and use a pair of headphones instead 

of using an external amplifier.

Содержание DRX-702ES

Страница 1: ...Owner s manual Mode d emploi Benutzerhandbuch Manual del propietario Bruksanvisning Betjeningsvejledning ...

Страница 2: ...ber einen längeren Zeitraum nicht benutzen trennen Sie das Instrucciones de seguridad Mantenga el equipo alejado de toda fuente de calor Evite que el equipo reciba salpicaduras o vertidos de líquidos No coloque sobre el equipo objetos que contengan líquidos como jarrones por ejemplo Desenchufe el cable de alimentación si no va a usar el equipo durante largos períodos de tiempo Säkerhetsföreskrifte...

Страница 3: ...4 Connecting using the Balanced Outputs 4 Using your DRX 702ES 5 Switching on and off 5 Changing the display brightness 5 Resetting your DRX 702ES 5 Replacing the fuse 5 Using DAB mode 5 Autotuning 5 Retuning your unit 6 Selecting a station 6 Advanced DAB setup options 6 Changing the display mode 7 Using FM or AM mode 8 Autotuning in FM mode 8 Retuning your unit in FM mode 8 Selecting a station 8 ...

Страница 4: ... with auto pass through to output at power off optical RDI data output connector headphone socket and USB port Quick start This section provides information on how to set up and start using your DRX 702ES in DAB mode For further details on using your radio see Using your DRX 702ES page 5 1 Connect your aerials amplifier and power lead 2 Plug in to your power supply and switch on at the wall 3 Push...

Страница 5: ...tical S PDIF socket to the digital in socket on your digital device using a suitable cable Connecting cables are available from PURE Digital see Accessories page 11 Connecting to an external DAB decoder The RDI Receiver Data Interface optical connector provides access to raw DAB multiplex data This may be used in the future to connect to an external decoder or computer for access to extra services...

Страница 6: ... optional fit balanced outputs enable you to use high quality low interference XLR connections between your DRX 702ES and your amplifier Ideally when connecting to these outputs you should ensure that your DRX 702ES is switched on but that your amplifier is not switched on If you want to use balanced outputs your unit does not already have them fitted contact your dealer or PURE Digital for inform...

Страница 7: ...ons will be stored in alphanumeric order and you will be asked if you want to additionally perform an FM Autotune see page 8 for details If you do not want to perform an FM Autotune leave the unit for a few seconds and it will return to DAB mode The first DAB station on the list will be selected and you will hear it through your speakers To listen to other stations see Selecting a station on page ...

Страница 8: ...ed order on the top row of the display and a scroll list on the bottom Turn the tuning knob to scroll through and push to select the following options Alphanumeric Displays all stations in alphanumeric order This is the default setting Fav station Displays the ten most listened to stations at the top of the station list in alphanumeric order and the rest below in alphanumeric order Your favourite ...

Страница 9: ...your menu options and programme type information only broadcast text remains in the language in which it is broadcast When you select this option you see the current language on the top line of the display and a scroll list on the bottom Turn the tuning knob to scroll through the languages and push the tuning knob to select one Sw version This option enables you to view the version number of the s...

Страница 10: ...as described on page 9 or whilst listening to a station by pushing the tuning knob to toggle between available modes Manual tune 1 Rotate the tuning knob to scroll through the available frequencies FM scrolls in 50 kHz steps AM in 9 kHz steps 2 Stop when you reach the desired frequency You now hear the station and if the station has an RDS name FM only or manually entered name it will be shown on ...

Страница 11: ...t from a list of named stations RDS or manually named stations This option is only available in FM mode after performing an FM autotune see page 8 Station order This option enables you to choose the order in which stations appear as you scroll through the FM station list This option is only available in FM mode after performing an FM autotune see page 8 When you select this option you see the curr...

Страница 12: ... advanced setup menu on your DRX 702ES This button performs the same function as the Setup button on the main unit Press the Setup button to enter the menu then use the Up Down button to scroll through the menu options and push the Select button to select that option The Up Down and Select buttons enable you to scroll through and select stations and menu options Together these buttons perform the ...

Страница 13: ...ween on and standby Rotary selection switch enables scrolling through and selection of stations and menu options Autotune automatically tunes in unit to broadcast services DAB or FM modes Brightness selects between 8 levels of LCD display brightness Display changes the display mode Setup enables access to advanced setup options Band toggles unit between DAB FM and AM modes LCD Display High visibil...

Страница 14: ...s 2 M Main unit 2 Manual tune 8 9 Menu options 10 Missing items 2 Mode 7 Mono mode 7 Multiplex 6 Multiplexes 7 Multiplex name 7 Mute 10 Mute button 10 N New stations 10 Now tuning 6 No stations available 6 8 O OUTPUT connectors 3 4 P PAC II 11 Phones socket 3 Phono cable 2 Power button 10 Power cable 2 Power LED 5 Power socket 3 Presets 6 10 Preset buttons 10 Preset empty 10 Program type 7 9 Prote...

Страница 15: ......

Страница 16: ...gination Technologies Ltd Home Park Estate Kings Langley Herts WD4 8LZ UK 44 0 1923 270188 fax sales pure digital com 44 0 1923 277488 sales support pure digital com 44 0 1923 277477 support www pure digital com 11Z26 ...

Отзывы: