280G-B / 280G-F Assembly, Operation &
(Reference)
Parts Manual
EU
/
US
Страница 1: ...280G B 280G F Assembly Operation Reference Parts Manual EU US...
Страница 2: ...ice Tel 44 0 1260 294600 Email global service pulsefitness com Corporate Website www pulsefitness com Regional Distributor Dealer Address es Current List of Distributors Dealers https www thepulsegrou...
Страница 3: ...gaining professional medical advice before using fitness equipment particularly if the user has a family history of high blood pressure or heart disease is over the age of 45 smokes has high choleste...
Страница 4: ...a commercial environment This equipment generates uses and can radiate radio frequency energy and if not installed and used in accordance with the instruction manual may cause harmful interference to...
Страница 5: ...Endcaps 25 3 16 Fitting Storage Buckets 26 Installing the Console on 280G B 280G F 27 4 1 Securing the Console 27 4 2 Assembling the Console 27 4 3 Wiring the Console 28 4 4 Assembling the Console 29...
Страница 6: ...ntenance Schedule 49 11 5 How to Obtain Product Service 50 11 6 Recycling the Battery 50 Specifications 51 12 1 Specifications 51 12 2 Pedal Options 52 12 3 Physical Dimensions L x H x W 52 12 4 Weigh...
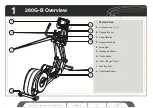
Страница 7: ...e Series 1 2 or 3 Storage Bucket Fixed Handles Transport Wheels Book Rest Handpulse Sensor Drinks Bottle iPod iPhone Dock Levelling Foot Articulated Pedals A B C D E F G H I J 280G B Overview 1 Assemb...
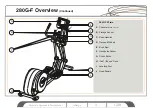
Страница 8: ...Series 1 2 or 3 Storage Bucket Fixed Handles Transport Wheels Book Rest Handpulse Sensor Drinks Bottle iPod iPhone Dock Levelling Foot Fixed Pedals A B C D E F G H I J 280G F Overview Continued Assem...
Страница 9: ...Collar Drinks Bottle iPhone Pod Dock Valance Moulding Book Holder Console Series 1 2 or 3 Column Rotating Endcaps Pivot Covers Front Joint Mouldings Console Bolts Column Bolts Top Console Column Neck...
Страница 10: ...ollar Drinks Bottle i Valance Moulding Phone Pod Dock Book Holder Console Series 1 2 or 3 Column Rotating Endcaps Pivot Covers Front Joint Mouldings Console Bolts Column Bolts Top Console Column Neck...
Страница 11: ...and lean it against its Mounting Bracket and secure the bolts into position by hand Once in position use an Allen Key to tighten up the bolts ensuring that the Column is aligned vertically and not tw...
Страница 12: ...n it against its Mounting Bracket and secure the bolts into position by hand Once in position use an Allen Key to tighten up the bolts ensuring that the Column is aligned vertically and not twisted Se...
Страница 13: ...ect ports to the PCB attached to the front joint See Figure B NOTE Make sure that the cables do not get trapped during this process and are not tight Figure B Connecting the Cables Assembly of the 280...
Страница 14: ...not to damage any cables or PCB in the process See Figure C NOTE Make sure that both the cable loom or PCB do not get damaged or trapped during this process Tools Required Phillips Screwdriver Figure...
Страница 15: ...not to damage any cables or PCB in the process See Figure C NOTE Make sure that both the cable loom or PCB do not get damaged or trapped during this process Tools Required Phillips Screwdriver Figure...
Страница 16: ...e shaft the arms are handed See Figure D NOTE Make sure that the cables from the handpulse do not get trapped during this process Figure D Attaching the Moving Handlebars Assembly of the Continued 280...
Страница 17: ...ot shaft See Figure E Check that the arms move freely without any excessive play NOTE Do not tighten until after you have attached the pivot endcaps Tools Required 10mm Allen Key M12 Cap Head Figure E...
Страница 18: ...ure the pivot shaft into position with the grub screws See Figure F Tools Required 5mm Allen Key M12 Cap Head Figure F Secure Pivot Shaft Assembly of the Continued 280G B 280G F Assembly Operation Par...
Страница 19: ...er washers either side of the bearing See Figure G 3 8 Insert Bottom Pivot Shaft Insert bottom pivot shaft from an inward direction See Figure H Figure G Attaching the Moving Handlebars to the Foot Ba...
Страница 20: ...I Tools Required 6mm Allen Key M12 Cap Head 3 10 Attaching the Pivot Mouldings Attach the pivot mouldings to each other on each link arm with 4 screws See Figure J Tools Required Phillips Screwdriver...
Страница 21: ...he moulding into position Then use a Phillips screwdriver to fasten 2x screws into the back of the moulding through the fixed bracket See Figure K NOTE Be careful not to scratch the moulding against t...
Страница 22: ...th bolts See Figure L NOTE Ensure that a rubber neck gasket has been fitted onto the neck before fastening to the bracket Tools Required 13 mm Combination Spanner M8 Hexagon Bolt x4 Attaching the Neck...
Страница 23: ...top moulding and fastening together with 3x screws See Figure M NOTE Make sure that the Dashboard and Valance mouldings are lined up before tightening the screws Tools Required Phillips Screwdriver Fi...
Страница 24: ...and Valance Then secure into position with 2x screws See Figure N NOTE Make sure that all the mouldings line up and do not overlap before tightening the screws Tools Required Phillips Screwdriver Figu...
Страница 25: ...handlebar bosses and securing with 3x screws See Figure O NOTE Make sure that a fixed handlebar gasket has been fitted before attaching Endcaps Tools Required Phillips Screwdriver Figure O Attaching R...
Страница 26: ...ge Buckets Insert the Storage Buckets into the Dashboard hoops and press down firmly See Figure P Figure P Fitting Storage Buckets Assembly of the Continued 280G B 280G F Assembly Operation Parts Manu...
Страница 27: ...ools Required 4mm Allen Key 4 2 Assembling the Console Place the top half of the Console onto the bottom half and carefully connect all the wires into the corresponding connectors from the front of th...
Страница 28: ...able Green Red Black Cable Green Black Pink Red 4 3 Wiring the Console Carefully pull the Electrical Connectors up from the Column Ensure that all the Electrical Connectors attach to the Circuit Board...
Страница 29: ...Holder For Series 1 and 2 carefully line up and firmly push the Book Holder into the consoles allocated slots until it is solidly fixed into position See Figure U NOTE This may take some force Be car...
Страница 30: ...1379 Series 1 Console 3 5 CV 135 1299 Series 2 Console 5 0 CV 135 1300 Series 3 Console 6 0 CV Cirrus V1 135 1824 Series 3 Console 6 0 CV Cirrus V2 NB Image for illustration only Assembly Operation Pa...
Страница 31: ...ignment As a final check make sure that the Console Handlebars and Storage are correctly aligned and are not twisted Refer to document 135 767 for further alignment instructions Console Handlebars Sto...
Страница 32: ...at the Console Handlebars and Storage are correctly aligned and are not twisted Refer to document 135 767 for further alignment instructions Console Handlebars Storage Alignment Checks on the 280G F C...
Страница 33: ...Elliptical Cross Trainer is now ready to use please read the Technical and Console booklets to become familiar with all operational and safety features before use Caution MAKE SURE ALL HARDWARE IS TI...
Страница 34: ...y to use please read the Technical and Console booklets to become familiar with all operational and safety features before use Caution MAKE SURE ALL HARDWARE IS TIGHT Assembly Operation Parts Manual G...
Страница 35: ...product safely To get onto the 280G Fi you need to ensure that the pedals are locked into the lowest position before stepping onto the pedal Note The IFI lock attachment See Figure W is only availabl...
Страница 36: ...nlocked padlock symbol See Figure Y Once in position release the yellow locking handle Note Ensure that the yellow locking handle is firmly in position before operating the Elliptical Cross Trainer Fi...
Страница 37: ...locked padlock symbol See Figure A A Once in position release the yellow locking handle Note Ensure that the yellow locking handle is firmly in position before getting off the Elliptical Cross Traine...
Страница 38: ...c shock or injury it is imperative to connect each product to a properly grounded electrical outlet WARNING Heart rate monitoring systems may be inaccurate Over exercising may result in serious injury...
Страница 39: ...uced physical sensory or mental capabilities or lack of experience or knowledge unless they have supervision or been given instruction concerning the use of the appliance by a person responsible for t...
Страница 40: ...ach product prior to starting a workout If warnings are missing or damaged please contact PULSE FITNESS immediately for replacement warning labels Warning labels are shipped with every product and sho...
Страница 41: ...y the plug provided with this product If the plug does not fit into an available electrical outlet have a proper outlet installed by a qualified electrician 8 4 Battery Powered Series 1 2 Only Series...
Страница 42: ...t Allow 0 3m 1ft of clearance in front of the PULSE FITNESS X Train Elliptical Cross Trainer to allow for movement of the footbars Allow at least 0 6m 2ft on the side of the Elliptical Cross Trainer I...
Страница 43: ...ole should begin its boot up cycle The Series 3 Consoles will show a message indicating it is initialising which takes approximately 2 minutes Note If any of the Consoles do not light up contact PULSE...
Страница 44: ...the equipment grounding conductor can result in a risk of electric shock Check with a qualified electrician or serviceman if you are in doubt as to whether the product is properly grounded DO NOT mod...
Страница 45: ...difficult to view the screen Note The Elliptical Cross Trainer is not suitable for outdoor use If the chosen surface is carpet then the Elliptical Cross Trainer can be pushed to the desired position o...
Страница 46: ...he front stabilising feet to determine which foot does not rest fully on the floor If necessary adjust the height of the feet to compensate Turn the feet to the left or right to increase or decrease t...
Страница 47: ...ure AD The Console should begin its boot up cycle The Series 3 Consoles will show a message indicating it is initialising which takes approximately 2 minutes This indicates that the Elliptical Cross T...
Страница 48: ...on the Console 11 2 Cleaning the Equipment PULSE FITNESS Approved Cleaners United States Availability Only Two preferred cleaners have been approved by PULSE FITNESS reliability experts PureGreen 24 o...
Страница 49: ...s DO NOT use paper towels DO NOT apply cleaners directly to the equipment surfaces DO use water based solutions on the following Clean the upholstery and handgrips with a mild soap and water solution...
Страница 50: ...unit which is located on the front of the unit near the foot rail 3 Contact Pulse Fitness Global Services Team refer to page 02 11 6 Recycling the Battery When this PULSE FITNESS product is about to b...
Страница 51: ...ip pedals Series 1 2 3 Patented articulating pedal with variable stride length cm 48 3cm 55 9cm 19 22 Lock able pedal positions Optional Twin removable storage buckets cup holders Series 1 2 3 Integra...
Страница 52: ...64 9 16 Width cm Series 1 2 3 75cm 29 1 2 Step Up Height Fixed Pedal 15cm 5 15 16 Articulated Pedal 27 2cm 10 11 16 12 4 Weight kg lbs Machine Weight kg lbs Series 1 161 5kg 356lbs Series 2 162kg 357...
Страница 53: ...ervals easy moderate advanced Random easy moderate advanced X Train mode arms legs total body Variable cool down with manual override Series 2 Quick Start Optional E Scape virtual workouts road lake v...
Страница 54: ...ble management programmable units imperial metric User selectable management programmable language Series 3 Profile display with level indicator Track display with level indicator pacer mode only Time...
Страница 55: ...ists Exploded Diagrams Details on both Parts Lists Exploded Diagrams for Series 2 3 280G X Train Elliptical Cross Trainer please refer to documents 135 1097 02 Exploded Dia 135 1098 03 Exploded Dia Sh...
Страница 56: ...User Notes 14 Assembly Operation Parts Manual G Range CV Pg56...
Страница 57: ...Assembly Operation Parts Manual G Range CV Pg57 User Notes Continued...
Страница 58: ...mail global service pulsefitness com 2018 Pulse Fitness Ltd All rights reserved Pulse Fitness is a registered trademark Any use of these trademarks without the express written consent of Pulse Fitness...