background image

5.Connection Instructions

- 7 -

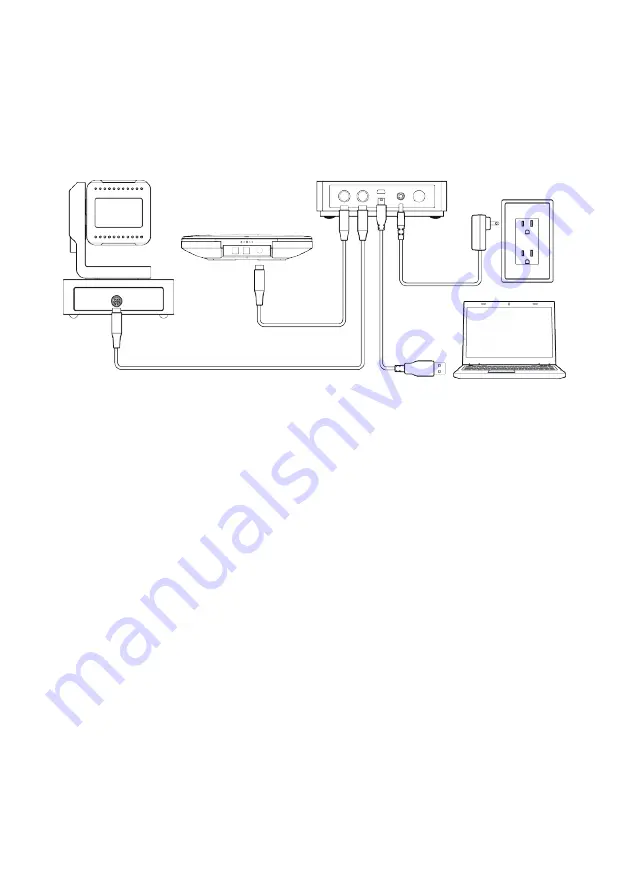
PUS-U51VC can be connected to the PC through the USB interface of 

the hub, hardware video equipment and the system, providing up to 

48KHz digital voice bandwidth and ultra-clear video experience. 

Steps:

1.Connect the camera to the hub with the original DIN6 cable;

2.Connect the omnidirectional microphone to the hub with the original 

DIN6 cable;

3.Connect the power supply equipment with the original power adapter;

4.Connect one end of USB cable to the USB port of the PC or video 

conferencing system, and connect the other end to the USB socket of the 

cable;

5.Turn on the power switch after confirming that the connection is correct.

In addition, it takes a few  seconds for the computer or other devices to 

identify and load drivers automatically,The computer prompts that the 

installation is successful (the driver needs to be installed for the first 

time);when the blue light of the omnidirectional microphone is on,and 

finished the self-test of the camera,it means to enter the communication 

state; after confirming all connections arecorrect, open the third-party 

conference software on the computer side, and select the corresponding 

camera (UVC Camera or HD Camera),omnidirectional microphone (PUAS) 

and speaker driver (PUAS),you can start audio and video conferences with 

this device.

Notice:Common  settings for PC and video equipment in USB call mode.

1.Please adjust the volume of the speaker and microphone comprehensively 

to ensure that the call is clear and smooth;

2.Please do not turn on the speaker and microphone auto gain;

3.Please give priority to turning off the computer software/the Audio 

USB cable

DIN6 cable

DIN6 cable

power 

adapter

① 

① 

② 

② 

③ 

③ 

④ 

④ 

Содержание U51VC

Страница 1: ......

Страница 2: ...U51VC Video Conference System Kit User Manuel...

Страница 3: ...eaker 4 3 Hub Relay 5 4 Button Instruction 5 1 Remote Control 5 2 Full duplux Microphone Speaker 6 5 Connection Instructions 7 6 Bluetooth Pairing 8 7 LED Status Display 8 8 Preset Setting 8 9 Expansi...

Страница 4: ...storage and installation It is transported by integrated packing style Power Polarity The camera adopt DC 12V power supply Installation with care Do not rotate the camera head forcibly otherwise it m...

Страница 5: ...ist PTZ Camera 1 Full duplux Microphone Speaker 1 Hub Relay 1 Remote Control 1 5meters DB8Pin Cable 2 3meter USB Cable 1 Power Adapter 1 User Manuel 1 3 C 1 2 PUS U51VC Video Conference System Kit Use...

Страница 6: ...4 Bracket mounting hole 1 Optional Expansion Mic Interface 1 2 Optional Expansion Mic Interface 2 3 DIN6 Cable Interface 4 Working Status Indicator 5 Bluetooth Power Indicator 6 Volume indicator 7 Fu...

Страница 7: ...Mute 6 Bluetooth Key Turn on off Mic Bluetooth 7 Menu Key Enter Exist Menu 8 Camera PTZ Control Key Press HOME button the camera returnto the middle position 9 Preset Setting Key Press Preset Number 1...

Страница 8: ...raise or reduce Bluetooth Key Open Close Bluetooth Speaker Mute Key Short press to turn on off the speaker mute Pick up Hang up Key Pick up Hang up the call Mic Mute Key Turn on off Mic Mute ECHOcanc...

Страница 9: ...ntify and load drivers automatically The computer prompts that the installation is successful the driver needs to be installed for the first time when the blue light of the omnidirectional microphone...

Страница 10: ...ed on again 8 7 LED Status Display Working status light Blue LED USB Connect Lync Connect Red LED Mic Mute Volume indicator Green light The higher the volume the more lights Red light Speaker Mute Blu...

Страница 11: ...C dedicated cable to the socket of the extension microphone Connect the other end to the omnidirectional EXT2 3 There is a mute switch and status indicator on the extended microphone The indicator lig...

Страница 12: ...D Noise Reduction Power supply DC12V Power Consumption 12W Decoder Built in Baud rate 2400 4800 9600 19200 38400 PTZ Control Protocol VISCA PELCO D PELCO P Address setting 1 255 Horizontal Rotation Ra...

Страница 13: ...pport infraredTransmit transparently Optional Expansion Mic Supporttoconnect2ExpansionMic MicrophoneCovergeradiusupto10meters Dimensions LxWxH 180mm 180mm 42mm Parameter Model Hub Relay Interface 2 DI...

Страница 14: ...long to the scope of free warranty When the product needs to be returned to the manufacturer for repair the user can return to the manufacturer through the supplier also can return to the manufacturer...

Отзывы: