PSG Wilden PS Stallion Series Скачать руководство пользователя страница 23

WIL-10830-E-03

 21 

WILDEN PUMP & ENGINEERING, LLC

ASSEMBLY:

Upon performing applicable maintenance to the air 
distribution system, the pump can now be reassembled. 
Please refer to the disassembly instructions for photos 
and parts placement. To reassemble the pump, follow 
the disassembly instructions in reverse order. The air 
distribution system needs to be  assembled first, then 
the diaphragms and finally the wetted path. Please 
find the applicable torque specifications on this page. 
The following tips will assist in the assembly process.
•  

Lubricate air valve bore, center section shaft 
and pilot spool bore with NLGI grade 2 white EP 


bearing grease or equivalent.

•   Clean the inside of the center section shaft bore to ensure 

no damage is done to new shaft seals.

•   A small amount of NLGI grade 2 white EP bearing grease 

can be applied to the muffler and air valve gaskets to 
lubricate gaskets during assembly.

•   Make sure that the exhaust port on the muffler plate is 

centered between the two exhaust ports on the center 
section.

•   Stainless bolts should be lubed to reduce the possibility 

of seizing during tightening.

•   Use a mallet to tamp lightly on the large clamp bands to 

seat the diaphragm before tightening.

PS4 STALLION MAXIMUM TORQUE SPECIFCATIONS

Description of Part

Torque

Air Valve

13.6 N•m (120 in-lb)

Air Chamber/Center Block

27 N•m (20 ft-lb)

Outer Pistons

54 N•m (40 ft-lb)

Small Clamp Bands

3.4 N•m (30 in-lb)

Large Clamp Bands

10.7 N•m (95 in-lb)

PS8 STALLION MAXIMUM TORQUE SPECIFCATIONS

Description of Part

Torque

Air Valve

13.6 N•m (120 in-lb)

Air Chamber/Center Block

27 N•m (20 ft-lb)

Outer Pistons

108 N•m (80 ft-lb)

Small Clamp Bands

6.6 N•m (58 in-lb)

Large Clamp Bands

48 N•m (35 ft-lb)

PS15 STALLION MAXIMUM TORQUE SPECIFCATIONS

Description of Part

Torque

Air Valve

13.6 N•m (120 in-lb)

Air Chamber/Center Block

27 N•m (20 ft-lb)

Inner Piston Ring

19 N•m (15 ft-lb)

Outer Piston

108 N•m (80 ft-lb)

Small Clamp Bands

15.5 N•m (137 in-lb)

Large Clamp Bands

61 N•m (45 ft-lb)

SHAFT SEAL INSTALLATION:

PRE-INSTALLATION
•   Once all of the old seals have been removed, the 

inside of the bushing should be cleaned to ensure 
no debris is left that may cause premature damage 
to the new seals.

INSTALLATION
The following tools can be used to aid in the installation 
of the new seals:
  Needle-Nose Pliers
  Phillips Screwdriver
  Electrical Tape
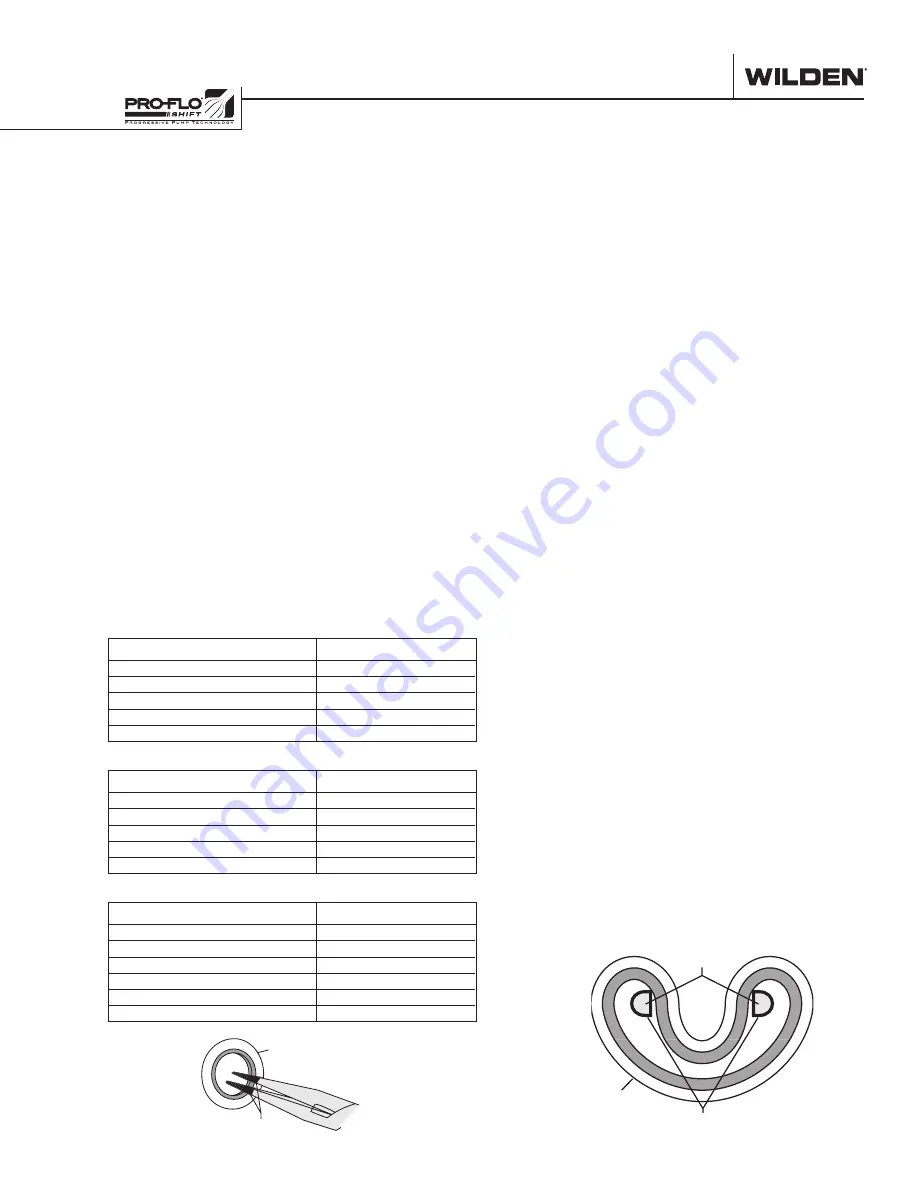
•   Wrap electrical tape around each leg of the needle-nose 

pliers (heat shrink tubing may also be used). This is done 
to prevent damaging the inside surface of the new seal.

•   With a new seal in hand, place the two legs of the 

needle-nose pliers inside the seal ring. (See Figure A.)

•   Open the pliers as wide as the seal diameter will allow, 

then with two fingers pull down on the top portion of 
the seal to form a kidney shape. (See Figure B.)

•   Lightly clamp the pliers together to hold the seal into 

the kidney shape. Be sure to pull the seal into as tight 
of a kidney shape as possible, this will allow the seal to 
travel down the bushing bore easier.

•   With the seal clamped in the pliers, insert the seal into 

the bushing bore and position the bottom of the seal 
into the correct groove. Once the bottom of the seal is 
seated in the groove, release the clamp pressure on the 
pliers. This will allow the seal to partially snap back to its 
original shape.

•   After the pliers are removed, you will notice a slight 

bump in the seal shape. Before the seal can be properly 
resized, the bump in the seal should be removed as 
much as possible. This can be done with either the 
Phillips screwdriver or your finger. With either the side 
of the screwdriver or your finger, apply light pressure 
to the peak of the bump. This pressure will cause the 
bump to be almost completely eliminated.

•   Lubricate the edge of the shaft with NLGI grade 2 

white EP bearing grease.

•   Slowly insert the center shaft with a rotating motion. 

This will complete the resizing of the seal.

•  Perform these steps for the remaining seals.

Figure A

SHAFT SEAL

TAPE

Figure B

SHAFT SEAL

TAPE

NEEDLE-NOSE 

PLIERS

R E A S S E M B L Y   H I N T S   &   T I P S

Содержание Wilden PS Stallion Series

Страница 1: ...wildenpump com EOM Engineering Operation Maintenance Where Innovation Flows PS Stallion Metal Pump...

Страница 2: ...rmance Curves PS4 Stallion EZ InstallTPE Fitted 6 PS8 Stallion EZ InstallTPE Fitted 6 PS15 Stallion EZ InstallTPE Fitted 7 Suction Lift Curves 8 SECTION 6 SUGGESTED INSTALLATION OPERATION TROUBLESHOOT...

Страница 3: ...er grounding point when handling flammable fluids and whenever discharge of static electricity is a hazard CAUTION Do not exceed 8 6 bar 125 psig air supply pressure CAUTION The process fluid and clea...

Страница 4: ...4 lpm 202 gpm MODEL PS4 38 mm 1 1 2 PS8 51 mm 2 PS15 76 mm 3 WETTED PARTS OUTER PISTON AA ALUMINUM ALUMINUM WW DUCTILE IRON DUCTILE IRON PS4 PS8 Only AIR CHAMBERS A ALUMINUM CENTER BLOCK A ALUMINUM AI...

Страница 5: ...the opposite discharge valve ball is forced onto its seat forcing fluid to flow through the pump discharge The movement of diaphragm A toward the center of the pump creates a vacuum within liquid cham...

Страница 6: ...G 292 11 5 H 348 13 7 J 432 17 0 K 233 9 2 L 48 1 0 M 122 4 8 N 15 DIA 0 6 DIA LW0261 REV B DIMENSIONS ITEM METRIC mm STANDARD inch A 406 16 0 B 612 24 1 C 51 2 0 D 362 14 3 E 630 24 8 F 671 26 4 G 61...

Страница 7: ...MENSIONS ITEM METRIC mm STANDARD inch A 495 19 5 B 742 29 2 C 74 2 9 D 422 16 6 E 770 30 3 F 828 32 6 G 84 3 3 H 48 1 9 J 213 8 4 K 414 16 3 L 424 16 7 M 498 19 6 N 409 16 1 P 84 3 3 R 305 12 0 S 15 D...

Страница 8: ...placement per stroke was calculated at 4 8 bar 70 psig air inlet pressure against a 2 1 bar 30 psig head pressure Example To pump 201 lpm 53 gpm against a discharge head of 2 8 bar 40 psig requires 5...

Страница 9: ...per Stroke1 3 7 L 0 97 gal Max Flow Rate 764 lpm 202 gpm Max Size Solids 25 mm 1 1 Displacement per stroke was calculated at 4 8 bar 70 psig air inlet pressure against a 2 1 bar 30 psig head pressure...

Страница 10: ...rating at 305 m 1 000 above sea level This chart is meant to be a guide only There are many variables which can affect your pump s operating characteristics The number of intake and discharge elbows v...

Страница 11: ...ating characteristics The number of intake and discharge elbows viscosity of pumping fluid elevation atmospheric pressure and pipe friction loss all affect the amount of suction lift your pump will at...

Страница 12: ...WILDEN PUMP ENGINEERING LLC 10 WIL 10830 E 03 N O T E S...

Страница 13: ...timated by counting the number of strokes per minute and then multiplying the figure by the displacement per stroke MUFFLER Sound levels are reduced below OSHA specifications using the standard Wilden...

Страница 14: ...imply close the shut off valve user supplied installed in the air supply line A properly functioning valve will stop the air supply to the pump therefore stopping output This shut off valve should be...

Страница 15: ...urate records make it possible to identify pumps that are poorly suited to their applications Pump will not run or runs slowly 1 Ensure that the air inlet pressure is at least 0 4 bar 5 psig above sta...

Страница 16: ...onding air chamber to note alignment This will assist in proper alignment during reassembly Step 2 Using an appropriate sized wrench remove the four nuts that fasten the handles handle brackets handle...

Страница 17: ...area of the liquid chambers for excessive wear or damage Step 7 Remove the inlet valve balls and seats from the inlet manifold and inspect for nicks chemical attack or abrasive wear Replace worn parts...

Страница 18: ...an be removed from the center section assembly 2 The outer piston diaphragm and inner piston separate from the shaft which remains fastened to the opposing side Repeat the disassembly instructions for...

Страница 19: ...FT metal pumps utilize the revolutionary Pro Flo SHIFT air distribution system Proprietary composite seals reduce the co efficient of friction and allow the Pro Flo SHIFT to run lube free The Pro Flo...

Страница 20: ...zed wrench loosen the fasteners and lift away remaining air chamber and center block gasket from center section Replace gasket if necessary Step 7 Gently remove the pilot spool from the sleeve and ins...

Страница 21: ...opriate sized wrench remove the pilot exhaust muffler Inspectfordamageorcontamination and replace if necessary Step 14 Lift away muffler plate and muffler plate gasket from center block Inspect for we...

Страница 22: ...of the air valve spool and gently sliding the spool out of the air valve body Inspect seals for signs of wear and replace the entire air valve assembly if necessary Re insert the spool immediately int...

Страница 23: ...p Bands 15 5 N m 137 in lb Large Clamp Bands 61 N m 45 ft lb SHAFT SEAL INSTALLATION PRE INSTALLATION Once all of the old seals have been removed the inside of the bushing should be cleaned to ensure...

Страница 24: ...STROKE TPE PS4 STALLION E X P L O D E D V I E W S e c t i o n 8 E X P L O D E D V I E W P A R T S L I S T I N G ALL CIRCLED PART IDENTIFIERS ARE INCLUDED IN REPAIR KITS see Section 9 WILDEN PUMP ENGIN...

Страница 25: ...Plug Pipe 1 4 NPT 1 00 7010 08 00 7010 08 WETTED PATH COMPONENTS 26 Liquid Chamber 2 04 5000 01 04 5000 02 27 Manifold Discharge NPT 1 04 5020 01 04 5020 02 Manifold Discharge BSPT 1 04 5020 01 14 04...

Страница 26: ...METAL ADS PS8 STALLION E X P L O D E D V I E W E X P L O D E D V I E W P A R T S L I S T I N G ALL CIRCLED PART IDENTIFIERS ARE INCLUDED IN REPAIR KITS see Section 9 WILDEN PUMP ENGINEERING LLC 24 WI...

Страница 27: ...Plug Pipe 1 4 NPT 1 00 7010 08 00 7010 08 WETTED PATH COMPONENTS 26 Liquid Chamber 2 08 5000 01 08 5000 02 27 Manifold Discharge NPT 1 08 5020 01 08 5020 02 Manifold Discharge BSPT 1 08 5020 01 14 08...

Страница 28: ...METAL ADS PS15 STALLION E X P L O D E D V I E W E X P L O D E D V I E W P A R T S L I S T I N G ALL CIRCLED PART IDENTIFIERS ARE INCLUDED IN REPAIR KITS see Section 9 WILDEN PUMP ENGINEERING LLC 26 WI...

Страница 29: ...010 08 WETTED PATH COMPONENTS 27 Liquid Chamber 2 15 5000 01 28 Manifold Discharge NPT 1 15 5020 01 Manifold Discharge BSPT 1 15 5020 01 14 29 Manifold Footed Inlet NPT 1 15 5080 01 30 Manifold Footed...

Страница 30: ...e N A 08 1080 51 50 08 1120 51 50 Buna N N A 08 1080 52 50 08 1120 52 50 Geolast 08 1022 15 N A N A EPDM N A 08 1080 54 50 08 1120 54 50 Viton N A 08 1080 53 50 08 1120 53 50 Wil Flex 08 1022 58 08 10...

Страница 31: ...s for warranty consideration and must be accompanied by the appropriate MSDS for the product s involved A Return Goods Tag obtained from an authorized Wilden distributor must be included with the item...

Страница 32: ...nt without prior notice This is a non contractual document 02 2017 Authorized PSG Representative Where Innovation Flows PSG 22069 Van Buren St Grand Terrace CA 92313 5607 P 1 909 422 1730 F 1 909 783...

Отзывы: