background image

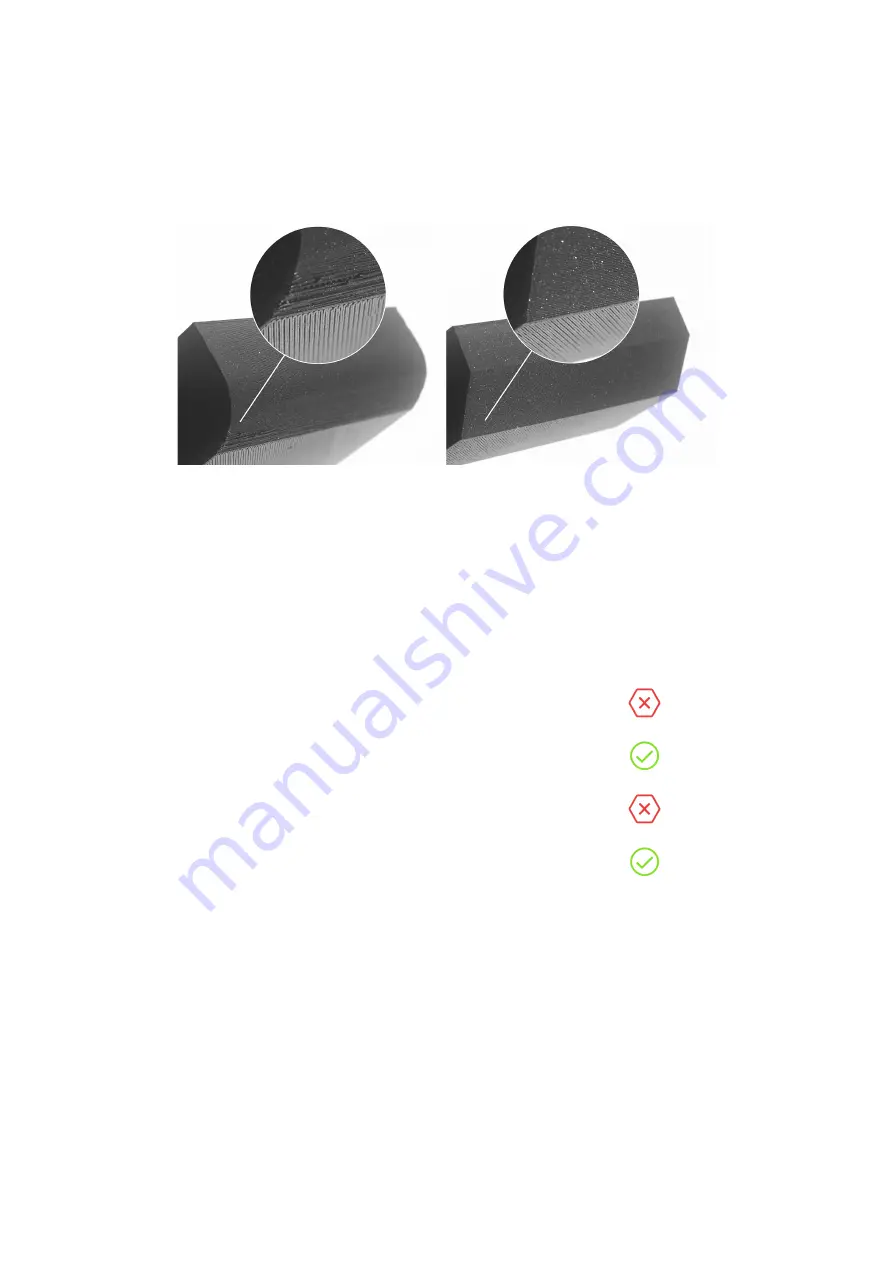
10.3.2 Fillet vs chamfer

If oriented towards the print bed, fillets create a very steep overhang, which negatively
affects the surface of the object. For this reason,

use chamfer instead

if perfect part finish

is the priority.

Pict. 28 - Fillet (left) vs chamfer (right)

10.3.3 Thin walls and minimum feature size

Another limitation is the nozzle diameter. The default nozzle size is 0.4 mm with

extrusion

width of 0.45 mm

. Keep this number in mind, especially when you’re designing thin walls or

tiny features.

Wall thickness

Is it printable?

Less than one perimeter


One perimeter


More than one perimeter, but less than two perimeters


More than two perimeters


10.3.4 Splitting model into multiple parts

Both visuals and mechanical properties of your model can be improved by splitting it into
multiple parts. It’s often better to split a complex object into multiple parts that are easier to
place on the print platform. This way, you can minimize the number of supports required. You
can then glue the object together.

51

Содержание ORIGINAL i3 MK3S+

Страница 1: ...Prusa Research a s Partyzánská 188 7A 170 00 Praha www prusa3d com info prusa3d com 3DPRINTING HANDBOOK USER MANUAL FOR 3D PRINTERS ORIGINAL PRUSA i3 MK3S KIT ORIGINAL PRUSA i3 MK3S ENG ...

Страница 2: ... safety or for proper printer service This symbol indicates text related to a printer kit only How to contact our support First check the last chapters of this handbook for troubleshooting guides or visit https help prusa3d com for a complete list of common issues print quality troubleshooting and other guides If your problem is not listed there or the solution does not work please send an e mail ...

Страница 3: ...e market it s an improved version of the original 3D printer s third iteration It is constantly updated with the latest innovations and you ve just purchased its latest version In addition to printer hardware upgrades the main goal is to make the technology more accessible and understandable to all users Josef Prusa also organizes workshops for the public participates in professional conferences d...

Страница 4: ... first layer 29 7 Printing 30 7 1 Removing objects from the printer 30 7 2 Printer Control 31 7 2 1 LCD screen 31 7 2 2 Controlling the LCD screen 31 7 2 3 Print statistics 32 7 2 4 Fail stats 32 7 2 5 Normal vs Stealth mode 33 7 2 6 Factory reset 33 7 2 7 SD card sorting 34 7 2 8 Testing if file gcode is complete 34 7 2 9 LCD layout 35 7 2 10 Print speed versus print quality 37 7 2 11 USB cable a...

Страница 5: ...1 3 Print in color with ColorPrint 56 12 Materials 58 12 1 PLA PETG ASA ABS PC Blend Flex CPE Nylon XT HT Composites HIPS PVA nGen PP T Glase 58 12 16 Creating profiles for new materials 67 13 FAQ Printer maintenance and print issues 68 13 1 Regular maintenance 68 13 2 Print surface preparation 69 13 3 Filament sensor 70 13 4 Clogged jammed extruder 71 13 5 Nozzle cleaning 72 13 6 Replacing changi...

Страница 6: ... of any printer related problem do not hesitate to contact us at info prusa3d com or via 24 7 live chat at shop prusa3d com We are glad to receive all of your valuable comments and tips We also suggest you visit our official forum at forum prusaprinters org where you can find solutions to common issues tips advice and hints in addition to actual information about the Original Prusa i3 printer s de...

Страница 7: ...ug rather than the cord to reduce the risk of damage to the plug or to the AC outlet 6 Never disassemble the printer power supply it does not contain any parts that could be repaired by an unskilled worker All repairs must be performed by a qualified technician 7 Do not touch the nozzle or heatbed when the printer is printing or warming up Note that the temperature of the nozzle is 210 300 C 410 5...

Страница 8: ...frequently worldwide although there is no difference in printing quality The filament is provided on a spool which should feature a list of basic information filament maker material ABS PLA etc and filament diameter 2 85 mm filament is commonly called 3 mm This printer supports only a 1 75 mm filament Please check that the filament diameter is 1 75 mm before inserting it into the extruder Do not t...

Страница 9: ...nd assembly instructions can be found in chapter 6 2 Printer assembly Keep in mind you can use our support email or live chat when you purchase the kit Do not hesitate to write to us if you need any advice or help Follow the contact information on page 2 Pict 2 Original Prusa i3 MK3S printer kit unboxed 9 ...

Страница 10: ... more foam which needs to be removed Some parts are additionally secured with the white zip ties cut those off too Pict 3 Proper handling of the printer Both the assembled version and the kit version come with a few things you might need during the printer use USB Cable used for uploading new firmware or alternatively printing from the computer Acupuncture needle used for cleaning a clogged nozzle...

Страница 11: ...owing the guidelines and assembling the kit according to the online manual at help prusa3d com The online manual is available in several languages on the website The construction of the printer should not take more than one working day After successful completion continue to chapter 6 3 Setup before printing 6 3 Setup before printing Place the printer in a horizontally stable position the best pla...

Страница 12: ...ed printer it will guide you through all the tests and calibrations you need to do to get started printing The Wizard can be also started manually from LCD menu Calibration Wizard Do not forget to read chapter 6 3 2 Preparation of the spring steel sheet before running the Wizard 12 ...

Страница 13: ...t the printer USB from any computer or OctoPrint running on Raspberry Pi for the whole calibration because during the calibration the printer will not respond to any request from a host connected via USB and communication will time out Such a time out would cause the host to reset the connection causing the printer to restart in the middle of calibration and it might end up in a weird state requir...

Страница 14: ...e bed with warm water and a few drops of dish soap on a paper towel Denatured alcohol is yet another option Consumable parts such as PEI sheets smooth textured satin etc are not covered by warranty as the coatings will deteriorate over time unless failure has occurred due to a defect in materials or workmanship Cosmetic damage including but not limited to scratches dents cracks or other cosmetic d...

Страница 15: ...et left Satin powder coated sheet middle textured powder coated PEI sheet right effect on the first layer Due to a different thickness of the sheets each sheet requires individual First layer calibration To avoid re calibrating every time you switch the sheet you can save the settings for up to 8 sheets Read more about this feature in chapter 8 1 Steel sheet profiles 15 ...

Страница 16: ...red to smooth sheets Powder coating directly on metal makes it very hard to damage this build plate If a heated nozzle crashes into it the metal can dissipate the heat Powder coating also gives the surface a distinct textured look that will be visible on your prints The textured surface hides most of the mechanical damage caused by tools Only the top of the small bumps can be scratched which will ...

Страница 17: ...r temperatures are used the glue can migrate under the PEI and create slight bumps on the surface To remove the bubbles flip the sheet and print on the other side they should disappear after a couple of prints 6 3 2 3 Double sided Powder coated Satin Spring Steel Sheet Suitable for both PLA and PETG Prints from ASA PC Blend require a brim skirt shield around the print Lightly textured matte finish...

Страница 18: ...ut damaging it This also applies to materials that would not stick to PEI otherwise like Nylon etc Before applying anything onto the bed consider using the Brim option in PrusaSlicer which increases the surface area of the first layer For Nylon blends a simple glue stick does the trick The glue can be easily removed later either using a window cleaner or dish soap water For ABS prints ABS juice ca...

Страница 19: ...e that both are properly connected to the EINSY electronics and that they are not swapped Please check Not connected Heater Thermistor Check the proper wiring of the hotend power cables and the thermistor cables Ensure that both are properly connected to the EINSY electronics and that they are not swapped Bed Heater Wiring error Check that the heatbed and the hotend power cables are not swapped or...

Страница 20: ...r and the other one to the correct slot on the EINSY board 6 3 5 Calibrate XYZ kit only The Original Prusa i3 MK3S comes with a full mesh bed leveling feature however for this to work we need to first calibrate the distance between the tip of the nozzle and the SuperPINDA Prusa INDuction Autoleveling probe The process is fairly straightforward so let s get to it The purpose of the X Y Z calibratio...

Страница 21: ...inted parts at the top Please make sure the print head went all the way up the Z axis and that you heard a rattling sound as the Z stepper motors skip steps This procedure ensures that 1 the X axis is perfectly horizontal 2 the print nozzle is in a known distance from the print bed If the print head did not touch the end stoppers at the top of the Z axis the printer could not possibly know the dis...

Страница 22: ...not precisely perpendicular but still quite all right The firmware will correct for the X Y skew during normal printing so boxes will be printed with right angles 5 XYZ calibration all right A skew will be corrected automatically The firmware will correct the skew during normal printing and as long as the X and Y axes move freely the printer will print correctly You may want to consider revisiting...

Страница 23: ...tion points in non volatile memory The stored information is used every time mesh bed leveling is called during a print When the measured values are vastly different from the stored values the print is canceled because it is a good indicator something is wrong Calibrate Z is a part of the routine Calibrate XYZ so there s no need to run it after a successful Calibrate XYZ It is a good practice to r...

Страница 24: ...changing the Z probe nr you can change how many times will each point be probed We suggest either 3 or 5 measurements since the final value is calculated as an average value Changing these settings affects how long will the Mesh bed leveling procedure takes to complete However even the slowest variant finishes in under a minute Finally with 7x7 Mesh bed leveling you can choose whether or not to us...

Страница 25: ...ature c Insert the filament into the extruder and confirm loading by pressing the control knob 4 The filament is then loaded to the extruder by the extruder stepper automatically If you have the filament sensor and autoloading enabled preheat the printer and simply insert the filament into the extruder Everything is automated from this point Make sure that the filament tip is nice and pointy The Z...

Страница 26: ...ure press the knob to unload the filament If the nozzle was preheated the filament is unloaded immediately 6 3 9 First layer calibration kit only Now we will finally calibrate the distance between the tip of the nozzle and the probe Check if your print surface is clean You can find instructions on how to clean it in the chapter 6 3 2 Preparation of the spring steel sheet Don t forget to complete 6...

Страница 27: ...zzle height until the extruded plastic sticks nicely to the bed and you can see that it is being slightly squished The value should not exceed 2 000 mm If you have to adjust it more e g 2 500 move the SuperPINDA probe slightly higher Please refer to help prusa3d com in case the SuperPINDA probe needs to be re aligned Loosen the M3 screw on the probe holder to make adjustments Gently push or pull t...

Страница 28: ...ons in the first layer This feature can be found in LCD Menu Calibration Bed level correction For example if the first layer seems to be ever so slightly more squished on the right side you can virtually raise the nozzle by 20 microns on the right side Settings are available for Left Right Front and Back The limit is 100 microns and even 20 microns can make a huge difference When you are using thi...

Страница 29: ...ting thickness varies It is a good practice to check the first layer and adjust accordingly with Live adjust Z when switching between different types of steel sheets You can find more info and photos at help prusa3d com Pict 12 Perfect Prusa logo first layer 6 3 10 2 Check probe height kit only If the first layer seems inconsistent between multiple prints the probe might be too high Lower it sligh...

Страница 30: ...e filename gcode must not contain any special characters otherwise the printer is not able to display the file on the LCD 7 1 Removing objects from the printer Removing prints from the build plate is much easier because of the ability to remove and bend the build plate Different thermal expansion of the steel sheet and plastics used in 3D printing also helps with detaching prints after the plate h...

Страница 31: ... information screen displaying the most important details They are the temperature of the nozzle and the heatbed 1 2 printing time 3 and the actual Z axis position 5 Pict 14 LCD layout 1 Nozzle temperature actual desired temperature 2 Heatbed temperature actual desired temperature 3 Progress of printing in shown only during the printing 4 Status bar Prusa i3 MK3S ready Heating file_name gcode etc ...

Страница 32: ...eed to press the control knob to continue Shortcut Quick access to Move Z axis function press and hold the Control knob for 3 seconds 7 2 3 Print statistics The printer tracks printing statistics When you access this option during a print you will see statistics for the running print If you do so while the printer is idle you will see the lifetime statistics Both filament usage and print time are ...

Страница 33: ...n the LCD panel 2 Press and hold the control knob until you hear a beep 3 Release the control knob Options Language option resets the language preference Statistics will erase all the recorded print time and material from the memory Shipping prep which resets only the printer language selection All the calibration data including the Live adjust Z remain intact Even though the calibration data are ...

Страница 34: ...and then other files follow The maximum number of files which can be displayed is 100 If there are more than 100 files on the SD card only the first 100 will be displayed Pict 17 SD card sorting 7 2 8 Testing if file gcode is complete The printer automatically looks for common g codes which indicate the end of the generated file If they are not detected you will get a warning You can still continu...

Страница 35: ...ing the printing process only Stop print during the printing process only Preheat PLA 215 60 PET 230 85 ASA 260 105 PC 275 110 PVB 215 75 ABS 255 100 HIPS 220 100 PP 254 100 FLEX 230 50 Cooldown Print from SD AutoLoad Filament Load filament if Filament autoload is off Unload filament Settings Temperature Nozzle Bed Fan speed Move axis Move X Move Y Move Z Extruder Disable steppers Filament sensor ...

Страница 36: ...ne Sound Loud Once Silent Assist Brightness Level Bright default 130 50 255 Level Dimmed default 50 0 130 Mode Auto Bright Dim Timeout default 10 1 999 Calibration Wizard First layer calibration Auto home Belt test Selftest Calibrate XYZ Calibrate Z Mesh Bed Leveling Bed level correction PID Calibration Reset XYZ calibration Temperature Calibration only on MK3S Statistics Fail stats Last print Tot...

Страница 37: ...vely minor with significantly longer print times Our most used profiles 0 15 mm and 0 20 mm come in two different versions Quality slower perimeters and infill gives you better surface quality Speed faster perimeters and infill without much sacrifice of surface quality Pict 19 Print quality vs print time The speed can also be changed while printing The LCD shows the FR 100 item it s actual print s...

Страница 38: ...tion to finish the object Connect the printer to the computer with the USB cable Pict 20 You can find the USB port here Choose the connection port in Pronterface download available with the printer drivers see the chapter 9 Printer drivers Mac users use usbmodem port PC Windows ports are COM1 COM2 etc the correct port is displayed in the device manager Linux users connect the printer using the vir...

Страница 39: ...tc for Windows PC 3 The Print button starts the printing process 4 The Disconnect button disconnects the printer from the computer 5 Printer controls Here you can manipulate the printer axes 6 Setting the nozzle and bed temperatures 7 Thermometer 8 Confirming the set temperatures heating starts 9 2D print process preview 10 Info panel Estimated print time axis position and other info are displayed...

Страница 40: ...ection just pinch the smooth rods and let the extruder hit your hand Crash detection doesn t work if you push the extruder in the direction of its movement That s not a real world scenario and normally never happens during print 7 2 14 Temperatures By default the printer shows the heatbed and hotend temperatures on the LCD screen If you also want to check the ambient temperature you can do so in t...

Страница 41: ...while scrolling through the menu and at the end of the menu 7 2 18 Language settings The following languages are supported English Czech German Spanish Italian Polish and French Go to the printer s LCD Menu Settings Language and select any of the available languages In addition to the officially supported languages you can also select any of the community made translations from the LCD Menu Settin...

Страница 42: ...ails Headphone stands various holders racks or flower pots can all be printed in half the usual time PrusaSlicer comes with presets for both 0 8mm and 0 6mm nozzles simply switch the Printer setting to Original Prusa i3 MK3S 0 8 nozzle or Original Prusa i3 MK3S 0 6 nozzle respectively 7 3 1 2 0 25 nozzle by E3D The nozzle diameter has a noticeable effect on the printing resolution of the plane par...

Страница 43: ...second generation of our unique addon which enables your 3D printer to print with up to 5 colors at the same time Now compatible with the Original Prusa i3 MK2 5S and MK3S 3D printers the MMU2S went through a major revision resulting in a simpler and more reliable design The number of simultaneously supported filaments increased to the total of five which enables the users to print even more compl...

Страница 44: ...ations like OctoPrint octoprint org or Repetier Server www repetier server com to control the printer via a web browser interface PowerPanic functionality will not work with OctoPrint as of now but Prusa Research is working with OctoPrint developers on implementing it You can always find up to date detailed instructions on how to connect the Raspberry Pi Zero W at help prusa3d com This walkthrough...

Страница 45: ... the name up to seven characters Reset sets the values back to the factory defaults As soon as two or more profiles are configured by the First Layer Calibration you will be able to quick toggle between them directly from the main menu 8 2 Nozzle diameter setup By default all Original Prusa i3 printers are shipped with the 0 4mm nozzle In case you change the nozzle you can set the correct diameter...

Страница 46: ... is stored in the printer and the temperature calibration is active by default You can re calibrate the data table from the menu it can be found in LCD Menu Calibration Temp calibration Calibrate Before you do so please make sure that your nozzle and heatbed are perfectly clean as the extruder will be moving around the heatbed during this process This procedure must be done in a place with normal ...

Страница 47: ...ear Advance 1 5 starting with firmware 3 9 0 It is recommended to re slice older G codes If you are using different slicers from PrusaSlicer or you just want to tweak and play around with different values you can manually change the settings in g code script However if you do not understand the concept of G codes yet or never played with editing it stop reading here and skip to another chapter The...

Страница 48: ...ctured in second half of 2019 and newer With older printers you have to replace the LCD screen and also in some cases the Einsy board Einsy 1 1a or newer is required 9 Printer drivers The latest drivers and information can be found at www prusa3d com drivers The driver package contains the following settings and programs PrusaSlicer converting 3D models into gcode format for printing Pronterface l...

Страница 49: ...s Find out more at https www prusaprinters org 10 1 2 Bundled 3D models We asked a couple of known 3D designers to prepare some printable objects for you to print They are ideal for the first prints on your new printer STL and G code files are available after installing the drivers package in the 3D Objects folder or bundled on your SD card You can check them out at https www prusa3d com printable...

Страница 50: ...park Mechanical Blender Maya 3DS Max Autocad and many more Pict 26 Fusion 360 10 3 Modeling with 3D printing in mind Modeling for 3D printing presents several interesting challenges 10 3 1 Overhangs and support material The most important thing to keep in mind while modeling for 3D printing is support material 3D printers can t print in mid air each layer has to be laid on top of the previous laye...

Страница 51: ...of 0 45 mm Keep this number in mind especially when you re designing thin walls or tiny features Wall thickness Is it printable Less than one perimeter One perimeter More than one perimeter but less than two perimeters More than two perimeters 10 3 4 Splitting model into multiple parts Both visuals and mechanical properties of your model can be improved by splitting it into multiple parts It s oft...

Страница 52: ...pplication Tolerance Fit 0 1 mm Very tight 0 15 mm Tight 0 20 mm Loose 11 Slicing When you download 3D models from the internet or create your own models you will need to convert the 3D model stl obj into a set of instructions for the printer called G code G code is a file format readable by 3D printers The file contains information such as nozzle movement the amount of filament to extrude tempera...

Страница 53: ...rusaSlicer 2 Delete and Delete All buttons remove the model s from PrusaSlicer 3 Opens the detailed settings of print filament and printer 4 Move scale rotate Place on Face and cut tools 5 Slice and generate gcode button 6 Quality Speed setting of a print 7 Material selection 8 Printer selection 9 Right click on model opens a context menu 10 Switch between 3D editor and layers preview 11 Model pre...

Страница 54: ... in the left column First you have to check the Generate support material box 3 Next item Overhang threshold 4 lets you set the minimal angle for the printing of the support material Setting this item to zero lets the printer detect problematic parts automatically and print supports where needed Enforce support option 5 is used mostly with small models or models with a small base to prevent the ob...

Страница 55: ...e bottom right corner to type in an exact scale value Pict 32 Changing the scale of a printed object If you need to print an object that does not fit the printer at its original scale you have to cut the object into smaller pieces Select the Cut tool from the left menu or press the C key Position the cut plane to the desired position or enter a precise height into the Cut dialog window You can dec...

Страница 56: ...icer 1 Switch to the layer preview using the button in the lower left corner 2 Using the slider on the right side select a layer where the color change should occur 3 Click on the orange plus icon 4 A preview is instantly displayed You can remove the color change by clicking on the grey cross button that is now displayed instead of the orange plus button 5 Export the G code and you re ready to pri...

Страница 57: ...lay Changed correctly with three options 1 Yes Everything went ok and printing can continue Check if the new color is clear without any remains of the previous filament if so choose this option to continue printing with a new color 2 Filament not loaded If the new filament was not loaded properly choose this option and the printer will start the automatic filament load again When the filament is l...

Страница 58: ...he most commonly used material for 3D printing It is biodegradable easy to print with and PLA prints are very hard The perfect choice for printing large objects due to low thermal expansion prints do not warp on the heatbed and for printing small detailed models It is the only material that is well suited for printing 50 micron layers Ultradetail resolution Advantages Disadvantages Easy to print B...

Страница 59: ...uitable for printing small models Easy to print Possible stringing Low thermal expansion Bridging is problematic Ductility and strength Strong adhesion to the printbed Easy sanding Cannot be smoothed with acetone Almost odorless Supports can be difficult to remove Glossy surface Perfect layer adhesion Water and humidity resistant Recyclable Typical use mechanical components holders and cases water...

Страница 60: ...heated bed set to 100 C the print can begin to warp and peel off the bed The material also produces and unpleasant odor during printing Advantages Disadvantages High impact and wear resistance Difficult to print Very good temperature resistance Tendency to warp Suitable for outdoor use UV stable Worse detail resolution Soluble in acetone easy to glue together Unpleasant odor during printing Can be...

Страница 61: ...y for advanced users However this doesn t apply to our Prusament PC Blend which is significantly easier to print compared to other polycarbonates Polycarbonate requires some experience to print properly If you are a beginner consider experimenting with easier materials like PLA or PETG first Advantages Disadvantages High temperature resistance High warping especially with large models High impact ...

Страница 62: ...nvironment Nozzle temperature 230 260 C Bed temperature 45 65 C a larger object requires a higher temperature Heatbed Make sure the surface is clean as described in 6 3 2 Preparation of spring steel sheet chapter WARNING Some very soft materials can adhere very strongly to the smooth PEI sheet and Satin powder coated sheet require the use of a glue stick as a separator to avoid damaging the PEI su...

Страница 63: ...jects with a glossy finish Advantages Disadvantages Mechanical properties Must be stored in a dry environment Chemical resistance Somewhat difficult to print Flexible but strong May warp Nozzle temperature 240 C Bed temperature 80 90 C Heatbed Do not print on the smooth PEI sheet Apply a thin layer of glue stick on the Satin and Textured powder coated sheets Typical use screws nuts replacement par...

Страница 64: ...mposite materials Composite materials corkfill copperfill bronzefill carbon or aramid composites and many others are based on the main plastic medium and second material in the form of dust These materials are very abrasive so if you plan to print them long term we recommend using a hardened nozzle When using wood composites we recommend larger nozzles 0 5 mm and larger The printing characteristic...

Страница 65: ... 110 C a larger object requires a higher temperature Heatbed Make sure the surface is clean as described in 6 3 2 Preparation of spring steel sheet chapter Typical use Support material for ASA ABS Protective cases 12 12 PVA and BVOH These are water soluble materials that are used to print supports for the most widely used PLA printing material Support can be printed even in difficult to reach plac...

Страница 66: ...thin layer of glue stick when using the Smooth PEI sheet 12 14 PP Polypropylene has very good mechanical properties is partially elastic can withstand higher temperatures than ABS or PLA and is resistant to many chemicals Advantages Disadvantages Ductile Tendency to warp Partially elastic Bad adhesion to the heatbed Temperature resistance Nozzle temperature 210 230 C Bed temperature 95 100 C Heatb...

Страница 67: ... even though they are both PLA For some manufacturers it may even happen that different colors of the same material behave differently For best results you should experiment with nozzle and heatbed temperature settings fan speed print speed and material flow All of this can be adjusted while printing in the Tune menu on the LCD panel The same applies to materials for which we do not have a print p...

Страница 68: ...and greased on the inside they need to be removed from axis because the plastic lip will prevent most of the grease from getting inside 13 1 2 Fans Both fans should be checked and cleaned every couple hundred hours dust or plastic build up can decrease their efficiency or even damage them Computer cleaner spray will get the dust away and tweezers can be used for little plastic strands Both extrude...

Страница 69: ... it needs lubrication to reduce wear lower the friction and to reduce noise A lithium based grease is recommended to be used Oil is not recommended since it might spread to the section where the filament is fed to the hotend After extensive use it is recommended to remove clean and inspect the gears This is also a good time to also put some grease on the needle bearings in the secondary gear to ke...

Страница 70: ...ent extruded during the loading process After that you can continue in the current print 13 3 2 False sensor readings and debugging You can encounter false runout readings reported by the sensor First step is to check if the filament sensor is working properly in LCD menu Support Sensor info When you insert filament into the extruder the IR state should be 1 When you unload and remove the filament...

Страница 71: ...rt an allen key or a strand of black filament into the sensor green arrow in picture 39 If the IR value has changed from 0 to 1 the filament sensor is working properly which means you have probably a mechanical problem with the extruder overtightened FS lever blocked steel ball wrong magnet orientation Please refer to the assembly manual and make sure that extruder is assembled properly 13 3 2 4 I...

Страница 72: ...ttings Move axis Move Z axis As you will be operating with the hotend Use a wire brush to clean the nozzle from the outside Heat the nozzle before you do so Filament is pouring out a little If the filament doesn t go through the extruder smoothly and only a small volume is coming out first check if the extruder fan is working properly and that the temperature is set correctly PLA 210 C ABS 255 C H...

Страница 73: ...Ruby nozzle please visit this website for instructions otherwise you might damage it http support 3dverkstan se article 66 the olsson ruby instructions for use CAUTION Heated parts can cause severe burns Be extra careful around the hotend thermistor leads You can break them off easily 1 Gain better access to the nozzle by moving the extruder axis as high as possible Go to LCD Menu Settings Move Ax...

Страница 74: ...nd the heatbreak easily It is a good practice to run 6 3 9 First layer calibration after changing the nozzle When the nozzle is fully screwed into the heater block there is still a small gap between them That s normal do not try to overtighten the nozzle to get rid of the gap Pict 41 Nozzle change Pict 42 A gap between a fully screwed in nozzle and the heater block 74 ...

Страница 75: ...ll use the same settings unless you change it again in the menu or reset the printer or unplug it from the power source 13 8 Problems with finished models 13 8 1 Model breaks and or is easily damaged This is a typical feature of larger models printed from ABS If you have set the temperature properly the printer is away from drafts and object design is right the printed object should not break The ...

Страница 76: ...ddress find the correct firmware file for your printer Keep in mind that firmware files are different for each model Pict 43 Firmware and Drivers Apps packages at www prusa3d com drivers To flash the firmware connect your 3D printer to your PC using a USB 2 0 Type B cable and then start PrusaSlicer Go to Configuration Flash printer firmware and a new window will pop up Check whether your printer h...

Страница 77: ...ter is rocking YZ frame geometry check If your printer is rocking on the table please check Step 10 of Y axis assembly YZ frame geometry check All the components are cut or drilled by a machine for the highest precision but with uneven tightening it is possible to warp the frame Using your hand try to wiggle with the frame sides and check whether some corners are lifting up or not In case you find...

Страница 78: ...ard is formatted with the FAT32 standard If everything is OK and the card is readable on the computer check the EXT2 wiring from electronics to the LCD If the cable is connected properly try to swap the cables 14 4 Loose X and or Y axis belts Check if both belts are properly tightened loose belts would cause a printer malfunction and prevent proper printing The easiest way to check is printing a r...

Страница 79: ...tus is a unitless number measured as an average load on the stepper motor Lower value corresponds to higher tension higher motor load a higher value means looser belt less motor load Pict 47 A properly tightened Y axis belt under the heatbed Pict 48 A properly tightened X axis belt 14 5 Cables detached from the heatbed Do not forget to use a textile sleeve on heatbed cables and attach the cables p...

Страница 80: ...e MINTEMP error and the MINTEMP BED error MINTEMP problem with the hotend temperature readout MINTEMP BED problem with the heatbed temperature readout 15 4 MAXTEMP The MAXTEMP error occurs when at least one of the temperature readouts of the hotend or the heatbed is higher than 310 C It is a safety feature that prevents the printer from overheating uncontrollably Check if the thermistor cable is n...

Страница 81: ... FAN ERROR The EXTR FAN ERROR message appears when the extruder fan does not receive any RPM Revolutions per Minute readings In other words there is something preventing it from spinning Check the fan for any plastic debris and clean it if necessary Also make sure that the fan is properly plugged into the electronics board and that the cable is undamaged 15 10 Blackout occurred Recover print This ...

Страница 82: ...Print and share Do not forget to tag your prints with prusai3MK3S while sharing so we can find pin and showcase them with our http www prusa3d com original prusa i3 prints Happy Printing 82 ...

Отзывы: