background image

4

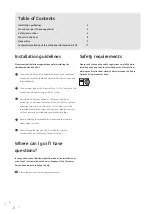
Table of Contents

Installation guidelines 

4

Where can I go if I have questions? 

4

Safety instructions 

4

What is in the box? 

8

Necessities 9
Technical installation of the Whiteboard Extension Kit G2 

11

Installation guidelines

Please consider the following guidelines before installing the 
whiteboard extension kit G2.

1

  The wall to which the lift is assembled, needs to be capable of 

supporting twice the combined weight of the touchscreen and 

the whiteboards. 

2

  The maximum load of the Prowise lifts is 150 kg. The mobile lifts 

cannot support systems larger than 75 inches. 

3

  Clear the wall from any obstacles. To prevent the risk of 

entrapment, a minimum distance of 10 cm to the left, right and 

above the screen and a minimum of 12 cm below it must be 

respected between the screen and any other objects around it 

such as accessories, whiteboards and keyboard holders.

4

  Before installing the whiteboards, please read the supplied 

safety guide carefully.

5

  The Whiteboard Extension Kit G2 is made for Prowise 

Touchscreen One and Prowise Touchscreen Ten.

Where can I go if I have
questions?

In case you have any additional questions about the installation or 
use of the Prowise whiteboards, our colleagues at the Customer 
Service department are happy to help.

  Please send an email to: [email protected]

Safety requirements

Please read the supplied safety regulations carefully before 
installing and using the Prowise whiteboards. Please follow 
warnings and instructions closely and always keep the Safety 
Guide and User Manual at hand.

Содержание iPro Wall Lift G2

Страница 1: ...1 EN DE NL 05 55 55 EN DE NL User Manual Prowise iPro Whiteboard Extension Kit G2 for Prowise Touchscreen One and Prowise Touchscreen Ten...

Страница 2: ...2 Prowise 2021 01...

Страница 3: ...3 EN DE NL 04 05 06 User Manual Prowise iPro Whiteboard Extension Kit G2 for Prowise Touchscreen One and Prowise Touchscreen Ten...

Страница 4: ...f 10 cm to the left right and above the screen and a minimum of 12 cm below it must be respected between the screen and any other objects around it such as accessories whiteboards and keyboard holders...

Страница 5: ...n muss nach der Installation links rechts und oberhalb des Bildschirms mindestens 10 cm Platz bleiben nach unten mindestens 12 cm Diese Abst nde verstehen sich inklusive aller Zubeh rteile wie Whitebo...

Страница 6: ...komen moet er na de installatie te allen tijde rondom het scherm inclusief eventuele accessoires zoals whiteboarden en toetsenbordhouders naar links rechts en boven minstens 10 cm ruimte vrij blijven...

Страница 7: ...7 EN DE NL 04 05 06...

Страница 8: ...s 40x40 2x sidebars 40x20 4x hinges 2x left 2x right 1x safety clamp 18x M6x20 black 8x M6x60 2x M5x70 18x self tapping screws 4 5x25 2x bumper feet white 2x bumper feet black User manual Safety instr...

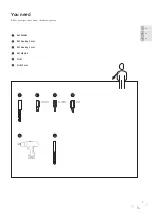
Страница 9: ...9 EN DE NL 04 05 06 4 mm 5 mm 1 2 3 4 5 6 20 You need DE Das ben tigen Sie au erdem NL Benodigdheden Bit holder Bit hex key 4 mm Bit hex key 5 mm Bit ttap 20 Drill Drill 3 mm 1 2 3 4 5 6...

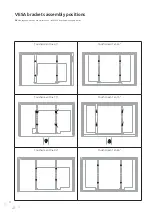
Страница 10: ...ckets assembly positions DE Montagepositionen Vesa Halterungen NL VESA brackets montage posities Touchscreen One 65 Touchscreen Ten 65 Touchscreen One 75 Touchscreen Ten 75 Touchscreen One 86 Touchscr...

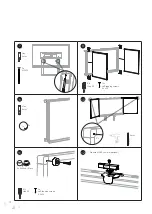
Страница 11: ...nsion Kit DE Installation Whiteboard Extension Kit NL Installatie Whiteboard extension kit 8x M6x60 8x M6x20 8x M6x20 2x M6x20 Hex 4mm Hex 5mm Hex 4mm Hex 4mm Hex 4mm 4x M8x20 Supplied with Prowise To...

Страница 12: ...12 2x M5x70 16x self tapping screws 4 5x25 2x self tapping screws 4 5x25 2x White or Black Bit ttap 20 Bit ttap 20 Hex 4mm 8x 3mm 2x Hex 4mm Prowise MOVE camera optional 7 9 11 8 10 12...

Страница 13: ...13 EN DE NL 04 05 06 Keyboard Tray G2 optional on G2 Lift Keyboard Tray G1 optional on G1 Lift 13 14...

Страница 14: ...14...

Страница 15: ...15...

Страница 16: ...16 www prowise com Let education speak...

Отзывы: