background image

Page 10 

IP CAMERA USER MANUAL 


2.2.1


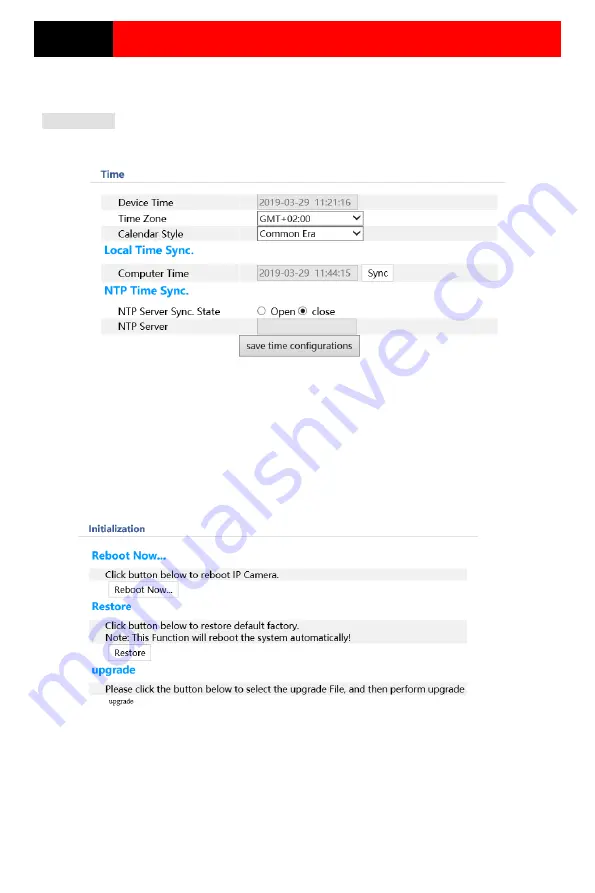
Date & Time Configuration 

Setting steps: 
1. Go to System Configuration 

Date & Time menu as shown below.   


2. Set the time zone.   
3. Change the time zone according to your location. You may synchronize the camera time 
with an NTP server (Internet connection required) or synchronize the camera time with the 
time of the computer you are using.


2.2.2 

12B

System Initialization


1. Go to System Configuration 

Initialization menu as shown below.   


2. Reboot Now – Reboot the camera 
 
3. Restore – restore the system to it’s default configuration. 
 
4. Upgrade – Choose an upgrade file to locally upgrade the camera. 


Содержание I3-330WIP536

Страница 1: ......

Страница 2: ...orized by a PROVISION ISR technician Keep away from heat sources such as radiators heat registers stove etc The instructions in this manual could be outdated if you need any clarifications you can contact an authorized PROVISION ISR technician PROVISION ISR reserves the right to add changes to this manual and publish it online on our website www provision isr com there may be inconsistencies with ...

Страница 3: ...e used together with Provision ISR s IP manager to enable the quick setting and full utilization of the camera 1 IE Remote Access You may connect IPC via LAN or WAN In this manual we will use IE v11 for example The details are as follows 2 1 Access through IP Manager Make sure the PC and IPC are connected to the LAN and that the IP Manager is installed on the PC You can install the IP manager form...

Страница 4: ...allation a login window will appear as shown below Input the username and password to log in 1 1 WAN Allows you to access the camera using a router or virtual server Make sure the camera is well connected and configured via LAN Log in the camera via LAN and go to the Setup Network Setup Local Setup tab Port to set up the port number In the menu modify the IP according to your needs The default use...

Страница 5: ...C IP address is 192 168 6 6 and the ports are default 9008 80 Router Setup Open the IE browser and input your WAN IP and HTTP port to access the camera 2 IPC Configuration In this chapter we will go through the configurations of the IPC 2 1 Video Configuration Camera Configuration includes five submenus Image Setup Video Stream OSD Config Video Mask and Motion Detection area configuration 2 1 1 Vi...

Страница 6: ...ly facilitate the image quality better in a constant bitrate but also help to calculate the capacity of the recording VBR Variable Bit Rate means that the compression bitrate can be automatically adjusted according to the change of the video resources with the configured bit rate as the maximum value This will help to optimize the storage network bandwidth Bitrate Per Second BPS Please set it acco...

Страница 7: ...ter Meaning Contrast Set the image contrast Brightness Set the image brightness Saturation Set the image saturation Hue Set the image hue Sharpness Enable Disable the sharpness and set its level Image Mirror Mirror the image horizontally Image Flip Flip the image vertically ...

Страница 8: ...Scene Mode Choose between Auto Indoor Outdoor White Balance Set the white balance of the camera IR Cut Mode Set the day night mode WDR Set WDR to deal with advanced light conditions WDR Range Set the WDR level Frequency Set the frequency to 50 60Hz 3D Denoise Strength Set the 3D noise reduction level ...

Страница 9: ... can set 4 mask areas at most To set up video mask 1 Enable video mask 2 draw the mouse to draw the video mask area 3 Click Save button to save the settings 4 Return to the live to see the following picture To clear the video mask Uncheck the Enable box ...

Страница 10: ... Video Config OSD menu to display the interface as shown below You may set the device name time stamp and custom OSDs here Drag the time stamp and custom OSD over the image on the left side to set their position Then press the Save button to save the settings ...

Страница 11: ... 1 Drag the mouse to draw the area that you wish to motion detection will be applied in 2 Click the Save button to save the settings 3 Click on Clear Area to clear the detection area 2 2 System Setup The System Configuration includes four submenus Basic Information Date Time and Local Config ...

Страница 12: ...ou may synchronize the camera time with an NTP server Internet connection required or synchronize the camera time with the time of the computer you are using 2 2 2 12BSystem Initialization 1 Go to System Configuration Initialization menu as shown below 2 Reboot Now Reboot the camera 3 Restore restore the system to it s default configuration 4 Upgrade Choose an upgrade file to locally upgrade the c...

Страница 13: ...The current software version Hardware version The hardware version of the device Release Time The software build date 5 Q A 1 Q How to find my password if I forget it A The default username is admin and the default password is 123456 If you have changed the password and you can t remember it use the physical reset button on the camera Press and hold for few second User name admin Password 123456 2...

Страница 14: ...controls Please perform the following steps Open IE browser Click Tools Internet Options Select Security Custom Level Refer to Fig 4 1 Enable all the sub options under ActiveX controls and plug ins Refer to Fig 4 2 Fig 4 1 Fig 4 2 Click ok to finish setup b Other plug ins or anti virus blocks ActiveX Please uninstall or close them ...

Отзывы: