protech MH-5100 Скачать руководство пользователя страница 87

Chapter  5  BIOS  Setup 


MH-5100 SERIES USER MANUAL


Page: 5-5


Press 

<Esc>

  (the  one  that  shares  the  decimal  point  at  the  bottom  of  the  number 

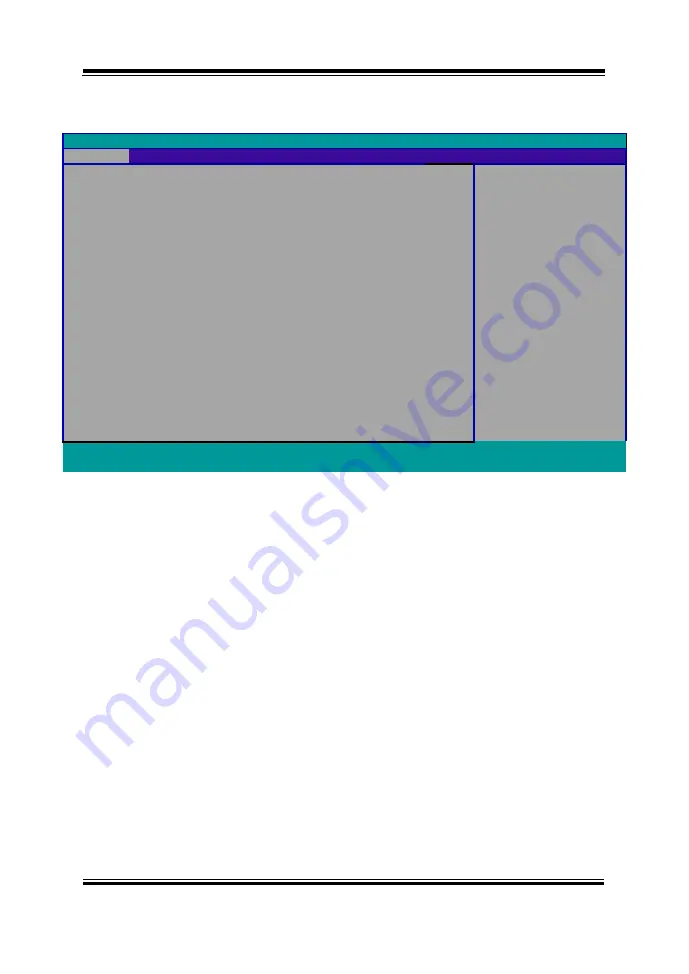
keypad)  to  select  SCU  icon  to  access  the  Setup  program.  In  a  moment,  the  main 
menu of the Insyde Setup Utility will appear on the screen: 

                                                InsydeH20 Setup Utility                                                      Rev. 5.0 

Main 

Advanced 

Security


Boot


Exit


BIOS Version                          51000PTA 

Select the current default 
language used by the 
InsydeH20. 

Build Date   

05/11/2017 

Build Time                             

14:10:19 

MCU Version: 

170210 

Processor Type                      Intel®  Atom

™ CPU Z3735F @ 1.33 GHz 

System Bus Speed                  83 MHz 
System Memory Speed 

1333 MHz 

Cache RAM 

1024 KB 

Total Memory 

2048 MB 


eMMC Total Size: 

32 GB 


VGFX value: 

1.00 


VCore value: 

0.71 


VDDR value: 

1.350 

Language 

<English> 

System Time 

[10:50:39] 

System Date 

[12/14/2016] 

F1

    Help                   



Select Item                   

F5/F6

 Change Values               

F9

 Setup Defaults 

Esc

 Exit                       



Select Menu             

Enter

 Select 

►SubMenu       


F10

 Save and Exit 

BIOS Setup Menu Initialization Screen 


You  may  move  the  cursor  by  <↑>  and  <↓>  keys  to  highlight  the  individual  menu 
items. As you highlight each item, a brief description of the highlighted selection will 
appear at the bottom of the screen. 


The language of the BIOS setup menu interface and help messages are shown in US 
English. You may use <↑> or <↓> key to select among the items and press <Enter> to 
confirm  and  enter  the  sub-menu.  The  following  table  provides  the  list  of  the 
navigation keys that you can use while operating the BIOS setup menu. 

Содержание MH-5100

Страница 1: ...USER MANUAL MH 5100 10 1 Integrated Pad Powered By Intel AtomTM MH 5100 M1...

Страница 2: ...r transmit in any form or by any means electronic or mechanical including photocopying and recording DISCLAIMER This user s manual is meant to assist users in installing and setting up the system The...

Страница 3: ...t FCC Caution Any changes or modifications not expressly approved by the party responsible for compliance could void the user s authority to operate the equipment The antenna s used for this transmitt...

Страница 4: ...the FCC and can be found under the Display Grant section of www fcc gov oet ea fccid after searching on FCC ID 2AMRAMH5100 CAUTION Danger of explosion may occur when the battery is incorrectly replace...

Страница 5: ...2 Rear View 2 5 2 3 3 Side View 2 6 2 3 4 Top View 2 6 2 3 5 Bottom View 2 7 2 3 6 Quarter View 2 8 2 4 Quick Setup 2 9 2 4 1 Turning the Power On from Pad and Connect to Wi Fi 2 9 2 4 2 Turning the P...

Страница 6: ...on 3 2 3 1 2 DC IN Port 3 2 3 1 3 USB Port 3 2 3 1 4 Audio Port 3 3 3 2 Lite Cradle I O Ports Diagram 3 3 3 2 1 I O Ports Diagram 3 3 3 3 Pad Main Board Component Locations 3 4 3 3 1 Top View of Pad M...

Страница 7: ...rd Connector 3 15 3 5 18 CCD Front Camera Connector 3 16 3 5 19 USB 2 0 Connector 3 16 3 5 20 MSR Connector 3 17 3 5 21 SCR Connector 3 17 3 5 22 SIM Card Connector 3 18 3 6 Daughter Board MR 5100RA 5...

Страница 8: ...Software Installation Utility 4 3 4 3 Installing Audio Realtek Software Installation Utility 4 5 4 4 Installing G Sensor Software Installation Utility 4 12 4 5 Installing Bluetooth Software Installati...

Страница 9: ...ploded Diagram For Camera Module Barcode Scanner Module Assembly A 5 Exploded Diagram For Back Cover Assembly A 6 Exploded Diagram For Smart Card Reader Assembly A 7 Lite Cradle Exploded Diagrams A 8...

Страница 10: ...vi Revision History The revision history of MH 5100 User Manual is described below Version No Revision History Date 1 0 Initial Release 8 14 2017...

Страница 11: ...5100 SERIES USER MANUAL Page 1 1 1 Introduction This chapter provides the introduction for the MH 5100 system as well as the framework of the user manual The following topic is included About This Man...

Страница 12: ...em specifications It also includes the physical illustrations and quick setup for the MH 5100 system Read the safety reminders carefully on how to take care of your system properly Chapter 3 System Co...

Страница 13: ...Lite Cradle together and place the system set on the desktop for user application needs This chapter describes the package contents system diagrams and outlines the system specifications The followin...

Страница 14: ...isted below are damaged or lost please contact your local distributor immediately Item Q ty MH 5100 Integrated Pad 1 Quick Reference Guide 1 AC Power Adapter for Pad 1 Hand Strap optional 1 Neck Strap...

Страница 15: ...Chapter 2 Getting Started MH 5100 SERIES USER MANUAL Page 2 3 2 2 Pad System Overview Unit mm 2 2 1 Front View 2 2 2 Rear View MSR Smart Card Reader Camera Battery Pack...

Страница 16: ...2 Getting Started MH 5100 SERIES USER MANUAL Page 2 4 2 2 3 Side View 2 2 4 Top View 2 2 5 Bottom View Scan Button Scan Button Power Button USB Port DC IN 25 2 POGO Pins 17 7 MSR Barcode Scanner Earph...

Страница 17: ...Chapter 2 Getting Started MH 5100 SERIES USER MANUAL Page 2 5 Unit mm 2 3 Lite Cradle System Overview 2 3 1 Front View 2 3 2 Rear View IN 12V COM DWR LAN USB COM...

Страница 18: ...Chapter 2 Getting Started MH 5100 SERIES USER MANUAL Page 2 6 2 3 3 Side View 2 3 4 Top View Kensington Lock Slot 217 23 131 65...

Страница 19: ...Chapter 2 Getting Started MH 5100 SERIES USER MANUAL Page 2 7 2 3 5 Bottom View LAN and Cash Drawer Selection DWR LAN...

Страница 20: ...Chapter 2 Getting Started MH 5100 SERIES USER MANUAL Page 2 8 2 3 6 Quarter View...

Страница 21: ...if it shows grey to activate Wi Fi Step 3 Select a Wi Fi network from the list and tap on it Step 4 Tap the Connect button Step 5 Enter the correct security key for the selected Wi Fi network and wait...

Страница 22: ...switch it to the LAN port location See the picture below Press the Power Button on the right side of the Pad to turn on the system Connect the Ethernet cable to the LAN port on the rear side of the Li...

Страница 23: ...5 Slide the left side battery switch to the right to secure and lock up the replaced battery Note 1 The factory default battery cycle life guarantees to retain 80 percent of its original capacity afte...

Страница 24: ...e right side of the Pad Refer to the Side View section of Pad for the location of the DC IN Jack Step 2 Plug the other end to an AC power outlet MH 5100 Pad battery will then start charging and the Po...

Страница 25: ...rom the bottom side of Pad align the two locking tabs located on both side of the POGO pins to their mating slots located inside of Lite Cradle base respectively Step 2 Lock the two locking tabs of Pa...

Страница 26: ...ER MANUAL Page 2 14 2 4 7 Separating Integrated Pad From Lite Cradle Step 1 Push down the Lock Switch on the front of Lite Cradle Step 2 Separate the integrated pad from the lite cradle See the pictur...

Страница 27: ...he Pad Refer to the Side View section of Pad for the location of the Scan Button Step 2 Point the Barcode Scanner at the barcode or QR code that you want to scan and position the light beam on the bar...

Страница 28: ...et onto the strap bracket holes on the back cover Step 2 Ready to hold the hand strap attached on the strap brackets to lift up the Pad with your hand Note The strap bracket set is pre installed for e...

Страница 29: ...umper rubber and adjust to tighten the neck strap Step 2 Insert another end of the neck strap through the upper opening of the left side bumper rubber and adjust to tighten the neck strap Step 3 Put t...

Страница 30: ...or Base Frequency 1 33 GHz Up to 1 83 GHz Chipset Intel Platform Built in CPU Memory DDR3L on Board 2GB DDR3L PMIC or EC Type TI Interface I2C Charger Type TI Interface I2C Storage eMMC Type 32GB 64GB...

Страница 31: ...ry error flashing Red light Power Supply Type DC 12V 2A 24W for USB Cradle Operating System OS Windows 10 IoT Enterprise LTSB 2016 OS 32 bits Dimension L x W x T 259 9 x 175 9 x 17 7mm Weight Pad only...

Страница 32: ...t AAMVA JIS II format support single dual triple tracks Interface USB Smart Card Reader Module Type Smart Card Reader optional USB port co layout with 3G meet ISO 7816 EMV Level 1 2 Certification Inte...

Страница 33: ...V 5V RI x 1 LAN 10 100 Mbps or DWR Cash Drawer Type RJ 45 x 1 Type RJ 11 with 12V 1A x 1 DIP Switch LAN Port and Cash Drawer selection Kensington Security Lock Slot Type 1 Lock Switch Fixing between I...

Страница 34: ...Chapter 2 Getting Started MH 5100 SERIES USER MANUAL Page 2 22 2 7 OS Specifications OS Description Windows 10 IoT Enterprise LTSB 2016 Supports 32 bits...

Страница 35: ...has been left outdoors in a cold winter day Avoid moving the system rapidly from a hot place to a cold place and vice versa because condensation may occur inside the system Do not place the system too...

Страница 36: ...tions are included Pad Function Buttons and I O Ports Lite Cradle I O Ports Diagram Pad Main Board Component Locations Pad Main Board Connectors Quick Reference Table Setting Pad Main Board Connectors...

Страница 37: ...ASSIGNMENT Press 0V Release 2 8V 3 1 2 DC IN Port Port Name DC IN Description DC Power In Port The DC IN Port is located on the right side of the Pad PIN ASSIGNMENT PIN ASSIGNMENT 0 12V 2 GND 1 12V 3...

Страница 38: ...Description Audio Port located on the top right side of the Pad PIN ASSIGNMENT 1 LEFT 2 RIGHT 3 GND 4 MIC 5 HP_DET 3 2 Lite Cradle I O Ports Diagram 3 2 1 I O Ports Diagram The I O ports are located o...

Страница 39: ...you are working with the connectors on the main board Make sure both the system and the external devices are turned OFF as sudden surge of power could ruin sensitive components Make sure MH 5100 is p...

Страница 40: ...Chapter 3 Hardware Configuration MH 5100 SERIES USER MANUAL Page 3 5 3 3 2 Bottom View of Pad Main Board Component Locations Figure 3 2 MB 5100 Main Board Component Locations Bottom View...

Страница 41: ...Battery Connector BAT2 Earphone Jack Connector CN_JACK1 Speaker Connector SPK1 Barcode Connector CN_BARCODE Left Scan Button BUTTON1 Right Scan Button BUTTON2 Power Button BUTTON4 Battery Connector BA...

Страница 42: ...iption Touch Panel Connector PIN ASSIGNMENT 1 V3P3S_TCH 2 GND 3 GND 4 I2C2_Touch_SCL 5 I2C2_Touch_SDA 6 GND 7 TOUCH_INT_R 8 TOUCH_RST_R 3 5 2 NFC Connector Connector Location NFC1 rear side of mainboa...

Страница 43: ...3 5 3 Flash Descriptor Override Selection Connector Location JP1 rear side of mainboard Description Flash BIOS Connector PIN ASSIGNMENT PIN ASSIGNMENT 1 SPI_VDD 2 GND 3 SPI_CS0J_R 4 SPI_CLK_R 5 SPI_MI...

Страница 44: ...cription LVDS Low Voltage Differential Signaling Connector PIN ASSIGNMENT 1 NC 2 LVDS_VCC 3 LVDS_VCC 4 NC 5 NC 6 NC 7 NC 8 LVDS_A_N0 9 LVDS_A_P0 10 GND 11 LVDS_A_N1 12 LVDS_A_P1 13 GND 14 LVDS_A_N2 15...

Страница 45: ...nnector Location BAT2 rear side of mainboard Description RTC Real Time Clock Battery Connector The RTC battery provides power supply for the internal real time clock and calendar PIN ASSIGNMENT 2 GND...

Страница 46: ...Description Speaker Connector PIN ASSIGNMENT PIN ASSIGNMENT 1 LEFT_SPK 2 RIGHT_SPK 3 5 8 Barcode Scanner Connector Connector Location CN_BARCODE rear side of mainboard Description Barcode Scanner Con...

Страница 47: ...ription Left Scan Button PIN ASSIGNMENT 1 GND 2 SCAN_EN_SW 3 5 10 Right Scan Button Connector Location BUTTON2 top side of mainboard Description Right Scan Button PIN ASSIGNMENT 1 GND 2 SCAN_EN_SW 3 5...

Страница 48: ...n BAT1 rear side of mainboard Description Battery Connector PIN ASSIGNMENT 1 BT 2 BT 3 BAT1_SENSE 4 BAT_DET 5 GND 6 BAT_SCL 7 BAT_SDA 8 GND 3 5 13 DC IN Jack Connector Connector Location DC_IN1 top si...

Страница 49: ...oard Description Cradle Connector PIN ASSIGNMENT 1 GND 2 CRA_DCIN 3 CRA_DCIN 4 GND 5 USB_DP 6 USB_DP 7 USB_DN 8 USB_DN 9 V5P0S 10 GND 3 5 15 MCU F W Update Connector Connector Location JP5 rear side o...

Страница 50: ...e of mainboard Description Battery Lock Switch Button PIN ASSIGNMENT PIN ASSIGNMENT 3 NC 1 GND 4 NC 2 BAT_LOCK 3 5 17 MicroSD Card Connector Connector Location J2 rear side of mainboard Description Mi...

Страница 51: ...tor Location CCM1 rear side of mainboard Description CCD Charge coupled Device Front Camera Connector PIN ASSIGNMENT 5 GND 4 GND 3 CCM_DP 2 CCM_DN 1 VCAM 3 5 19 USB 2 0 Connector Connector Location US...

Страница 52: ...ctor Location MSR1 rear side of mainboard Description MSR Magnetic Stripe Card Reader Connector PIN ASSIGNMENT 1 VCC 2 MSR_DN 3 MSR_DP 4 GND 5 GND 3 5 21 SCR Connector Connector Location SCR1 rear sid...

Страница 53: ...USER MANUAL Page 3 18 3 5 22 SIM Card Connector Connector Location SIM1 rear side of mainboard Description SIM Subscriber Identity Module Card Connector PIN ASSIGNMENT PIN ASSIGNMENT C5 GND C1 VSIM C...

Страница 54: ...R 5100RA 5 JP_COM1 COM2 Port Pin9 Definition Selection Guide MR 5100RA 5 JP_COM2 CONNECTOR Description NAME COM Port Connector RJ45 COM1 COM Port Connector D Sub 9 COM2 Universal Serial Bus 2 0 Connec...

Страница 55: ...t placement has been used by Pad system JP_COM1 Pin9 RI 5V 12V JP_COM2 Pin9 RI 5V 12V 5 5 6 6 RI 12V 5V RI 12V 5V default default 6 10 1 5 U8 JP1 EEPROM_CN1 10 24 ESD4 6 U12 JP3 U1 1 5 U13 48 Y1 1 U6...

Страница 56: ...ottom View 3 6 2 Daughter Board MR 5100RA 2 Connectors Location Figure 3 4 MR 5100RA 2 Daughter Board Component Locations Top View Figure 3 5 MR 5100RA 2 Daughter Board Component Locations Bottom View...

Страница 57: ...00RA 5 Connectors and Jumpers 3 7 1 COM1 COM2 Port Pin9 Definition Selection Guide Jumper Location JP_COM1 and JP_COM2 Description COM1 COM2 Port Pin9 RI 5V 12V Selection SELECTION JUMPER SETTING JUMP...

Страница 58: ...per setting Default setting is RI Please see COM1 COM2 Port Pin9 Definition Selection Guide section for selection details 3 7 3 D Sub 9 COM Port COM2 COM2 RS 232 D Sub 9 Connector Pin Assignment PIN A...

Страница 59: ...rt is located on the bottom side of Lite Cradle PIN ASSIGNMENT 1 VCC12V 2 GND 3 GND 3 7 5 Dual USB Ports Port Name USB1 Description Dual USB 2 0 Type A Connectors PIN ASSIGNMENT PIN ASSIGNMENT 1 VCC5V...

Страница 60: ...12 VCC3 3V 13 LINK_ACT_LED 14 VCC3 3V LAN LED Status There are 2 LAN LED indicators for LAN on the bottom side of the Lite Cradle By observing their status you can know the status of the Ethernet conn...

Страница 61: ...rawer Port PIN ASSIGNMENT 1 GND 2 DRAWER_OPEN 3 DRAWER_SENSE 4 VCC12V 5 NC 6 GND 3 7 8 LAN Port Cash Drawer Function Switch Connector Name SW1 Description LAN Port and Cash Drawer function selection 1...

Страница 62: ...UAL Page 3 27 3 8 Setting Daughter Board MR 5100RA 2 Connectors 3 8 1 Lite Cradle Connector Connector Name CRADLE1 Description Lite Cradle Connector PIN ASSIGNMENT 1 GND 2 CRA_DCIN 3 CRA_DCIN 4 GND 5...

Страница 63: ...r utilities for the system The following topics are included Installing Intel Chipset Software Installation Utility Installing Audio Realtek Software Installation Utility Installing G Sensor Software...

Страница 64: ...PIO I2C MBI PMIC Sensor TXEI UART WCE TXE C MH 5100_v1 0 DRIVER Platform 2_Audio Win10 32Bit Realtek High Definition Audio System Software C MH 5100_v1 0 DRIVER Device 3_G sensor Win10 32Bit ST Microe...

Страница 65: ...l Chipset Components in the Device Manager The utility pack is to be installed only for Windows 10 series 32 bit Please follow the steps below to install 1 Enter the C MH 5100_v1 0 DRIVER Platform 1_M...

Страница 66: ...ility BM driver utility Camera driver utility DPTF driver utility GFX driver utility GPIO driver utility GPIOVirtual driver utility I2C driver utility MBI driver utility PMIC driver utility Sensor dri...

Страница 67: ...ver utilities Please follow the steps below 1 Enter the C MH 5100_v1 0 DRIVER Platform 2_Audio Win10 32Bit RTK_6_2_9600_4239_WHQL x86 folder where the Audio Realtek ALC5640 VB CG driver is located and...

Страница 68: ...Chapter 4 Software Utilities MH 5100 SERIES USER MANUAL Page 4 6...

Страница 69: ...5100 SERIES USER MANUAL Page 4 7 3 From Realtek I2S Audio Codec Properties window click Update Driver from the Driver tab to start updating the audio driver software for MH 5100 4 Click Browse my com...

Страница 70: ...Chapter 4 Software Utilities MH 5100 SERIES USER MANUAL Page 4 8 5 Click Let me pick from a list of device drivers on my computer 6 Click Have Disk...

Страница 71: ...7 Click Browse button to browse for the file directory where the Realtek I2S Audio Codec installation driver is located 8 Select C MH 5100_v1 0 DRIVER Platform 2_Audio Win10 32Bit RTK_6_2_9600_4239_W...

Страница 72: ...Chapter 4 Software Utilities MH 5100 SERIES USER MANUAL Page 4 10 9 Click OK 10 Click Next to continue the installation...

Страница 73: ...11 11 Windows has finished installing Realtek I2S Audio Codec driver software Click Close to complete 12 Go to Realtek I2S Audio Codec Properties window and select Driver tab and you will see the Rea...

Страница 74: ...r utilities 1 Enter the C MH 5100_v1 0 DRIVER Platform 3_G sensor Win10 32Bit 1_4 22 0063_signed STEP 1 folder 2 Click setup exe file for driver installation 3 Follow the on screen instructions to ins...

Страница 75: ...Chapter 4 Software Utilities MH 5100 SERIES USER MANUAL Page 4 13...

Страница 76: ...USER MANUAL Page 4 14 6 From STMicroelectronics 3 Axis Digital Accelerometer Properties window click Update Driver from the Driver tab to start install the G sensor driver software for MH 5100 7 Click...

Страница 77: ...Chapter 4 Software Utilities MH 5100 SERIES USER MANUAL Page 4 15 8 Click Let me pick from a list of device drivers on my computer 9 Click Have Disk button...

Страница 78: ...tton to browse for the file directory where the G sensor installation driver is located 11 Select C MH 5100_v1 0 DRIVER Device G sensor Win10 32Bit 2_Accel_SPB_SensorAPI_2 8 1 10 STEP 2 x86 folder fro...

Страница 79: ...Chapter 4 Software Utilities MH 5100 SERIES USER MANUAL Page 4 17 12 Click OK 13 Click Next to continue the installation...

Страница 80: ...Chapter 4 Software Utilities MH 5100 SERIES USER MANUAL Page 4 18 14 Windows has finished installing G sensor driver software Click Close to complete...

Страница 81: ...STMicroelectronics 3 Axis Digital Accelerometer Properties window and select Driver tab and you will see the STMicroelectronics G sensor driver utility has been updated Click Close to exit 16 Once the...

Страница 82: ...o install the Bluetooth driver 4 Once the installation is completed restart MH 5100 for the changes to take effects 4 6 Installing 3G Software Installation Utility Optional Please follow the steps bel...

Страница 83: ...em configurations via the BIOS Setup Utilities The information of the system configuration is saved in BIOS NVRAM so that the Setup information is retained when the system is powered off The BIOS Setu...

Страница 84: ...terface consists of data tables that contain platform related information boot service calls and runtime service calls that are available to the operating system and its loader These provide standard...

Страница 85: ...rs can access the BIOS setup menu by pressing Del or Esc immediately while the POST message is running before the operating system is loading All the menu settings are described in details in this cha...

Страница 86: ...Chapter 5 BIOS Setup MH 5100 SERIES USER MANUAL Page 5 4 Figure 5 3 Front Page Screen...

Страница 87: ...l Memory 2048 MB eMMC Total Size 32 GB VGFX value 1 00 VCore value 0 71 VDDR value 1 350 Language English System Time 10 50 39 System Date 12 14 2016 F1 Help Select Item F5 F6 Change Values F9 Setup D...

Страница 88: ...d menu to the left or right and Select a different item move the cursor from the selected item upwards or downwards Enter Execute the command or select the sub menu F1 Help F5 F6 Change values F9 Load...

Страница 89: ...l Memory 2048 MB eMMC Total Size 32 GB VGFX value 1 00 VCore value 0 71 VDDR value 1 350 Language English System Time 10 50 39 System Date 12 14 2016 F1 Help Select Item F5 F6 Change Values F9 Setup D...

Страница 90: ...ent VGFX voltage VCore value No changeable options Displays the current VCore voltage VDDR value No changeable options Displays the current VDDR voltage Language English Francais Chinese Japanese End...

Страница 91: ...xit NFC Selection Disabled Enable to turn on this device on O S Disable to turn off this device on O S USB Configuration F1 Help Select Item F5 F6 Change Values F9 Setup Defaults Esc Exit Select Menu...

Страница 92: ...Controller Interface Controller and xHCI Mode InsydeH20 Setup Utility Rev 5 0 Advanced xHCI Controller Enabled xHCI Mode Enabled F1 Help Select Item F5 F6 Change Values F9 Setup Defaults Esc Exit Sele...

Страница 93: ...and then configure a user password A supervisor has much more privileges over the settings in the Setup utility than a user Heed that a user password does not provide access to most of the features i...

Страница 94: ...Page 5 12 BIOS Setting Options Description Purpose Set Supervisor Password Password can be 1 20 alphanumeric characters Specifies the administrator password Set User Password Password can be 1 20 alph...

Страница 95: ...o skip certain tests while booting This will decrease the time needed to boot up the system Quick Boot Enabled Quiet Boot Enabled Network Stack Enabled PXE Boot capability Disabled Add Boot Options Au...

Страница 96: ...FI PXE IPv4 IPv6 Legacy Legacy PXE OPROM only Add Boot Options First Last Auto Position in Boot order for shell Network and Removables ACPI Selection Acpi 1 0B Acpi 3 0 Acpi 4 0 Acpi 5 0 Selects booti...

Страница 97: ...devices InsydeH20 Setup Utility Rev 5 0 Boot EFI Windows Boot Manager EFI USB Device SanDisk F1 Help Select Item F5 F6 Change Values F9 Setup Defaults Esc Exit Select Menu Enter Select SubMenu F10 Sa...

Страница 98: ...select Exit Discarding Changes from this menu or simply press Esc to exit the BIOS setup Load Optimal Defaults You may simply press F9 at any time to load the Optimized Values which resets all BIOS s...

Страница 99: ...e 5 17 BIOS Setting Options Description Purpose Exit Discarding Changes No changeable options Exits and discard Changes done so far to any of the setup options Load Optimal Defaults No changeable opti...

Страница 100: ...d Exploded Diagram for Top Cover Touch Panel and Panel Assembly Exploded Diagram for Pad PCBAAssembly Exploded Diagram for Bottom Cover Assembly Exploded Diagram for Camera Module Barcode Scanner Modu...

Страница 101: ...y ITEM Description Part No Q ty 1 Touch Panel 52 380 14164023 1 2 Panel 52 351 12101028 1 3 MH 5100 Top Cover 30 002 12210378 1 4 MH 5100 Bumper Right 30 013 48300378 1 5 MH 5100 Bumper Left 30 013 48...

Страница 102: ...der 20 029 34001378 1 2 Round Head With Spring Washer Screw M2 5x0 45Px6mm 22 235 25006011 7 3 MH 5100 PCBA N A 1 4 Round Head With Spring Washer Screw M2x0 4Px5mm 22 232 20005311 11 5 Sub Battery 27...

Страница 103: ...ook Lock 90 019 04210378 1 5 MH 5100 Battery Lock Spring 23 002 00000332 1 6 Round Washer Head Screw 1 T2 0x5mm 22 132 20005011 2 7 MH 5100 MSR Bumper Rubber 30 013 48100378 1 8 MSR Module 52 551 0204...

Страница 104: ...ad Screw 3 3 1 M2x0 4Px4mm 22 232 20004811 2 3 Barcode Module 52 820 36800111 1 4 MH 5100 Barcode Fix Plate 80 005 03001378 1 5 Fillister Head Screw T1 7xL4mm 22 175 17004011 2 6 Round Head With Sprin...

Страница 105: ...Part No Q ty 1 MH 5100 Decoration Cover 30 002 28110378 1 2 Round Head With Spring Washer Screw M2 5x0 45Px6mm 22 235 25006011 11 3 MH 5100 Screw Hole Plug 30 013 06100378 9 4 MH 5100 Strap Bracket 8...

Страница 106: ...loded Diagram For Smart Card Reader Assembly ITEM Description Part No Q ty 1 MH 5100 Smart Card Cover 30 002 28610378 1 2 Round Head Screw 3 3 1 M2x0 4Px4mm 22 232 20004811 2 3 Smart Card Module 52 55...

Страница 107: ...Appendix A System Diagrams MH 5100 SERIES USER MANUAL Page A 8 Lite Cradle Exploded Diagrams Exploded Diagram For Cradle Top Cover Assembly...

Страница 108: ...025 1 5 MH 5100 Lite Cradle Hole Cover 30 002 28510378 1 6 Pan Head screw T2 0x4mm 22 125 20004011 2 7 MH 5100 Lite Cradle Ejection Spring 23 000 00010622 1 8 MH 5100 Lite Cradle Lock Button 30 046 09...

Страница 109: ...adle PCBA Bottom Cover Assembly ITEM Description Part No Q ty 1 MH 5100 Lite Cradle Metal Plate 80 005 03003378 1 2 Lite Cradle PCBA N A 1 3 Round Washer Head Screw M3x0 5Px6mm 22 232 30006311 4 4 T2...

Страница 110: ...Page B 1 Appendix B Technical Summary This appendix will give you a brief introduction of the allocation maps for MH 5100 resources The following topics are included Interrupt Map I O Map Memory Map S...

Страница 111: ...Audio Device WDM IRQ 28 Intel R SST Audio Device WDM IRQ 29 Intel R SST Audio Device WDM IRQ 32 I2C Controller IRQ 33 I2C Controller IRQ 34 I2C Controller IRQ 35 I2C Controller IRQ 36 I2C Controller I...

Страница 112: ...IRQ 66 Microsoft ACPI Compliant System IRQ 67 Intel R Power Management IC Device IRQ 67 Intel R Power Management IC Device IRQ 67 Intel R Power Management IC Device IRQ 67 Microsoft ACPI Compliant Sy...

Страница 113: ...al Framework Processor Participant Driver IRQ 86 Microsoft ACPI Compliant System IRQ 87 Microsoft ACPI Compliant System IRQ 88 Microsoft ACPI Compliant System IRQ 89 Microsoft ACPI Compliant System IR...

Страница 114: ...IRQ 111 Microsoft ACPI Compliant System IRQ 112 Microsoft ACPI Compliant System IRQ 113 Microsoft ACPI Compliant System IRQ 114 Microsoft ACPI Compliant System IRQ 115 Microsoft ACPI Compliant System...

Страница 115: ...IRQ 137 Microsoft ACPI Compliant System IRQ 138 Microsoft ACPI Compliant System IRQ 139 Microsoft ACPI Compliant System IRQ 140 Microsoft ACPI Compliant System IRQ 141 Microsoft ACPI Compliant System...

Страница 116: ...IRQ 163 Microsoft ACPI Compliant System IRQ 164 Microsoft ACPI Compliant System IRQ 165 Microsoft ACPI Compliant System IRQ 166 Microsoft ACPI Compliant System IRQ 167 Microsoft ACPI Compliant System...

Страница 117: ...IRQ 189 Microsoft ACPI Compliant System IRQ 190 Microsoft ACPI Compliant System IRQ 191 Microsoft ACPI Compliant System IRQ 192 Microsoft ACPI Compliant System IRQ 193 Microsoft ACPI Compliant System...

Страница 118: ...IRQ 266 Microsoft ACPI Compliant System IRQ 267 Microsoft ACPI Compliant System IRQ 268 Microsoft ACPI Compliant System IRQ 269 Microsoft ACPI Compliant System IRQ 270 Microsoft ACPI Compliant System...

Страница 119: ...IRQ 292 Microsoft ACPI Compliant System IRQ 293 Microsoft ACPI Compliant System IRQ 294 Microsoft ACPI Compliant System IRQ 295 Microsoft ACPI Compliant System IRQ 296 Microsoft ACPI Compliant System...

Страница 120: ...IRQ 327 Microsoft ACPI Compliant System IRQ 328 Microsoft ACPI Compliant System IRQ 329 Microsoft ACPI Compliant System IRQ 330 Microsoft ACPI Compliant System IRQ 331 Microsoft ACPI Compliant System...

Страница 121: ...IRQ 353 Microsoft ACPI Compliant System IRQ 354 Microsoft ACPI Compliant System IRQ 355 Microsoft ACPI Compliant System IRQ 356 Microsoft ACPI Compliant System IRQ 357 Microsoft ACPI Compliant System...

Страница 122: ...IRQ 379 Microsoft ACPI Compliant System IRQ 380 Microsoft ACPI Compliant System IRQ 381 Microsoft ACPI Compliant System IRQ 382 Microsoft ACPI Compliant System IRQ 383 Microsoft ACPI Compliant System...

Страница 123: ...IRQ 405 Microsoft ACPI Compliant System IRQ 406 Microsoft ACPI Compliant System IRQ 407 Microsoft ACPI Compliant System IRQ 408 Microsoft ACPI Compliant System IRQ 409 Microsoft ACPI Compliant System...

Страница 124: ...IRQ 431 Microsoft ACPI Compliant System IRQ 432 Microsoft ACPI Compliant System IRQ 433 Microsoft ACPI Compliant System IRQ 434 Microsoft ACPI Compliant System IRQ 435 Microsoft ACPI Compliant System...

Страница 125: ...IRQ 457 Microsoft ACPI Compliant System IRQ 458 Microsoft ACPI Compliant System IRQ 459 Microsoft ACPI Compliant System IRQ 460 Microsoft ACPI Compliant System IRQ 461 Microsoft ACPI Compliant System...

Страница 126: ...IRQ 483 Microsoft ACPI Compliant System IRQ 484 Microsoft ACPI Compliant System IRQ 485 Microsoft ACPI Compliant System IRQ 486 Microsoft ACPI Compliant System IRQ 487 Microsoft ACPI Compliant System...

Страница 127: ...ompliant System IRQ 509 Microsoft ACPI Compliant System IRQ 510 Microsoft ACPI Compliant System IRQ 511 Microsoft ACPI Compliant System IRQ 1028 Broadcom Serial Bus Driver over UART Bus Enumerator IRQ...

Страница 128: ...0x00000035 Programmable interrupt controller 0x00000038 0x00000039 Programmable interrupt controller 0x0000003C 0x0000003D Programmable interrupt controller 0x00000040 0x00000043 System timer 0x00000...

Страница 129: ...4 0x000000A5 Programmable interrupt controller 0x000000A8 0x000000A9 Programmable interrupt controller 0x000000AC 0x000000AD Programmable interrupt controller 0x000000B0 0x000000B1 Programmable interr...

Страница 130: ...erface 0x90800000 0x9080FFFF Intel R USB 3 0 eXtensible Host Controller 1 0 Microsoft 0x90900000 0x90900FFF Intel R SST Audio Device WDM 0x90901000 0x90901FFF Intel R SD Host Controller 0x90908000 0x9...

Страница 131: ...xFED05000 0xFED057FF Intel R Dynamic Platform Thermal Framework Processor Participant Driver 0xFED0C000 0xFED0CFFF GPIO Controller 0xFED0D000 0xFED0DFFF GPIO Controller 0xFED0E000 0xFED0EFFF GPIO Cont...

Страница 132: ...he O S with USB storage device Windows 10 32 bits 4 Run the BIOS file e g 51000PT6 exe in USB storage device on O S Windows 10 32 bits 5 During the update procedure you will see the BIOS update proces...

Страница 133: ...Appendix B Technical Summary MH 5100 SERIES USER MANUAL Page B 24...

Отзывы: