background image

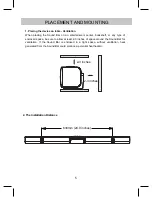
1. Placing the device on table - Ventilation

When placing the Sound Bar on an entertainment center, bookshelf, or any type of

enclosed space, be sure to allow at least 2-3 inches of space around the Sound Bar for

ventilation. If the Sound Bar is enclosed in a tight space, without ventilation, heat

generated from the Sound Bar could produce a potential heat hazard.

5

2-3 inches

2-3 inches

2. The Installation Distance

634mm (24.9 inches)

PLACEMENT AND MOUNTING

Содержание PSB378W

Страница 1: ...Please read this instruction manual carefully and keep it for future reference 37 Bluetooth Soundbar with Wireless Subwoofer MODEL PSB378W ...

Страница 2: ...ersons and must not be co located or operated in conjunction with any other antenna or transmitter FCC NOTE This equipment has been tested and found to comply with the limits for a Class B digital device pursuant to Part 15 of the FCC Rules These limits are designed to provide reasonable protection against harmful interference in a residential installation This equipment generates uses and can rad...

Страница 3: ...ed 2 Keep these instructions The safety and operating instructions should be kept for future reference 3 Heed all warnings All warnings on the appliance and in the operating instructions should be adhered to 4 Follow all instructions All operation and use instructions should be followed 5 Do not use this apparatus near water The appliance should not be used near water for example near a bath tub w...

Страница 4: ...ower supply cord or plug is damaged liquid has been spilled or objects have fallen into the apparatus the apparatus has been exposed to rain or moisture does not operate normally or has been dropped 15 This appliance should not be exposed to dripping or splashing water and no object filled with liquids such as vases should be placed on the apparatus 16 Power Sources The appliance should be connect...

Страница 5: ...losed space be sure to allow at least 2 3 inches of space around the Sound Bar for ventilation If the Sound Bar is enclosed in a tight space without ventilation heat generated from the Sound Bar could produce a potential heat hazard 5 2 3 inches 2 3 inches 2 The Installation Distance 634mm 24 9 inches PLACEMENT AND MOUNTING ...

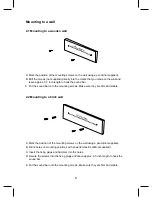
Страница 6: ...inch length to hook the sound bar C Put the sound bar onto the mounting screw s Make sure they are firm and stable A Mark the position of the mounting screw s on the w all using a pencil not supplied B Drill 2 holes on mounting positions w ith pow erful electric drill not supplied C Insert the fix ing plugs and hammer into the holes x ing x 0 3 inch length to hook the plugs and leav e appro E Put ...

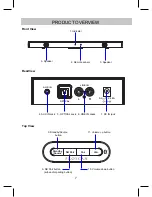
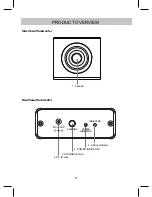
Страница 7: ...r 3 Speaker 4 AUX IN Jack 5 OPTICAL Jack 6 LINE IN Jacks 7 DC IN jack 8 Standby Source button 9 SB Pair button 10 Volume down button 11 Volume up button 7 PRODUCT OVERVIEW Vol Vol SB Pair Standby Source AUX IN LINE IN L R DC 12V 2 0A OPTICAL subw oofer pairing button ...

Страница 8: ...1 Speaker PRODUCT OVERVIEW INDICATOR POWER INDICATOR STANDBY DC 12V 2 DC IN Jack 3 STANDBY Button 4 POWER INDICATOR 5 Pairing Indicator RearViewofSubwoofer SideViewofSubwoofer 8 ...

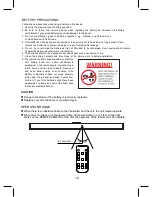
Страница 9: ...on OPEN OPEN 3V CR2025 3V CR2025 with the polarity markings facing upward as Fig 3 Fig 4 AUX OPTICAL LINE IN TALK MOVIE MUSIC Sound Mode VOL STANDARD 12 7 Bluetooth Button 8 OPTICAL Button 5 Sound Mode MUSIC TALK MOVIE STANDARD REMOTE CONTROL BATTERY INSTALLATION OF REMOTE CONTROL BATTERY REPLACING USING AT FIRST TIME Pull out the battery holder as Fig 2 Replace the old button cell with a new CR20...

Страница 10: ...contacts and also those of the device prior to battery installation 8 The remote control is supplied with a coin button cell battery If the coin button cell battery is swallowed it can cause severe internal burns in just 2 hours and can lead to death Keep new and used battery away from children If the Battery compartment does not close securely stop using the product and keep it away from children...

Страница 11: ... indicator on the SUBWOOFER will light up and turn RED 4 After a few seconds the Main Unit will be connected with SUBWOOFER automatically the pairing INDICATOR on SUBWOOFER will be solid BLUE IMPORTANT NOTE If the pairing INDICATOR on the SUBWOOFER is off it means the Main Unit is not connected with the SUBWOOFER successfully Please operate as the steps below A Press and hold the SB Pair button on...

Страница 12: ...ying Press the button on remote control to turn off sound the mode indicator on the Main Press the MUSIC button on remote control to turn to MUSIC sound effect mode Press the TALK button on remote control to turn to TALK sound effect mode Press the MOVIE button on remote control to turn to MOVIE sound effect mode Press the STANDARD button on remote control to turn to normal sound effect mode Press...

Страница 13: ...ack on the external audio player 5 Power on the connected external player and start playing the music as usual AUX IN OPERATION AUX IN LINE IN L R DC 12V 2 0A OPTICAL 3 Power on the Main Unit and SUBWOOFER and paired together as previous stated IN mode the mode indicator on the unit will turn Indigo Blue Green 4 Press the button on remote control or press the Standby Source button on Main Unit rep...

Страница 14: ... white 5 Power on the connected external player and start playing the music as usual red LINE IN OPERATION AUX IN LINE IN L R DC 12V 2 0A OPTICAL Line out jacks of TV DVD player etc L R Video 3 Power on the Main Unit and SUBWOOFER and paired together as previous stated LINE IN mode the mode indicator on the unit will turn Green 4 Press the button on remote control or press the Standby Source butto...

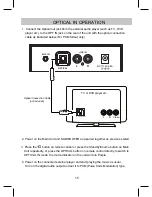
Страница 15: ...connection cable as illustated below For PCM format only OPTICAL OUT Optical Connection Cable TV or DVD player etc not included OPTICAL IN OPERATION AUX IN LINE IN L R DC 12V 2 0A OPTICAL 2 Power on the Main Unit and SUBWOOFER and paired together as previous stated OPTICAL IN mode the mode indicator on the unit will turn Purple 3 Press the button on remote control or press the Standby Source butto...

Страница 16: ...is too far from the unit Remote Control not functioning Out of working range The battery in the remote control is drained Point the remote control to the remote sensor on the unit within 16 feet 30 degress Replace with new battery No sound or sound weak Volume level in minimum position Raise the volume level by pressing the Vol Button on the unit or the SYMPTOM POSSIBLE CAUSE POSSIBLE SOLUTION No ...

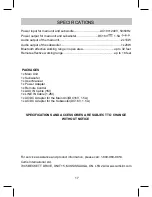
Страница 17: ...ote effective working range up to 16 feet PACKAGES 1x User Manual 1x Power Adapter 1x Remote Control 1x AUX IN Cable 1M 1x LINE IN Cable 1 2M 1x Main Unit For service assistance and product information please call 1 800 968 9853 Curtis International Ltd 7045 BECKETT DRIVE UNIT 15 MISSISSAUGA ON L5S 2A3 www curtisint com SPECIFICATIONS 1x AC DC Adapter for the Main Unit DC16V 1 5A 1x AC DC Adapter ...

Страница 18: ...ference that may cause undesired operation of the device French Le présent appareil est conforme aux CNR d Industrie Canada applicables aux appareils radio exempts de licence L exploitation est autorisée aux deux conditions suivantes 1 l appareil nedoit pas produire de brouillage et 2 l utilisateur de l appareil doit accepter tout brouillage radioélectrique subi même si le brouillage est susceptib...

Отзывы: