


5
6
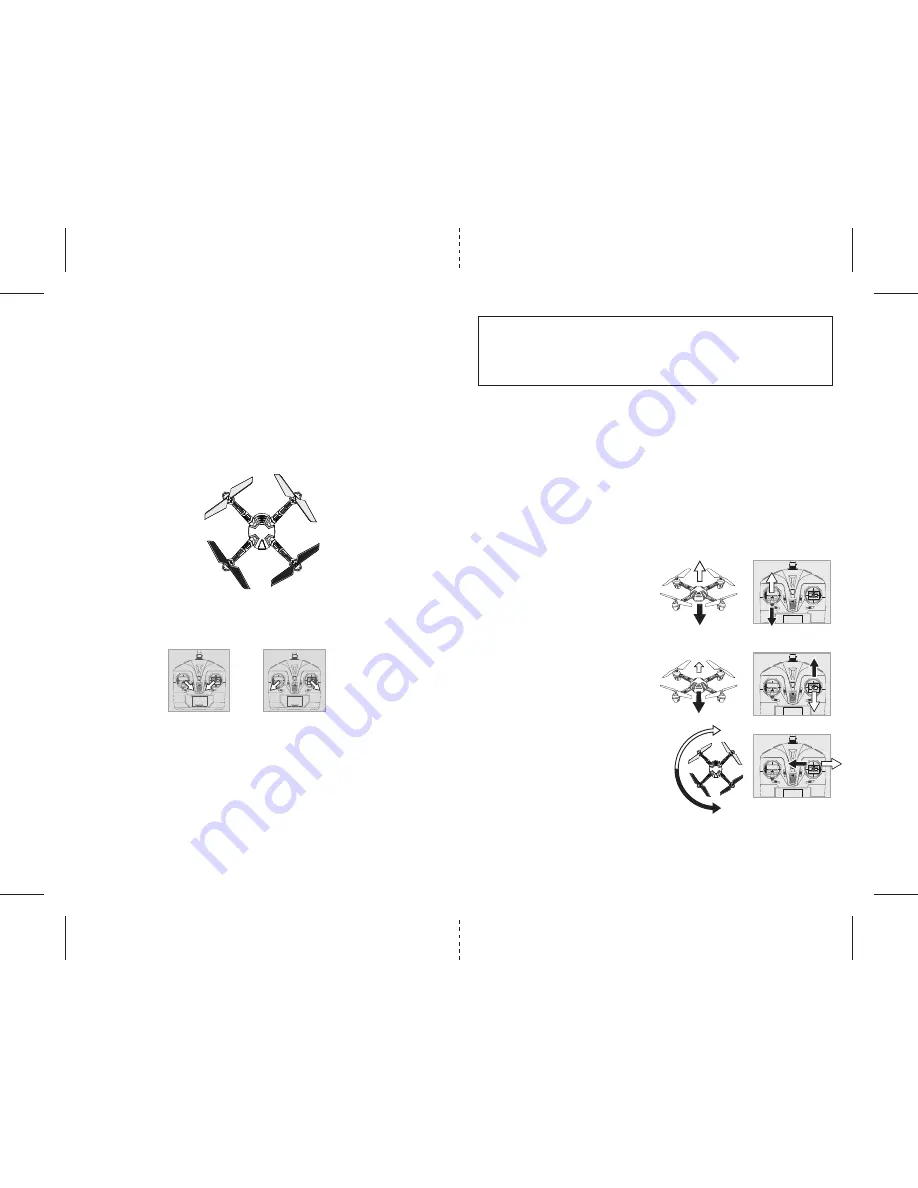
F
FRONT
REAR
L
M
N
3 CHANNEL FLIGHT CONTROL
Below is a list of basic flight functions for your long-range remote to control the ALTITUDE 2.0 Drone. While
learning to fly your ALTITUDE 2.0 Drone it is best to start in a large space until you get used to the basic
controls. As you master flying your ALTITUDE 2.0 Drone you can move to more advanced maneuvering
techniques. Practice makes perfect! When you have these basic steps down you can move to the next level.
Move the left Throttle stick up to increase the
propeller speed and the ALTITUDE 2.0 will
accelerate and ascend.
Move the left Throttle stick down to decrease the
propeller speed and the ALTITUDE 2.0 will
decelerate and descend (see diagram L).
While in the air, move the right Direction Stick up
and the ALTITUDE 2.0 will move forward.
Move the right Direction Control down and the
ALTITUDE 2.0 will move backward (see diagram M).
While in the air, move the right Direction Control left
and the ALTITUDE 2.0 will spin to the left.
Move the right Direction Control right and the
ALTITUDE 2.0 will spin to the right (see diagram N).
3 CHANNEL VS 4 CHANNEL FLYING
Propels unique “switch-blade” technology allows you to choose between 3ch or 4ch flight control modes.
Most people with no experience in flying multi copters may find 3ch easier to learn at first as controls are
set up to simply move forward, back, turn left and turn right. 4channel flying gives the operator ultimate
control by adding two more dimension of flight banking left and banking right.
• NOTE: The ALTITUDE 2.0 Drone’s default setting is 4 Channel mode.
To change to 3 Channel mode:
PRESS and hold the 3/4 CH. button (see remote diagram on pg 3), you will hear beep sounds and the screen
showing MODE 2 indicating the ALTITUDE 2.0 Drone now is set to 3 CH. mode.
To change back to 4 Channel mode:
PRESS and hold the 3/4 CH. button (see remote diagram on pg 3), you will hear beep sounds and the screen
showing MODE 1 indicating the ALTITUDE 2.0 Drone is now set to 4 CH. mode.
NOW YOU ARE READY TO FLY!
If you have successfully synced your ALTITUDE 2.0 drone to your controller as explained on page 4 you are
now ready to fly. Before beginning to fly your drone you should familiarize yourself with how to start and
stop the rotors, how to use your auto land feature and how the controls work so please carefully read and
familiarize yourself with various control features explain in the next two pages. Once again as a beginner
pilot you should learn how to control your drone in a large open field or park on a day with zero or very
light wind. Do not try to fly your Altitude 2.0 drone too high until you become a more experience pilot.
RECOGNIZING THE FRONT & BACK OF THE ALTITUDE 2.0 DRONE
Even though the ALTITUDE 2.0 has four rotors there is still a front or "forward" facing direction and "back"
or backwards facing direction. The forward Front and forward facing direction of the ALTITUDE 2.0 is the
side with two gray blades (see diagram F ). The rear and back of the Quadrocopter is the side with two black
propellers (see diagram F).
NOTE: The front of the Quadrocopter also displays WHITE LED light and the back of the Quadrocopter displays
RED LED lights.
HOW TO START/STOP ROTORS
Make sure you have properly synced the Altitude 2.0 drone and the power is on.
• To start and stop the rotors simply move the two control sticks either simultaneously down and to the
inside or down and to the outside corners and hold for one second (see illustration below).
• Once the rotors begin to spin release the control sticks and they will return to the center position. Now you
are ready for take-off.
SPEED SELECT BUTTON
The ALTITUDE 2.0 has 3 speed settings; SLOW (40%), MEDIUM (70%) and HIGH (100%). The Default setting
when you first turn on your ALTITUDE 2.0 Drone is the SLOW (40%) speed mode. To increase the speed
simply trigger the Speed setting button (see remote diagram on pg 3) you will hear a beep and the speed
setting indicator on screen will show you what speed setting you are on. Speed settings can be set before
flight or during the flight.
AUTO LAND BUTTON
The ALTITUDE 2.0 Drone has an auto land feature which allows you to land automatically. Simply press the
Auto Land Button for 1.5 seconds and your ALTITUDE 2.0 Drone will begin land itself.
Note: you can still control the direction while auto landing to avoid obstacles
Note: Either position will both start and stop the rotors so use the position you are most comfortable with.


