


C
1
2
TABLE OF CONTENTS
Product Features. . . . . . . . . . . . . . . . . . . . . . . . . . . . . . . . . . . . . . . . . . . . . . . . . . . . . . . . 2
Remote Control Battery Installation. . . . . . . . . . . . . . . . . . . . . . . . . . . . . . . . . . . . . . . . 2
Charging Your ORBIT™ HD Battery. . . . . . . . . . . . . . . . . . . . . . . . . . . . . . . . . . . . . . . . . 2
ORBIT™ HD Quadrocopter Diagram . . . . . . . . . . . . . . . . . . . . . . . . . . . . . . . . . . . . . . . . 3
Remote Control Diagram . . . . . . . . . . . . . . . . . . . . . . . . . . . . . . . . . . . . . . . . . . . . . . . . . 3
Remote LCD Diagram . . . . . . . . . . . . . . . . . . . . . . . . . . . . . . . . . . . . . . . . . . . . . . . . . . . . 3
Flight Preparation. . . . . . . . . . . . . . . . . . . . . . . . . . . . . . . . . . . . . . . . . . . . . . . . . . . . . . . 4
Syncing Your ORBIT™ HD. . . . . . . . . . . . . . . . . . . . . . . . . . . . . . . . . . . . . . . . . . . . . . . . . 4
Flying Tips . . . . . . . . . . . . . . . . . . . . . . . . . . . . . . . . . . . . . . . . . . . . . . . . . . . . . . . . . . . . . 4
How To Start/ Stop Rotors. . . . . . . . . . . . . . . . . . . . . . . . . . . . . . . . . . . . . . . . . . . . . . . . 5
Auto Start/land Button. . . . . . . . . . . . . . . . . . . . . . . . . . . . . . . . . . . . . . . . . . . . . . . . . . . 5
Speed Select Button . . . . . . . . . . . . . . . . . . . . . . . . . . . . . . . . . . . . . . . . . . . . . . . . . . . . . 5
Recognizing The Front & Back Of The ORBIT™ HD . . . . . . . . . . . . . . . . . . . . . . . . . . . . 5
4 Channel Flight Control. . . . . . . . . . . . . . . . . . . . . . . . . . . . . . . . . . . . . . . . . . . . . . . . . . 5
Adjusting Trim . . . . . . . . . . . . . . . . . . . . . . . . . . . . . . . . . . . . . . . . . . . . . . . . . . . . . . . . . 6
Level Surface Calibration . . . . . . . . . . . . . . . . . . . . . . . . . . . . . . . . . . . . . . . . . . . . . . . . . 6
Flight Environment . . . . . . . . . . . . . . . . . . . . . . . . . . . . . . . . . . . . . . . . . . . . . . . . . . . . . 7
Flight Practice . . . . . . . . . . . . . . . . . . . . . . . . . . . . . . . . . . . . . . . . . . . . . . . . . . . . . . . . . . 7
Performing a 360º Stunt Flip . . . . . . . . . . . . . . . . . . . . . . . . . . . . . . . . . . . . . . . . . . . . . 7
Trouble Shooting . . . . . . . . . . . . . . . . . . . . . . . . . . . . . . . . . . . . . . . . . . . . . . . . . . . . . . . 8
Attaching Camera . . . . . . . . . . . . . . . . . . . . . . . . . . . . . . . . . . . . . . . . . . . . . . . . . . . . . . . 8
Replacing The Propeller Blades. . . . . . . . . . . . . . . . . . . . . . . . . . . . . . . . . . . . . . . . . . . . 9
Warnings . . . . . . . . . . . . . . . . . . . . . . . . . . . . . . . . . . . . . . . . . . . . . . . . . . . . . . . . . . . . . . 10
Battery Warnings . . . . . . . . . . . . . . . . . . . . . . . . . . . . . . . . . . . . . . . . . . . . . . . . . . . . . . . 10
Care and Maintenance . . . . . . . . . . . . . . . . . . . . . . . . . . . . . . . . . . . . . . . . . . . . . . . . . . . 10
FCC Information . . . . . . . . . . . . . . . . . . . . . . . . . . . . . . . . . . . . . . . . . . . . . . . . . . . . . . . . 11
Thank you for purchasing the ORBIT™ HD 2.4 Ghz Quadrocopter. Please read this instruction booklet as it
contains valuable information on how to properly fly and care for your ORBIT™ HD Drone.
FEATURES
• 6 Axis Gyro For Extremely Stable Flight and Maneuverability
• Wide Range Digital Radio Allows Flight Range Up To 500 Feet
• 3 Speed Settings From Beginner To Advanced Pilots
• 360 Degree Push Button Stunt Rolls
• Air pressure sensors lock flight altitude for stable video footage
• Automatically lands with the push of a button
• 2.4 Ghz Controller, Replaceable Li-poly Battery and Additional Replacement Parts Included.
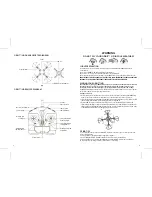
REMOTE CONTROL BATTERY INSTALLATION
1. Remove the battery cover from the back of the controller as shown in diagram A.
2. Install 6 “AA” fresh alkaline batteries into the controller as shown in diagram B. Make sure to install
batteries to their correct polarity. Do not mix old and new batteries or battery types.
3. Replace the battery cover.
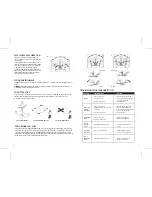
CHARGING YOUR ORBIT™ HD Li-POLY BATTERY
1. Slide the battery into the USB charger and then connect the MICRO USB cable to the charger
(see diagram C). Connect the universal end of the USB cable to your computer’s USB port.
CAUTION: Do not force battery into charger, improper connection may damage the ORBIT™ HD battery.
2. The indicator light will flash red while the unit is charging. When the RED Led light turns GREEN your
battery has a complete charge.
3. Average charging time is around 50 minutes untill fully charged.
4. A full charge will allow for about 7-10 minutes of flight time depending on environment and user input.
IMPORTANT: ALWAYS REMEMBER TO UNPLUG YOUR CHARGING CORD WHEN NOT IN USE!
1.5V
AA
1.5V
AA
1.5V
AA
1.5V
AA
1.5V
AA
1.5V
AA
A
B
6 1.5 volt “AA” Alkaline Batteries
Universal USB Charging Cable


