background image

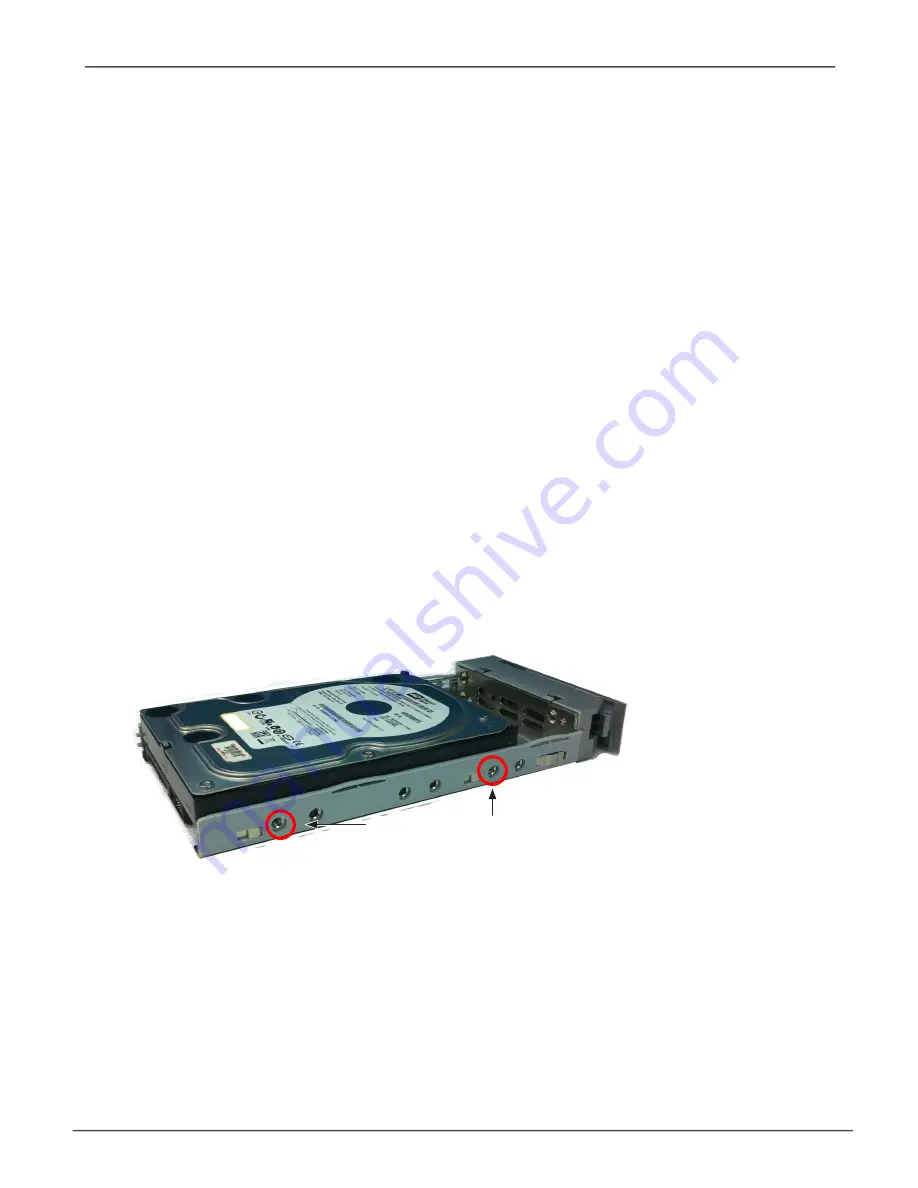
Hard disk drive mounted in a drive carrier

Counter-sink screws 

(two screws on each side)

i

nstalling

 3.5” d

isk

 d

riVe


in


tHe

 c

arrier

The instructions below apply 3.5” hard disk drives installed in drive carriers intended for use with models Vess 

A8020. 

1.  Remove a disk drive carrier.

2.  Carefully lay the disk drive into the drive carrier at the front, so that the screw holes on the sides line up 

correctly with the power and data connectors facing away from the carrier handle.

3.  Insert the screws through the holes in the drive carrier and into the sides of the disk drive.

Install only the counter-sink screws supplied with the drive.

• 

Install four screws per drive.

• 

Snug each screw. Be careful not to over-tighten.

4.  Reinstall the drive carrier into the  enclosure. 

12

Introduction

Vess A8020 Storage Appliance for Video Surveillance 


Содержание VES0709

Страница 1: ...Vess A8020 VES0709 Storage Appliance for Video Surveillance Product Manual Version 1 0 2020 Promise Technology All Rights Reserved ...

Страница 2: ...them Caution A Caution informs you of possible equipment damage or loss of data and how to avoid them Important An Important message calls attention to an essential step or point required to complete a task including things often missed Note A Note provides helpful information such as hints or alternative ways of doing a task Vess A8020 Storage Appliance for Video Surveillance ...

Страница 3: ...servicing this device Warning The electronic components within the Vess A8020 enclosure is sensitive to damage from Electro Static Discharge ESD Observe appropriate precautions at all times when handling the Vess A8020 or its subassemblies Promise Technology Product Manual ...

Страница 4: ...ugged into an extension cord or power strip does not exceed 80 percent of the ampere ratings limit for the extension cord or power strip Do not disable the power cord grounding plug The grounding plug is an important safety feature Plug the power cord into a grounded earthed electrical outlet that is easily accessible at all times Only a qualified technician who is familiar with fix up service pro...

Страница 5: ...適用於您的產品的電源線以及電氣上標註的電壓和電流產品的評級標籤 電源線的電壓 和電流額定值必須大於電壓和產品上標明的電流額定值 請勿拉扯電線或電纜 從電源插座上拔下插頭時 請抓住電源線 確保所有插入延長線或配電盤的產品的總額定電流值不超過延長線或電源插座的安培額定值的80 請勿禁用電源線接地插頭 接地插頭是一個重要的安全功能 將電源線插入隨時可輕鬆接地的接地 接地 電源插座 只有熟悉維修程序的合格技術人員才能安裝和維修設備 如果您不確定所需的電源類型 請諮詢喬鼎資訊授權的服務提供商或當地的電力公司 警告 電池如果更換不正確會有爆炸的危險 請依製造商說明處理用過之電池 Promise Technology Product Manual ...

Страница 6: ... be required to correct the interference at personal expense Modification This device complies with Part 15 of the FCC Rules Operation is subject to the following two conditions 1 this device may not cause harmful interference and 2 this device must accept any interference received including interference that may cause undesired operation Industry Canada Regulatory Compliance Notices Avis de confo...

Страница 7: ...nd on the product nameplate label along with all required approval markings and information When requesting compliance information for this product always refer to this regulatory model number The regulatory model number is not the marketing name or model number of the product Consult PROMISE Technology Inc authorized service provider https www promise com Manufacturing Dates of Products https www...

Страница 8: ...nd to comply with the limits for Class A Information Technology Equipment according to CISPR 32 European Standard EN 55032 The limits for Class A equipment were derived for commercial and industrial environments to provide reasonable protection against interference with licensed communication equipment This is a Class A product In a domestic environment this product may cause radio interference in...

Страница 9: ...ix ix 警告使用者 這是甲類的資訊產品 在居住的環境中使用時 可能會造成射頻干擾 在這種情況下 使用者 會被要求採取某些適當的對策 Promise Technology Product Manual ...

Страница 10: ...x x Vess A8020 Storage Appliance for Video Surveillance ...

Страница 11: ...ect directly to Vess A8020 9 Connect the Power 10 Power on 10 Removing the Drive Carrier 11 Installing 3 5 Disk Drive in the Carrier 12 Promise Management GUI 13 Logging into Promise Management GUI 13 Logging in at the Enclosure 13 Logging in over the Network 14 Login Screen 16 Using the Promise Management GUI Interface 17 Using the Header 18 Using Tree View 18 Using Management View 19 Choosing a ...

Страница 12: ...ivity schedule 28 Event Logs 28 Administrative Tools 29 Restore factory default settings 29 Clear Statistics 29 User Management 30 Viewing User Information 30 Making User Settings 30 Making Your Own User Settings 31 Changing Your Own Password 31 Creating a User 32 List of User Privileges 33 Deleting a User 33 View Network Settings 34 Software Management 34 Importing a Configuration Script 35 Expor...

Страница 13: ...ler Settings 46 Enclosures 47 Locate an enclosure 47 Enclosure Information 47 Enclosure temperature sensor settings 48 Buzzer Settings 48 Physical Drives 49 Disk Arrays and Logical Drives 51 Logical drive management 53 Logical Drive Summary 54 How to Save a Service Report 55 ...

Страница 14: ...ording and playback operation without dropping frames for networked installations of High Definition IP cameras Vess A8020 Series Storage Appliance for Video Surveillance are available with the Windows operating system and disk drives in order to streamline the installation and integration process The Vess A8020 Series subsystems are stand alone devices with internal RAID storage eliminating need ...

Страница 15: ...rt HDMI VGA USB Ports 2 x USB 3 0 on front 4 x USB 3 0 2 x USB 2 0 on back RAID JBOD or Software RAID RAID0 RAID1 Software Supported OS 64 bit Windows 10 Management Graphical UI SNMP via Ethernet CLI CLU via Ethernet or Graphics OPAS Service via USB IPMI SDK or API for Integration Event Notification Email SNMP Audible warning buzzer LEDs Introduction Vess A8020 Storage Appliance for Video Surveill...

Страница 16: ... 10 to 80 Non Condensing Relative Humidity Non Operational 10 to 95 Non Condensing Temperature 5 40 C 40 60 C non operational Dimensions H x W x D 130 x 185 x 245 2 mm 5 11 x 7 28 x 9 65 in Safety EMI CE FCC VCCI RCM BSMI KC Class A CB Warranty 3 year limited warranty Optional Accessories 8 16GB DDR Memory Promise Technology Product Manual ...

Страница 17: ...liance for Video Surveillance Front Panel Hardware The front panel of Vess A8020 provides access to the drives carriers two USB ports and power button The embedded LED on the power button lights BLUE to indicate the system is powered on Vess A8020 front view Introduction Vess A8020 Storage Appliance for Video Surveillance ...

Страница 18: ...hes ORANGE when there is activity on the port and remains dark no connection has been established The LED above and on the right of each port indicates connection speed ORANGE is 100 Mbps GREEN is 1000 Mbps dark is 10 Mbps Vess A8020 back view No Component 1 Audio In Out ports 2 VGA port 3 Network ports 4 six ports 4a four USB 3 0 ports 4b two USB 2 0 ports 5 DisplayPort 6 HDMI port 7 S PDIF Out p...

Страница 19: ...r Display Port monitors it is also used to view the management interface HDMI Provides video out connection for HDMI enabled monitors used to view the management interface USB Use to connect to a USB keyboard for managing the Vess A8020 or use it to transfer data to or from a USB memory device There are six USB ports Audio In Use for input from a peripheral audio device such as a microphone Plug I...

Страница 20: ...Vess A8020 can be shipped with or without drives therefore instructions for installing hard drives are also included in this section The sections in Hardware Setup include the following Unpacking Management Path Connection Connect the Power Power On Enclosure Installing Disk Drives Unpacking Packing List The Vess A8020 box contains the following items Vess A8020 storage appliance 7 Promise Technol...

Страница 21: ...t via remote computer The administrator s computer Host PC should be on the same network as the network of IP cameras i e same IP domain and subnet To establish the management path network connection 1 Attach one end of an Ethernet cable to the network port in the Host PC attach the other end of the Ethernet cable to a port on a network switch The switch Host PC and IP camera network should all be...

Страница 22: ... HDMI Network connections to management PC and IP camera network Connect directly to Vess A8020 The Vess A8020 is running Windows operating system To access the user interface connect to the device using a USB keyboard and monitor Use a VGA DisplayPort of HDMI monitor 9 Promise Technology Product Manual ...

Страница 23: ...power supply connect the PSU to a suitable power source Power on To power on the Vess A8020 press the power button on the front panel The Power Status LED is embedded in the power button on the front It will light blue after powering up 10 Introduction Vess A8020 Storage Appliance for Video Surveillance ...

Страница 24: ...andle Place your free hand under the carrier Do not drop the disk carrier even if it is empty Removing the Drive Carrier The drive carrier accommodates 3 5 inch drives Cautions Swing open the drive carrier handle before you insert the drive carrier into the enclosure To avoid hand contact with an electrical hazard remove only one drive carrier a time 11 Promise Technology Product Manual ...

Страница 25: ...to the drive carrier at the front so that the screw holes on the sides line up correctly with the power and data connectors facing away from the carrier handle 3 Insert the screws through the holes in the drive carrier and into the sides of the disk drive Install only the counter sink screws supplied with the drive Install four screws per drive Snug each screw Be careful not to over tighten 4 Rein...

Страница 26: ...e to log into Promise Management GUI do one of the following actions Double click the Promise Management GUI desktop icon Choose Promise Management GUI in the Windows Programs menu Follow the steps under Logging in over the Network on page 14 Note The default IP settings for the Gigabit Ethernet ports are Port 1 192 168 0 1 Port 2 192 168 1 1 IP settings for the ports are controlled by the OS Use ...

Страница 27: ...ure Connection Otherwise use the Regular Connection Regular Connection Promise Management GUI uses an HTTP connection http Enter the Subsystem IP address 192 168 0 1 Enter the Port number 8090 Together your entry looks like this http 192 168 0 1 8090 Important For Vess A8020 running Windows OS it is necessary to disable the Windows Firewall in order to allow access to Promise Management GUI throug...

Страница 28: ...ether your entry looks like this https 192 168 0 1 8443 Note You can enter the Host PC s network name in place of the IP address If you are logging in at the Host PC you can enter local Host in place of the IP address Whether you select a regular or a secure connection your login to Promise Management GUI and your user password are always secure Promise Technology Product Manual ...

Страница 29: ...2 Type password in the Password field 3 Click the Login button The User Name and Password are case sensitive After logging in the Quick Links menu appears The Promise Management GUI login screen Quick Links menu Managing with the Web Manager Vess A8020 Storage Appliance for Video Surveillance ...

Страница 30: ...management software with a graphic user interface Basic user interface components and functions include There are three parts to the Promise Management GUI interface 1 Header 2 Tree View 3 Event Frame Promise Management GUI interface Subsystem home page 2 1 3 Promise Technology Product Manual ...

Страница 31: ...tware management RAIDcontroller enclosure physicaldrives diskarrays andlogicaldrives Thefigurebelowshowsthecomponents of Tree View The Administrative Tools section is different for the Administrator and Super Users than for other users The remainder of the Tree is the same for all users Logged in User Vess A8020 Series enclosure Promise Management GUI Tree View Managing with the Web Manager Vess A...

Страница 32: ...lick the Help link to the right of the tabs in Management View to access online help for the function currently displayed Choosing a Display Language Promise Management GUI displays in the following languages English Simplified Chinese Traditional Chinese Japanese Korean Arabic Polish French German Italian Spanish Portuguese Turkish Russian To change the display language 1 Click the Language drop ...

Страница 33: ...o action is required Warning User can decide whether or not action is required Minor Action is needed but the condition is not serious at this time Major Action is needed now Critical Action is needed now and the implications of the condition are serious Fatal Non Recoverable error or failure has occurred Time Time and date of the occurrence Description A brief description of the event You can als...

Страница 34: ...of Promise Management GUI Close your browser window Click Logout in the Promise Management GUI Header Clicking Logout brings you back to the Login Screen After logging out you must enter your user name and password in order to log in again Promise Technology Product Manual ...

Страница 35: ...isk Arrays manage disk arrays Logical Drives Summary read only logical drive information display Click on the subsystem IP address and model name listed under the Subsystems top level menu icon in Tree View In the Information tab the following information for the subsystem appears Alias Vendor Model Serial Number World Wide Number Part Number Revision Number System Date Time Here you can also save...

Страница 36: ...rent Background Activities To view current background activities 1 Click the Subsystem icon of the subsystem on which you want to view Background Activities 2 In the Subsystem menu click the Background Activities tab Background Activities currently running are displayed in the top portion of the menu You can also view the current Background Activities parameter settings in the lower part of the me...

Страница 37: ...The following settings can be configured Rebuild Rate High Medium Low Background Synchronization Rate High Medium Low Logical Drive Initialization Rate High Medium Low Redundancy Check Rate High Medium Low Migration Rate High Medium Low PDM Rate High Medium Low Transition Rate High Medium Low Reassigned Block Threshold Error Block Threshold Enable Media Patrol Enable Auto Rebuild These settings ca...

Страница 38: ...itialization is a foreground activity as you cannot access a logical drive while it is initiating Initialization is normally done to logical drives after they are created from a disk array Initialization sets all data bits in the logical drive to zero The action is useful because there may be residual data on the logical drives left behind from earlier configurations For this reason Initialization...

Страница 39: ...d select Redundancy Check Schedule Redundancy Check Rate To change Redundancy Check Rate setting the in Background Activities Settings menu 1 Click the Redundancy Check Rate drop down menu and choose a rate Low Fewer system resources to Redundancy Check more to data read write operations Medium Balances system resources between Redundancy Check and data read write operations High More system resou...

Страница 40: ...menu tab Click to check the Enable Media Patrol option Notice also that the Auto Rebuild option is here as well If you want to automatically begin rebuilding a logical drive as soon as a faulty drive is replaced make sure this option is enabled To begin Media Patrol manually click on the menu expander to the right of the Background Activities tab and scroll down and select Start Media Patrol to se...

Страница 41: ... during off peak times Add or delete an activity schedule To add enable or delete an activity schedule click on the Subsystem in Tree View then click on the Scheduler menu expander to the right of the Scheduler tab Scroll down to the schedule option you want to view that menu Schedule options are Add Media Patrol Schedule Add Redundancy Check Schedule and Delete Schedule View or modify an existing...

Страница 42: ...a new menu 3 Check mark the option boxes for the settings you want to return to the factory default values Default Settings options include 4 Click the Submit button to return the selected settings to default values To deselect all options and start over click the Reset button Clear Statistics To clear all subsystem statistics for controllers ports physical drives and logical drives 1 Click on the...

Страница 43: ...romise Management GUI as the Administrator or a Super User 2 Click the Administrative Tools icon 3 Click the User Management icon 4 Click the Information tab 5 In the list of users click the link of the user whose settings you want to change The Settings screen for the chosen user displays 6 Enter or change the settings for this user Enable disable this user Display name Privilege 7 Click the Subm...

Страница 44: ...ton Changing Your Own Password To set or change your own password 1 Log into Promise Management GUI under your own user name 2 Click the Administrative Tools icon 3 Click the User Management icon 4 Click the Password tab in Management View 5 Enter the current password in the Old Password field 6 If you do not have a password leave this field blank 7 Enter the new password in the New Password field...

Страница 45: ...assword is optional If you do not assign password tell this user to leave the password field blank when he she logs into to Promise Management GUI 7 Check the Enabled box to enable this user on this subsystem 8 Enter a display name in the Display Name field A display name is optional but recommended 9 Choose a privilege level from the Privilege drop down menu For definitions of each privilege leve...

Страница 46: ...l access to all functions including create and delete users and changing the settings of other users and delete disk arrays and logical drives The default administrator account is a Super User Deleting a User There is always at least one Super User account You cannot delete the user account you used to log in To delete a user 1 Log into Promise Management GUI as the Administrator or a Super User 2...

Страница 47: ...ngs for Email SNMP settings and Web services The Email function is used for sending notifications of events The Web service is used for remote network connection to the Promise Management GUI management interface This is also where you can export and import configuration script files and user database files If the port is enabled disabled If the link is up down IP type IPv4 IPv6 IP address Subnet ...

Страница 48: ...tic configuration of a subsystem 1 Click the Administrative Tools icon 2 Click the Software Management icon 3 Click the Import tab in the Software Management menu 4 Choose Configuration Script from the Type drop down menu 5 Click the Import button 6 Click Browse and find the file Configscript txt on the Host PC 7 Click the Submit button The configuration script is loaded and applied automatically ...

Страница 49: ...Management icon 3 Click the Export tab in the Service Management menu 4 Choose Configuration Script from the Type drop down menu 5 Click the Export button 6 Select a location on the Host PC for the downloaded file and save the file The file is saved to your PC as Configscript txt Cautions Do NOT attempt to write or modify a configuration script until you receive guidance from Technical Support Man...

Страница 50: ...open the Subsystem Information display 2 Click the Save button in the Save System Service Report row of the information display Information for the report is gathered and compiled This action takes up to a few minutes depending on the size of your RAID system 3 Determine where you want to store the file on the Host PC then click the Save button in the pop up menu The report saves to your Host PC a...

Страница 51: ...nt Info Runtime LogDrive Info Basic logical drive information LogDrive Dump Info Diagnostic information Logical Drive Verbose Info Full logical drive information Network Info Virtual port Phydriv Info Basic physical drive information Phydriv Verbose Info Full physical drive SWMGT Info Software management Service Setting Email Service Setting Webserver Statistic Info Subsystem info User Info Managi...

Страница 52: ... Click the Confirm button To start the Email service after stopping it 1 Click the Administrative Tools icon 2 Click the Software Management icon 3 Click on Email in the Service List of the Service Management menu 4 Click the Start button under Service Status Email 5 Click the Confirm button Restarting Email Service To restart the Email service 1 Click the Administrative Tools icon 2 Click the Sof...

Страница 53: ...cation under Email Server Settings Username Required if SMTP authentication is enabled SMTP Authentication Password Required if SMTP authentication is enabled Under Email Content Customization Email Sender From Address The sender s name shown on notification messages Email Subject The subject line of the notification message 5 Click the Submit button 6 Click the Confirm button Sending A Test Email...

Страница 54: ...d statistics or choose the Read Write tab to view specific Read and Write performances separately 4 Under Logical Drive choose the metric you want to see from the Measurement drop down menu 5 Check the boxes for the logical drives you want to see Total of all logical drives Up to 4 devices Information Bandwidth in MB s Cache usage by Dirty cache usage by Maximum latency in ms Average latency in ms...

Страница 55: ...tion To save performance statistics for analysis or troubleshooting save a Service Report See Saving a Service Report Information Bandwidth in MB s Maximum latency in ms Average latency in ms Minimum latency in ms I Os per second Read Write Read bandwidth Write bandwidth Maximum Read latency in ms Maximum Write latency in ms Average Read latency in ms Average Write latency in ms Minimum Read laten...

Страница 56: ...sections View Controller Information Viewing Controller Statistics Controller Settings View Controller Information To view controller information 1 Click the Controllers icon 2 Click the specific Controller icon of the controller for which you want to view information 3 The Information tab will present basic controller information Promise Technology Product Manual ...

Страница 57: ...Version Install Package Build Date Memory Type Memory Size Flash Type Flash Size Preferred Cache Line Size Cache Line Size Coercion Enabled Disabled Coercion Method SMART Log Enabled Disabled SMART Polling Interval Write Back Cache Flush Interval Enclosure Polling interval Host Cache Flushing Enabled Disabled Forced Read Ahead Enabled Disabled Spin Down Type HDD Power Levels HDD Idle Time HDD Stan...

Страница 58: ...on display menu between the Information and Settings tabs click on the menu expander to reveal the Statistics link Controller statistics include Data Transferred Read Data Transferred Errors Read Errors I O Requests Read IO Requests Statistics Start Time Write Data Transferred Non Read Write Errors Write Errors Non Read Write Requests Write I O Requests Statistics Collection Time Promise Technolog...

Страница 59: ...ing Choose time periods from the drop down menus After an HDD has been idle for the set period of time Power Saving Idle Time Parks the read write heads Power Saving Standby Time Lowers disk rotation speed Power Saving Stopped Time Spins down the disk stops rotation Host Cache Flushing Check the box to enable or uncheck to disable Forced Read Ahead cache Check the box to enable or uncheck to disab...

Страница 60: ...click the Locate button The LED indicators on the front panel of the enclosure will blink for one minute Enclosure Information The Enclosure Information read only display menu provides key real time information about current hardware status of the enclosure Click on the expanders buttons to reveal current conditions and status of the enclosure power supplies fans blowers temperature sensors and vo...

Страница 61: ...shold a warning message is sent and an event is recorded in the event log Controller Critical Temperature Threshold 100 105 C If the enclosure temperature reaches this threshold a warning message is sent an event recorded is recorded in the event log Buzzer Settings The audible enclosure alarm buzzer can be enabled or disabled To enable or disable the buzzer click on the enclosure in Tree View the...

Страница 62: ...he individual Enclosure icon in Tree View to see the Physical Drives icon for the enclosure To display the information for any populated slot you can expand the Physical Drives icon in Tree View to reveal links to each slot or click on the slot in the Physical Drives List or click on the populated slot in the virtual enclosure displayed in the menu View individual physical drive information Promis...

Страница 63: ...e Interface Serial Number Firmware Version Protocol Version Visible To Controller Write Cache Enabled Disabled Read Look Ahead Cache Enabled Disabled SMART Feature Set SMART Self Test SMART Error Logging Command Queuing Support Command Queuing Enabled Disabled Queue Depth Maximum Multiple DMA Mode Supported Maximum Ultra DMA Mode Supported DMA Mode Drive Temperature C F Reference Drive Temperature...

Страница 64: ...anagement GUI please refer to the Quick Start Guide Use the top level Disk Arrays menu to view the Disk Array List to delete existing arrays and to create new disk arrays using the Automatic Express or Advanced disk array creation menus Note that there must be physical drives available in order to use any of the disk array creation menus View information for existing disk arrays by clicking on the...

Страница 65: ...ncy fault tolerance You must determine the cause of the problem and correct it Rebuilding This condition is temporary When a physical drive has been replaced the logical drive automatically begins rebuilding in order to restore redundancy fault tolerance When a logical drive is rebuilding it will function and your data is available However access will be slower due to the rebuilding operation Info...

Страница 66: ...cal Drive LD in the list to view Information and Statistics to change Settings Alias Read Policy Write Policy to start Background Activities Initialization Redundancy Check or to view the Check Table for the LD Information displayed in the menu includes Logical Drive ID Alias Raid Level Operational Status Capacity Physical Capacity Number of Axles Number of Used Physical Drives Stripe Size Sector ...

Страница 67: ...oes not arrange the logical drives under the disk array to which they belong nor under the enclosure in which they are located The menu functions in the same way as the Logical Drives menu discussed in Logical drive management on page 53 Managing with the Web Manager Vess A8020 Storage Appliance for Video Surveillance ...

Страница 68: ...rmation display 2 Click the Save button in the Save System Service Report row of the information display Information for the report is gathered and compiled This action takes up to a few minutes depending on the size of your RAID system 3 Determine where you want to store the file on the Host PC then click the Save button in the pop up menu The report saves to your Host PC as a compressed HTML fil...

Страница 69: ...nt Info Runtime LogDrive Info Basic logical drive information LogDrive Dump Info Diagnostic information Logical Drive Verbose Info Full logical drive information Network Info Virtual port Phydriv Info Basic physical drive information Phydriv Verbose Info Full physical drive SWMGT Info Software management Service Setting Email Service Setting Webserver Statistic Info Subsystem info User Info Managi...

Отзывы: