-48-
17.
LARGE ONE-POINT PATTERN SHAPE (SOFT ADJUSTMENT)
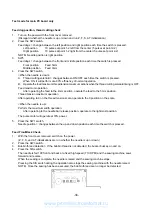
STANDARD
When pattern adjustment "3" is selected in test mode and the start/stop button is pressed, the vertical and
horizontal separation of the test pattern outline should be 1 mm or less.
ADJUSTMENT
1.
Select "3" pattern adjustment in the test mode.
2.
Press the start/stop button and sew the test pattern outline.
∗
Install presser foot N before sewing.
3.
Adjust the pattern.
Adjustment Points
1.
If the pattern is compressed in the direction, press the vertical
button. (A)
If the pattern is stretched in the direction, press the vertical
button. (B)
If the pattern is compressed in the direction, press the horizontal
button. (C)
If the pattern is stretched in the direction, press the horizontal button. (D)
2.
The should be adjusted using the four settings for each direction.
* If the pattern cannot be adjusted using the four settings for each direction, refer to FEED
ADJUSTMENT (VERTICAL FEED) on page 46 and adjust the F pulse motor position.
Adjustment Limits
Adjust form of edge of the tune-up pattern as seen in the following diagram.
Intricate adjustments may be required for some patterns.
www.promelectroavtomat.ru
Содержание M3000C
Страница 4: ... 2 1 MECHANICAL CHART EMBROIDERY UNIT MECHANISM www promelectroavtomat ru ...
Страница 6: ... 4 3 ELECTRONIC PARTS ARRANGEMENT CHART www promelectroavtomat ru ...
Страница 13: ... 11 www promelectroavtomat ru ...
Страница 17: ... 15 www promelectroavtomat ru ...
Страница 19: ... 17 www promelectroavtomat ru ...
Страница 25: ... 23 2 LEAD WIRE ARRANGEMENT www promelectroavtomat ru ...
Страница 67: ...ULT2003D S G 3100D ULT2001N ULT2001C M3000N M3000C 11C03HF114200 www promelectroavtomat ru ...


