

A
B
1
5
4
2
3
Prepare pictures
Arrange prints in such a
way as they will appear as
double pages in the final
album.
Hint
: It is recom-
mended to practice the
function of this machine
with a stack of obsolete
pictures, before mak-
ing the first commercial
album!
Bilder vorbereiten
Sortieren Sie Ihre Bilder in der
Reihenfolge, wie sie als Dop-
pelseiten im Album erscheinen
sollen.
Hinweis:
Es empfiehlt
sich die Funktion dieses Geräts
mit einem Stapel alter Bilder
zu testen, bevor Sie das erste
kommerzielle Album binden!
Set up picture height
Insert the Alignment Block
into the hole correspond-
ing to your paper height:
(56-2200 only, from top)
1st hole: 8” paper height
2nd hole: 6” paper height
3rd hole: 5” paper height
4th hole: 4” paper height
On DoublePage
Maker XL:
See marking next to hole
Papierhöhe einstellen
Setzen Sie den Anschlagblock in
das Loch ein, das der verwende-
ten Papierhöhe entspricht:
(Nur 56-2200, von oben)
1. Loch: 8” (20 cm)
2. Loch: 6” (15 cm) Papierhöhe
3. Loch: 5” (13 cm) Papierhöhe
4. Loch: 4” (10 cm) Papierhöhe
Beim DoublePageMaker XL:
Die Löcher sind entsprechnd
markiert
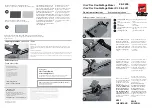
Align first picture
Take top print from stack
and position it face down
with the album outside
edge towards the machine
into the left bottom corner
guides.
Erstes Bild anlegen
Nehmen Sie das erste Foto
vom Stapel und legen Sie es
mit der Bildfläche nach unten
auf die Arbeitsfläche. Richten
Sie es unten und links aus.
(Album Aussenseite zum
Anschlag)
Tape first picture
Move tape slider all the
way towards you, then
press slightly (A) - (not too
hard!) and move in direc-
tion B, until slide is lifted
by TapeLiftBar.
Klebstoff auf erstes Bild
aufbringen
Bewegen Sie den Klebeband-
Schlitten ganz zu sich. Drück-
en Sie Ihn leicht an (A) - (nicht
zu fest!) und bewegen Sie Ihn
in Richtung B, bis er durch die
TapeLiftBar angehoben wird.
Position reverse side of
page
Take second print from
stack and slide it along
bottom guide as shown
towards edge of first print.
Try to avoid touching
adhesive. Hold first print in
position.
Rückseitenbild anlegen
Nehmen Sie das zweite Bild
vom Stapel und schieben Sie
es unten bündig wie gezeigt
nach links in Richtung der Ecke
des ersten Bildes. Berühren
Sie nicht den Klebstoff. Halten
Sie das untere Foto an seiner
Position fest.
6
Fix second picture
When both prints are
aligned perfectly one on
top of other, slowly lower
second print to adhere
to bottom one. Seal edge
with firm pressure, wearing
cotton glove. Proceed with
next double page in same
sequence 3-6.
Zweites Bild verkleben
Wenn beide Bilder genau
aufeinander ausgerichtet
sind, lassen Sie das obere Foto
langsam auf das Untere herab.
Benutzen Sie einen Baumwoll-
handschuh und kleben es mit
starkem Druck fest. Fahren Sie
mit der nächsten Doppelseite
mit den Schritten 3-6 fort.
When using the position-
ing magnet, first position
print as shown in picture
3, then move magnet right
up to the edge of the print
as shown. This helps to
hold the picture in place
correctly while applying
adhesive. However, hold
down print by hand as well
while applying adhesive.
Wenn Sie mit dem Positionier-
Magneten arbeiten, erst Print
wie in Bild 3 gezeigt, anle-
gen. Dann Magnet bis zur
Bildkante heranführen. Dies
verhindert ein Verrutschen
während Sie Klebstoff auftra-
gen. Dennoch Print nahe an
der Tapespur zusätzlich mit
der Hand festhalten.
When working with prints
larger than 20x30cm
(8x12“) we recommend to
position the magnet
half way
on to
the picture,
as illustrated. This helps
the print to stay flat.
Bei Prints größer als 20x30cm
empfehlen wir, den Magneten
wie gezeigt, zur Hälfte
auf
den
Print zu platzieren. Er bleibt
dadurch flach liegen.
If you have to handle prints that do not lay flat, it may help to apply a short line
(about 5-8mm) of tape right under the top end of the picture onto the base plate
of the machine. To accomplish this, position a print as usual and mark with a felt
pen where you want to apply the adhesive onto the base plate of the machine.
Then operate the gluing mechanism just at this section.
Now, when you place the print, you can actually “lock” it additionally with this
little spot of glue. Apply adhesive as usual. When removing the double paged
sheet, you will hear a little “blipp” but the surface of the picture should be un
-
damaged.
You may remove the adhesive any time by using ethyl alcohol or other appropri-
ate cleaning agent.
Wenn Sie Prints verarbeiten, die nicht
plan liegen, kann es hilfreich sein,
eine kleine Fläche (5-8mm) des Tapes
auf die Bodenplatte des Gerätes zu
applizieren. Dazu ein Bild gewünschter
Größe positionieren und mit einem
Filzstift auf der Platte markieren, wo
Sie den Klebstoff auftragen wollen.
Dann mit dem Klebeband-Schlitten
nur diese Fläche abfahren.
Jetzt können Sie nach der
Positionierung des Prints diesen durch
leichtes Andrücken zusätzlich „sichern“.
Dann weiter mit dem normalen
Arbeitsschritt. Wenn Sie die verklebte
Doppelseite abheben, hören Sie ein
leichtes „Blipp“, aber die Oberfläche
Ihres Prints müsste aufgrund der
kurzen Kontaktzeit völlig unbeschädigt
sein.
Diesen oder anderen ungewollt
applizierten Klebstoff können Sie mit
Ethyl Alkohol oder einem anderen
geeigneten Reinigungsmittel
entfernen.
How to double the pictures
Wie Sie die Seiten verdoppeln


