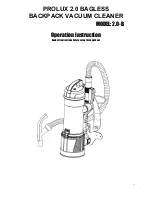
Proluxe 2.0-B Скачать руководство пользователя страница 7

- 7 - 

8.  Crevice Tool 
9.    Upholstery/Pet Hair tool 
10. Dusting Brush 
11. Telescopic Tube/wand 
 

OPERATION INSTRUCTIONS 


Assembling your vacuum 
NOTE:

 Always remove the power plug from the wall outlet before assembling or removing accessories 

n


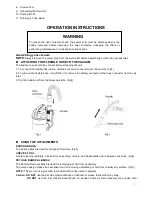
ATTACHING THE FLEXIBLE HOSE TO THE VACUUM 

The flexible hose should be connect before strapping the unit 
1. To connect the flexible hose to the unit slide the hose connector over the air inlet. (Fig1) 
2. To remove the flexible hose, turn off the unit, remove the battery and pull out the hose connector from the air 
inlet. 
3. Pull the handle out from the telescopic tube. (Fig2) 


n


USING THE ATTACHMENTS 

DUSTING BRUSH 

The Dusting Brush is used for all types of furniture. (Fig3) 

CREVICE TOOL 

Use for cleaning radiators, cracks & crevices along corners, and baseboards and in-between cushions. (Fig4) 

PET HAIR REMOVAL BRUSH 

The Pet Hair Removal Brush is used for removing pet hair from upholstery. 
The unique design makes it an excellent tool for removing unwanted pet hair from virtually any surface. (Fig5) 

NOTE: 

This tool is not a grooming tool and should not be used on animals. 

Caution: DO NOT 

use


the


Pet Hair Removal Brush on delicate or woven fabrics that may snag. 


DO  NOT 

use


the


Pet  Hair  Removal  Brush  on  wooden  floors  as  this  accessory  may  cause  mild 
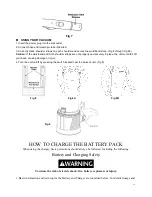
WARNING 

To reduce the risk of electric shock, the power cord must be disconnected or the 
battery  removed  before  removing  the  dust  container,  changing  the  filters  or 
performing maintenance or troubling shooting checks 

Содержание 2.0-B

Страница 1: ...1 PROLUX 2 0 BAGLESS BACKPACK VACUUM CLEANER MODEL 2 0 B Operation Instruction Read all instructions before using this appliance...

Страница 2: ...less backpack vacuum with the new Prolux 2 0 Bagless Technology that makes it 40 more powerful than current bagless vacuums Large companies use backpack vacuums because they literally cut your cleanin...

Страница 3: ...nly weighs 8 lbs 8 lbs w o battery 11 lbs with battery Powerful deep cleaning motor with an amazing 52 Cubic Feet per Minute of Airflow most battery powered vacuums have 20 Dependable Motor Bypass val...

Страница 4: ...ents 5 Do not use with damaged cord or plug If vacuum cleaner is not working as it should has been dropped damaged left outdoors or dropped into water take it to a service center before use 6 Do not p...

Страница 5: ...sive materials there is danger of fire or explosion Never use the appliance outdoors there is danger of rain and dirt destroying the appliance Never stick objects into the appliance s openings it coul...

Страница 6: ...n or instruction of a responsible person Packing materials are not toys There is danger of suffocation KEEP OUT OF REACH OF CHILDREN GETTING TO KNOW YOUR BACK PACK VACUUM 1 Main motor unit 2 Flexible...

Страница 7: ...e Dusting Brush is used for all types of furniture Fig3 CREVICE TOOL Use for cleaning radiators cracks crevices along corners and baseboards and in between cushions Fig4 PET HAIR REMOVAL BRUSH The Pet...

Страница 8: ...3 to the bottom end of the telescopic tube Fig 3 4 NOTE Shove all the way together and firmly twist to the right to connect pieces 3 Adjust the length of the telescopic tube Press down the release la...

Страница 9: ...y in place the unit could fall off your back causing damage or injury 4 Turn the unit on off by pressing the switch located near the base of unit Fig 9 Fig 8 Fig 8A Fig 8B Fig 9 HOW TO CHARGE THE BATT...

Страница 10: ...the cord 8 DO NOT handle the charger s cord plug with wet hands when inserting into electrical outlet 9 Keep sparks and flames away from batteries Do not smoke near batteries or charger 10 DO NOT cha...

Страница 11: ...voltage level the electronics will shut off the battery Once the battery shuts off it must be recharged PREPARING BATTERY PACK FOR CHARGING 1 Turn off the power switch Confirm the switch is on the off...

Страница 12: ...1 Switch the vacuum cleaner to the Off position and disconnect the plug from the wall outlet 2 Release the dust container by pressing down the release button Fig 10 3 Pull the dust container away fro...

Страница 13: ...ressed air or using warm water then allow the filter to air dry completely Once the filter has completely air dried then assemble the filter back into the container Or if the filter is too dirty or in...

Страница 14: ...Possible Cause s Solution The vacuum will not turn on The battery is not charged Make sure the battery is fully charged by plugging the battery into the charger then plug the charger into your wall o...

Страница 15: ...do this FIVE 5 YEAR LIMITED WARRANTY Prolux warranties this product s motor free from defects in material and workmanship for a period of five 5 years on the motor three 3 years on the body of the va...

Страница 16: ...ending unit back for warranty work contact your authorized PROLUX retailer you bought the unit from first Unauthorized warranty claims may be sent back Authorized Warranty claims PROLUX shall be respo...

Отзывы: