background image

7

E

n

g

li

sh

Synchronisation

1.  Place the units close to each other.
2.  Synchronisation will begin automatically once all batteries are in place.
3.  The sensor is preset to channel 1.
4.  The main unit will automatically display readings from channel 1 (if channel 1 does 

not show, press [

/CHANNEL] until channel 1 is displayed).

5.  If the outdoor temperature shows (coming from the outdoor sensor) on the main 

unit’s display, synchronisation is complete.

6.  The units can now be placed at their desired locations. 

Note:

 Max range: 30 m.

Setting the sensor unit’s channels

1.  Press [

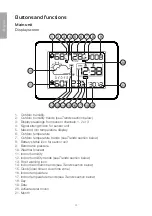
/CHANNEL] on the main unit until channel 2 appears (3).

2.  Press and hold in [

/CHANNEL] until the signal icon (4) begins to flash.

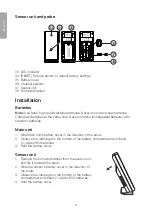
3.  Open the sensor’s battery compartment.
4.  Set the channel selector (36) to channel 2.
5.  Observe the markings on the bottom of the battery compartment and insert 

2 × AAA/LR03 batteries.

6.  Refit the battery cover.
7.  The readings from the sensor will appear on the main unit‘s display after  

a few seconds.

8.  Repeat the same procedure for setting the sensor to channel 3, if desired.

Operating instructions

Setting the time and date

1.  Press and hold [SET/AL SET] for about 3 seconds until the year display flashes.
2.  Press [

/CHANNEL] or [

▼/

ºC/ºF] to select the desired year.

3.  Press [SET/AL SET] until the month display begins to flash. 
4.  Press [

/CHANNEL] or [

▼/

ºC/ºF] to select the desired month.

5.  Press [SET/AL SET] until the date display begins to flash. 
6.  Press [

/CHANNEL] or [

▼/

ºC/ºF] to select the desired date.

7.  Press [SET/AL SET], until the time zone begins to flash ”00” (see 

Dual time zone 

section below).

8.  Press [

/CHANNEL] or [

▼/

ºC/ºF] to select the desired time zone. 

00

 = local time, 

01

 = +1 hour, 

-01

= -1 hour etc.

9.  Press [SET/AL SET] until “24hr” begins to flash. 
10. Press [

/CHANNEL] or [

▼/

ºC/ºF] to select a 12 or 24 hour time display.

11. Press [SET/AL SET] until the hours display begins to flash.
12. Press [

/CHANNEL] or [

▼/

ºC/ºF] to select the desired hour.

13. Press [SET/AL SET] until the minutes display begins to flash.
14. Press [

/CHANNEL] or [

▼/

ºC/ºF] to select the desired minutes.

15. Press [SET/AL SET] or wait 10 seconds to return to normal time and date display.

Содержание IW004 36-5136

Страница 1: ...Wireless Weather Station Tr dl s v derstation Tr dl s v rstasjon Langaton s asema Art no Model 36 5136 IW004 Ver 201209 English S ve ns ka No r s k S u o m i...

Страница 2: ......
Страница 3: ...es located between the transmitter and the receiver e g a concrete wall will interfere with the signal more than a plasterboard wall If you experience problems try the following Turn off any other exi...

Страница 4: ...temperature display 6 Outdoor temperature 7 Outdoor temperature trends see Trends section below 8 Battery status icon for sensor unit 9 Barometric pressure 10 Weather forecast 11 Indoor humidity 12 I...

Страница 5: ...L SET Sets date time and alarm 26 AL ON OFF Alarm on off 27 MEM DUAL TIME Memory button for max min temperature display of local time dual time zone 28 C F Temperature unit selector Moves down decreas...

Страница 6: ...ver combine rechargeable batteries with standard batteries Main unit 1 Slide main unit s battery cover in the direction of the arrow 2 Observe the markings on the bottom of the battery compartment and...

Страница 7: ...on the main unit s display after a few seconds 8 Repeat the same procedure for setting the sensor to channel 3 if desired Operating instructions Setting the time and date 1 Press and hold SET AL SET...

Страница 8: ...he desired day pattern for the alarm 8 Press SET AL SET or wait 10 seconds to return to normal time and date display Activating the alarm Press AL ON OFF until the desired alarm is activated The follo...

Страница 9: ...The barometric pressure trend 14 displays to the right of the weather forecast The trend arrows have the following meaning Rising pressure improving weather Falling pressure worsening weather Even pr...

Страница 10: ...ot located near heaters cookers or other heat sources The main unit can be placed free standing using the desk stand or wall mounted Desk placement Remove the stand from its holder and insert and clic...

Страница 11: ...r station and sensor unit Re synchronise the devices See the Synchronisation section above Temperature humidity and barome tric readings are inaccurate Press RESET 29 on the back of the weather statio...

Страница 12: ...inns mellan s ndaren och mottagaren t ex en betongv gg d mpar signalen avsev rt mer n en gipsv gg Vid funktionsproblem prova f ljande l sningar St ng av vriga befintliga tr dl sa utrustningar f r att...

Страница 13: ...gsta l gsta temperatur 6 Utomhustemperatur 7 Temperaturtrend utomhus se avsnitt Trender nedan 8 Batteristatus f r utomhusgivare 9 Lufttryck 10 V derprognos 11 Luftfuktighet inomhus 12 Luftfuktighetstr...

Страница 14: ...upp t 25 SET AL SET Inst llning av datum tid och alarm 26 AL ON OFF Alarm p av 27 MEM DUAL TIME Minne f r h gsta l gsta temperatur visning av lokaltid tidszon 28 C F Val av temperaturvisning i C elle...

Страница 15: ...erier vid batteribyte Blanda inte heller laddningsbara batterier med s dana som inte g r att ladda Huvudenhet 1 Skjut huvudenhetens batterilucka ned t i pilens riktning 2 Se m rkningen i botten p batt...

Страница 16: ...tillbaka batteriluckan 7 V rden fr n givaren p kanal 2 visas efter n gra sekunder p huvudenhetens display 8 Upprepa ovanst ende f r att ev ansluta givare p kanal 3 Anv ndning Inst llning av tid och da...

Страница 17: ...l rdag och s ndag 7 Tryck CHANNEL eller C F f r att v lja nskade veckodagar 8 Tryck SET AL SET eller v nta 10 sekunder f r att terg till normal visning Aktivera alarm Tryck AL ON OFF flera g nger til...

Страница 18: ...ender f r lufttryck luftfuktighet och temperatur Lufttryck Trenden f r lufttryck 14 visas till h ger om v derprognosen Pilarna har f ljande inneb rd Stigande lufttryck fint v der Fallande lufttryck s...

Страница 19: ...ftfuktighet Placera d rf r enheten p s dant s tt att den inte uts tts f r v rme fr n element spisar eller andra v rmek llor Huvudenheten kan anv ndas med bordsst det eller v ggmonteras Bordsplacering...

Страница 20: ...nkronisera enheterna Se avsnitt Synkronisering ovan V rden f r temperatur luftfuktighet och lufttryck r felaktiga Tryck RESET 29 p baksidan av v derstationen F rs kra dig om att enheterna inte uts tts...

Страница 21: ...mottaker kan p virke kontakten rekkevidden mellom disse En betongvegg kan f eks dempe signalene dramatisk i forhold til en gipsvegg Ved problemer pr v f lgende Skru av vrig tr dl st utstyr for kontrol...

Страница 22: ...aveste temperatur 6 Temperatur utend rs 7 Trend for temperatur utend rs se avsnittet Trender nedenfor 8 Batteristatus for utend rsgivere 9 Lufttrykk 10 V rprognose 11 Luftfuktighet innend rs 12 Trend...

Страница 23: ...L SET Innstilling av dato tid og alarm 26 AL ON OFF Alarm p av 27 MEM DUAL TIME Minne for h yeste laveste temperatur visning av lokaltid tidssone 28 C F Valg av temperaturvisning i C eller F G nedover...

Страница 24: ...r samtidig Bland aldri ladbare og ikke ladbare batterier Hovedenhet 1 Skyv batterilokket til hovedenheten i pilens retning 2 Plasser 3 AAA LR03 batterier i holderen F lg merkingen i holderen for plass...

Страница 25: ...ktig 6 Sett batterilokket tilbake igjen 7 Verdier fra giveren som er innstilt p kanal 2 vises etter noen sekunder p skjermen til hovedenheten 8 Gjenta punktene over for tilkobling av giver til kanal 3...

Страница 26: ...Trykk CHANNEL eller C F for velge nskede ukedager 8 Trykk SET AL SET eller vent i 10 sekunder for g tilbake til normal visning Aktiver alarmen Trykk AL ON OFF flere ganger til nsket nskede alarm er a...

Страница 27: ...ighet og temperatur Lufttrykk Trenden for lufttrykk 14 vises til h yre for v rprognosen Pilene har f lgende betydning Stigende lufttrykk fint v r Fallende lufttrykk d rligere v r Jevnt lufttrykk v ret...

Страница 28: ...ktighetsm ling Plasser derfor enheten slik at den ikke utsettes for varme fra ovner komfyrer eller andre varmekilder Hovedenheten kan brukes med bordst tten eller den kan veggmonteres Bordplassering T...

Страница 29: ...roniseres Se avsnittet Synkronisering ovenfor Verdien p temperaturen luft fuktigheten og lufttrykket er feil Trykk p RESET 29 p baksiden av v rstasjonen Forviss deg om at enheten ikke utsettes for for...

Страница 30: ...astaanottimen v liset esteet vaikuttavat kaikkien langattomien laitteiden kantamaan esim betonisein heikent signaalia huomattavasti kipsisein enemm n Ongelmatilanteissa voit kokeilla seuraavia keinoja...

Страница 31: ...limman l mp tilan n ytt 6 Ulkol mp tila 7 Ulkol mp tilan kehitys katso j ljemp n oleva luku Kehitys 8 Ulkol hettimen pariston varaustaso 9 Ilmanpaine 10 S ennuste 11 Sis ilmankosteus 12 Sis iImankoste...

Страница 32: ...in 25 SET AL SET P iv m r n ajan ja her tyksen asetus 26 AL ON OFF Her tys p lle pois p lt 27 MEM DUAL TIME Korkeimman matalimman l mp tilan muisti paikallisen ajan aikavy hykkeen n ytt 28 C F L mp t...

Страница 33: ...t samanaikaisesti paristoja ja akkuja P yksikk 1 Ty nn p yksik n paristolokeron kantta alasp in nuolen suuntaan 2 Aseta lokeroon paristot 3 kpl AAA LR03 paristolokeron pohjassa olevien merkint jen muk...

Страница 34: ...L hettimen arvot kanavalta 2 ilmestyv t muutaman sekunnin kuluttua p yksik n n yt lle 8 Toista edell olevat kohdat jos haluat liitt l hettimen kanavalle 3 K ytt Ajan ja p iv m r n asettaminen 1 Paina...

Страница 35: ...n lauantaisin ja sunnuntaisin 7 Valitse haluamasi viikonp iv t painamalla CHANNEL tai C F 8 Palaa takaisin normaaliin n ytt n painamalla SET AL SET tai odottamalla 10 sekuntia Her tyksen aktivointi Pa...

Страница 36: ...s ovat seuraavat kuvakkeet Ilmanpaineen ilmankosteuden ja l mp tilan kehitys Ilmanpaine Ilmanpaineen kehitys 14 n kyy s ennusteen oikealla puolella Nuolet tarkoittavat seuraavaa Nouseva ilmanpaine hie...

Страница 37: ...p tila ja ilmankosteusanturit T m n vuoksi yksikk on sijoitettava paikkaan jossa se ei altistu l mp pattereiden liesien tai muiden l mm nl hteiden l mm lle P yksikk voi k ytt p yt tuen kanssa tai sen...

Страница 38: ...timen paristot Synkronoi yksik t Katso edell oleva luku Synkronointi L mp tila ilmankosteus ja ilmanpainearvot ovat virheellisi Paina s aseman takana olevaa painiketta RESET 29 Varmista etteiv t l mm...

Страница 39: ...uirements and other relevant provisions of Directive 1999 5 EC Article 3 1a Safety EN 60950 1 EN 62479 EN 50371 Article 3 1b EMC EN 301 489 1 EN 301 489 3 EN 55014 1 EN 55014 2 Article 3 2 Radio EN 30...

Страница 40: ...ternett www clasohlson no Post Clas Ohlson AS Postboks 485 Sentrum 0105 OSLO Suomi Asiakaspalvelu Puh 020 111 2222 S hk posti asiakaspalvelu clasohlson fi Internet www clasohlson fi Osoite Clas Ohlson...

Отзывы: