PROLiNK PV-CX881P Скачать руководство пользователя страница 6


2 Hardware 

Configuration 


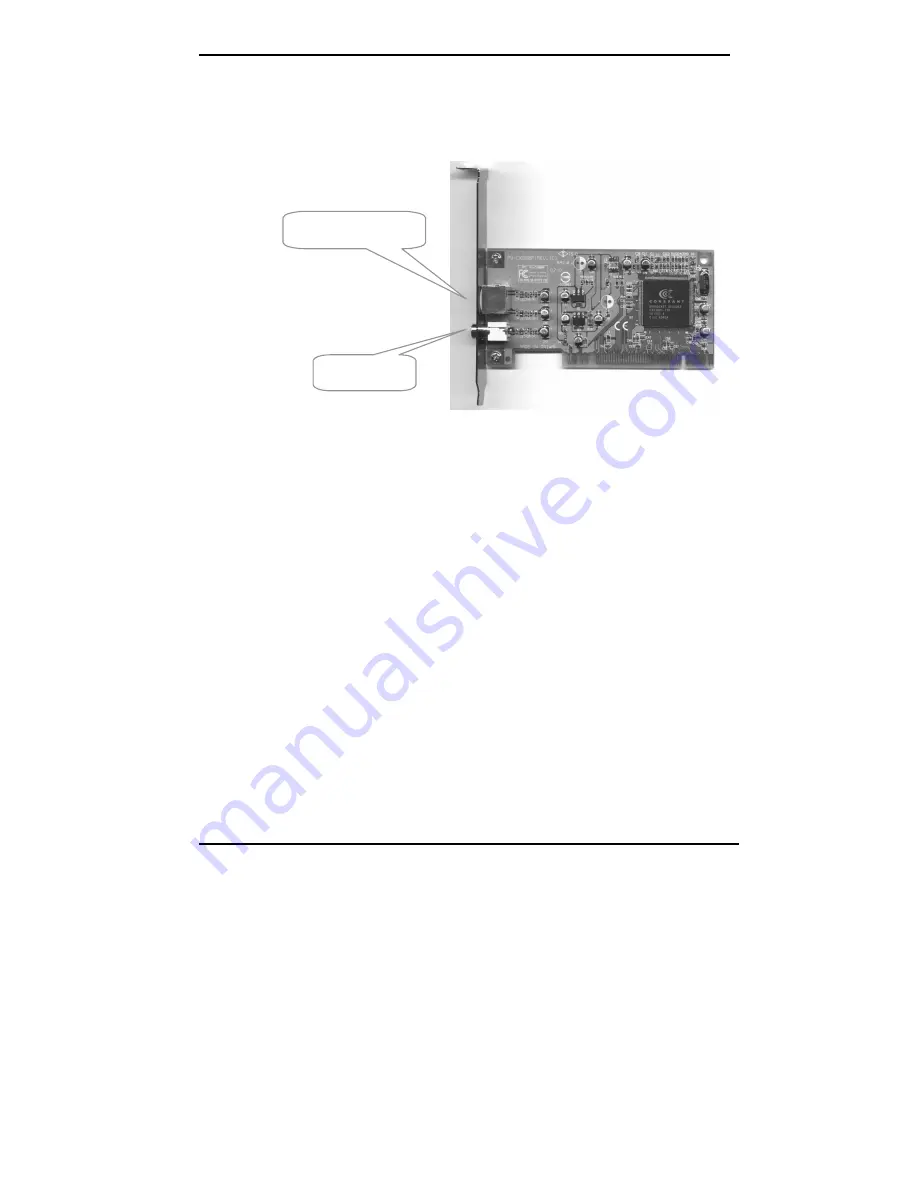
Standard type is featured with two ports, one is for composite video and the 
other is for S-Video. 


3 Hardware 

Installation 


1.  Turn off your computer first. Open the case and insert this PV-CX881P into 

your computer’s PCI slot. Make sure the adapter is well seated in the slot 
then fasten it with screws. Put the outer case back afterwards. 


2.  Connect the desired image output device to the input port of adapter. For 

instance, you may connect VCR, camera.   


S-Video video input 

Composite 
video input

Содержание PV-CX881P

Страница 1: ...User s Manual For PV CX881P DOC NO 54 0881P 01 Rev A 02 01 21...

Страница 2: ...he receiving antenna Relocate the computer away from the receiver Move the computer away from the receiver Plug the computer into a different outlet so that the computer and the receiver are on differ...

Страница 3: ...ademark Acknowledgements All brand names and trademarks are the property of their owners Limited Warranty Our company warrants this product against defects in materials and workmanship for a period of...

Страница 4: ...3 Hardware Installation 2 4 Software Installation 3 4 1 Windows 98SE ME driver Installation 3 4 2 Windows 2000 XP driver Installation 5 4 3 DirectX Installation 7 4 4 Capture Tool 7 4 5 Preview Pin F...

Страница 5: ...st writes Multiple YCrCb and RGB pixel formats supported on output Multiple composite and S Video inputs Supports planner YUV data format VBI data capture for closed caption data decoding Only support...

Страница 6: ...ff your computer first Open the case and insert this PV CX881P into your computer s PCI slot Make sure the adapter is well seated in the slot then fasten it with screws Put the outer case back afterwa...

Страница 7: ...l detect the newly added hardware and will show the following message on your monitor Click NEXT on every message box 2 The operating system will automatically detect the TV card as a new device and d...

Страница 8: ...d choose PV CX881P window that will be shown on the screen If it does not display please brow CD and double click AutoRun exe 7 Put the AutoRun driver into CD ROM waiting for a few seconds Click on TV...

Страница 9: ...turn on your computer the Windows 2000 will detect the newly added hardware and will show the following message on your monitor Click NEXT on every message box 2 Click NEXT 3 Click Finish 4 Insert the...

Страница 10: ...AutoRun driver into CD ROM waiting for a few seconds Click on TV Card Series and choose PV CX881P to install 6 If you see any Digital Signature Not Found this dialog box please click Yes 7 Click Yes...

Страница 11: ...3 After DirectX installation finished Windows will restart If you have other programs under executing please save files and exit those programs 4 4 Capture Tool 1 When you install capture driver compl...

Страница 12: ...mat that is installed in your system C Video Capture Filter Video decode to set the optional Video Proc Amp you can change the Brightness Contrast Saturation or Hue by using the various scroll bars an...

Страница 13: ...pture B Capture Audio Selecting the item is to let you to capture with audio C Master Stream You can choose master stream between None Video and Audio D Set Frame Rate This function is to set frame ra...

Страница 14: ...RGB555 640 x 240 V V V V RGB555 640 x 288 V V V V RGB555 640 x 480 V V V V RGB555 720 x 240 V V V V RGB555 720 x 288 V V V V RGB555 720 x 480 V V V V 2 RGB24 80 x 60 V V V V RGB24 88 x 72 V V V V RGB...

Страница 15: ...U9 640 x 288 V YVU9 640 x 480 V YVU9 720 x 240 V YVU9 720 x 288 V YVU9 720 x 480 V 4 YUY2 80 x 60 V V V V YUY2 88 x 72 V V V V YUY2 128 x 96 V V V V YUY2 160 x 120 V V V V YUY2 176 x 144 V V V V YUY2...

Страница 16: ...72 V V V V I420 128 x 96 V V V V I420 160 x 120 V V V V I420 176 x 144 V V V V I420 240 x 176 V V V V I420 240 x 180 V V V V I420 320 x 240 V V V V I420 352 x 240 V V V V I420 352 x 288 V V V V I420...

Страница 17: ...RGB555 352 x 240 V V V V V V V V RGB555 352 x 288 RGB555 640 x 240 V V V V V V V V RGB555 640 x 288 RGB555 640 x 480 RGB555 720 x 240 V V V V V V V V RGB555 720 x 288 RGB555 720 x 480 2 RGB24 80 x 60...

Страница 18: ...VU9 352 x 288 YVU9 640 x 240 V V V V V YVU9 640 x 288 YVU9 640 x 480 YVU9 720 x 240 V V V V V YVU9 720 x 288 YVU9 720 x 480 4 YUY2 80 x 60 V V V V V V V V YUY2 88 x 72 V V V V V V V V YUY2 128 x 96 V...

Страница 19: ...72 V V V V V V V V I420 128 x 96 V V V V V V V V I420 160 x 120 V V V V V V V V I420 176 x 144 V V V V V V V V I420 240 x 176 V V V V V V V V I420 240 x 180 V V V V V V V V I420 320 x 240 V V V V V V...

Страница 20: ...l because the signal is via CPU and memory to display Q How to enable audio function A 1 Double click speaker 2 Click properties of Options 3 Enable Line in of Playback Q The system will hang up when...

Отзывы: