background image

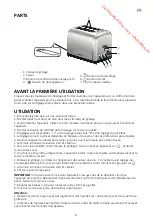
1. Plug the toaster into the mains socket.

2. Put the bread slice/slices into the slot(s) at the top of the appliance. 

• Make sure the crumb tray is fully in place by pushing it firmly into the appliance before using.

3. Turn the browning control knob to the desired setting. 

• There are 6 settings: “1” for the lightest setting, “6” for the darkest setting. 

• You will need to experiment with this setting depending on your browning colour preference and 

the thickness of the bread.

4. Press carriage lever down vertically until it locks in the down position to switch the appliance on. 

• The indicator light on the stop button will illuminate.

• Toasting process can be terminated at any time by pressing        . The carriage lever will spring up.

5. Once the bread has been toasted to the selected setting, the bread will automatically pop up 

and the  carriage lever will automatically spring up to switch off the appliance. 

• During toasting, you may observe the toasting colour, if the browning setting is higher than 

required, press        to stop the operation at any time.

• The indicator light on the stop button will go out.

6. Remove the bread from the slot. 

IMPORTANT: 

If the bread gets stuck inside the appliance, do not attempt to dislodge the bread 

when the appliance is plugged in. Remove the plug from the mains socket, allow the appliance

to cool down and carefully remove bread using wooden tongs.

7. Repeat steps 2 to 6 for additional toast as desired. 

8. When all toasting is complete, unplug the toaster from the mains socket.

Caution:

• Do not toast the food with extremely runny ingredients such as butter.

• The toast slot is only able to toast regular bread slice. Do not try to insert slices that are too thick.

Reheating

To reheat cold toasted bread, press       . 

The indicator light on the reheating button will illuminate to indicate the appliance is in the 

reheating cycle. 

In this mode toasting time is fixed, after the time runs out, the carriage lever will automatically 

spring up to end the reheating process. 

Defrosting


1. To toast frozen bread, turn the browning control knob to your desired setting.

• Setting 1-2: for refrigerated breads and thinner frozen items such as frozen pancakes

• Setting 3-5: for pastries, frozen waffles, thin French toast and refrigerated bagels

• Setting 6: for thicker frozen items such as bagels, hand cut bread and thick French toast.

2. Press the carriage lever down vertically until it latches in the down position.

3. Press        .

• The indicator light on the defrosting button will illuminate to indicate the appliance is in the 

defrosting cycle.

Remove all packaging materials and wipe the outside of the appliance with a damp cloth.

Before using the appliance for the first time, it is recommended to let the appliance complete a 

few toasting cycles without slices of bread on the highest browning setting in a properly ventilated 

room.

BEFORE FIRST USE

OPERATION

3

EN

Downloaded from www.vandenborre.be

Содержание 2STT

Страница 1: ...2STT TOASTER GRILLE PAIN BROODROOSTER TOSTADORA TORRADEIRA D o w n l o a d e d f r o m w w w v a n d e n b o r r e b e...

Страница 2: ...English French Dutch Spanish Portuguese EN1 EN5 FR6 FR10 NL11 NL15 ES16 ES20 PT21 PT25 Catalogue D o w n l o a d e d f r o m w w w v a n d e n b o r r e b e...

Страница 3: ...the appliance and its cord out of reach of children less than 8 years The appliance is not intended to be operated by means of an external timer or separate remote control system The outer surface may...

Страница 4: ...lammable materials or under wall cabinets as the bread may burn which constitutes a fire hazard Do not use the toaster without the crumb tray in place To avoid possibility of fire do not leave the toa...

Страница 5: ...den tongs 7 Repeat steps 2 to 6 for additional toast as desired 8 When all toasting is complete unplug the toaster from the mains socket Caution Do not toast the food with extremely runny ingredients...

Страница 6: ...t come into contact with food Correct food hygiene practices should always be followed at all times to avoid possibility of food poisoning cross contamination Pull out the crumb tray located at the bo...

Страница 7: ...ents the appliance and its accessories must be disposed of separately from household waste when the appliance reaches its end of life Contact your local authority to learn about disposal and recycling...

Страница 8: ...reil Le nettoyage et l entretien par l usager ne doivent pas tre e ectu s par des enfants sauf s ils ont plus de 8 ans et qu ils sont surveill s Maintenir l appareil et son cordon hors de port e des e...

Страница 9: ...lessures corporelles N ins rez pas dans le four du papier d aluminium des ustensiles m talliques ou des aliments trop volumineux ceux ci pourraient provoquer un incendie ou un choc lectrique Ne faites...

Страница 10: ...bouton d arr t s allume Vous avez la possibilit d interrompre le grillage tout moment en appuyant sur Le levier remonte tout seul 5 Une fois le pain grill au degr choisi l appareil s teint le pain es...

Страница 11: ...retournez le et secouez le d licatement R chau er Pour r chauffer des tartines grill es refroidies appuyez sur Le t moin situ c t du bouton de r chauffage s allume indiquant que l appareil est en mode...

Страница 12: ...ur les proc dures de mise au rebut et de recyclage contactez les autorit s de votre commune Apportez l appareil un point de collecte local pour qu il soit recycl Certains centres acceptent les produit...

Страница 13: ...t spelen Reinigen en onderhoud mogen alleen worden gedaan door kinderen als zij ouder zijn dan 8 jaar en onder toezicht staan Houd het apparaat en het snoer ervan buiten bereik van kinderen jonger dan...

Страница 14: ...ktrische schokken of verwonding te voorkomen Doe geen te grote stukken voedsel verpakkingen van metaalfolie of kookgerei in het apparaat omdat dit een gevaar van brand of elektrische schokken inhoudt...

Страница 15: ...in vastklikt om het apparaat in te schakelen Het controlelampje op de stopknop gaat branden U kunt het roosteren op eender moment stoppen door te drukken op De broodrooster hendel springt dan naar bov...

Страница 16: ...randen aangevend dat het apparaat in de ontdooistand is geschakeld Haal de stekker van het apparaat uit het stopcontact en laat het volledig afkoelen voordat u het gaat reinigen Reinig de buitenkant v...

Страница 17: ...Neem contact op met uw gemeente voor informatie over afdanking en recycling Lever het apparaat in bij het inzamelpunt van uw gemeente voor recycling Bij sommige inzamel punten kunt u het apparaat grat...

Страница 18: ...y est n bajo la supervisi n de un adulto Mantenga el aparato y su cable el ctrico fuera del alcance de ni os menores de 8 a os Este aparato no ha sido dise ado para ser utilizado con un temporizador...

Страница 19: ...duzca en el aparato trozos excesivamente grandes piezas envueltas en papel de aluminio ni otros utensilios porque podr a provocar un incendio o una descarga el ctrica No ponga el aparato en funcionami...

Страница 20: ...stop se apagar 6 Extraiga el pan de la ranura IMPORTANTE En caso de que el pan quede atascado dentro del aparato no intente extraerlo mientras el aparato est enchufado Desenchufe el cable el ctrico d...

Страница 21: ...el ciclo de descongelaci n Antes de limpiar el aparato debe desenchufarlo y esper ar hasta que se haya enfriado por completo Limpie el exterior del aparato con un pa o limpio S que lo por completo No...

Страница 22: ...entes electr nicos el aparato y sus accesorios no se deben tirar en la basura dom stica al final de la vida til del aparato Consulte a las autoridades locales sobre el modo correcto de eliminaci n y r...

Страница 23: ...om o aparelho A limpeza e a manuten o pelo utilizador n o devem ser realizadas por crian as com idade inferior a 8 anos e sempre sob vigil ncia de um adulto Mantenha o aparelho e o respetivo cabo el t...

Страница 24: ...para evitar o perigo de fogo choque el ctrico ou ferimentos pessoais N o devem ser inseridos no aparelho alimentos demasiado grandes embalagens em folha de alum nio ou outros utens lios dado que pode...

Страница 25: ...t o para parar o funcionamento em qualquer altura A luz indicadora no bot o stop parar apaga se 6 Retire o p o da abertura IMPORTANTE Se o p o ficar bloqueado no interior do aparelho n o tente extrair...

Страница 26: ...te Reaquecimento Para reaquecer p o torrado j frio prima o bot o A luz indicadora do bot o de reaquecimento acende se para indicar que o aparelho est a executar o ciclo de reaquecimento Neste modo o t...

Страница 27: ...o produto e os seus acess rios devem ser eliminados separadamente do lixo dom stico quando atingirem o fim da sua vida til Contacte as autoridades locais para obter informa es acerca da elimina o e re...

Страница 28: ...D o w n l o a d e d f r o m w w w v a n d e n b o r r e b e...

Отзывы: