background image

EVO160F

12

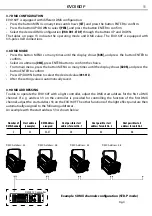
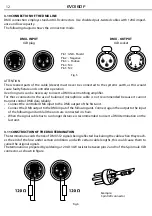
3.10 CONNECTION OF THE DMX LINE

DMX connection employs standard XLR connectors. Use shielded pair-twisted cables with 120Ω imped-

ance and low capacity.

The following diagram shows the connection mode:

ATTENTION

The screened parts of the cable (sleeve) must never be connected to the system’s earth, as this would 

cause faulty fixture and controller operation.

Over long runs can be necessary to insert a DMX level matching amplifier. 

For  those  connections  the  use  of  balanced  microphone  cable  is  not  recommended  because  it  cannot 

transmit control DMX data reliably. 

•  Connect the controller DMX input to the DMX output of the first unit.

•  Connect the DMX output to the DMX input of the following unit. Connect again the output to the input 

of the following unit until all the units are connected in chain.

•  When the signal cable has to run longer distance is recommended to insert a DMX termination on the 

last unit.

3.11 CONSTRUCTION OF THE DMX TERMINATION

The termination avoids the risk of DMX 512 signals being reflected back along the cable when they reach-

es the end of the line: under certain conditions and with certain cable lengths, this could cause them to 

cancel the original signals.

The termination is prepared by soldering a 120Ω 1/4 W resistor between pins 2 and 3 of the 5-pin male XLR 

connector, as shown in figure.

DMX - OUTPUT

XLR socket

DMX - INPUT

XLR plug

Pin1 : GND - Shield

Pin2 : - Negative

Pin3 : + Positive

Pin4 : N/C

Pin5 : N/C

Fig.5

Example:

3 pin XLR connector

Fig.6

Содержание EVO160F

Страница 1: ...EN IT Manuale Utente User Manual EVO160F LED PROJECTOR ...

Страница 2: ...rziale per propri scopi commerciali è vietata Al fine di migliorare la qualità dei prodotti la Music Lights S r l si riserva la facoltà di modificare in qualunque momento e senza preavviso le specifiche menzionate nel presente manuale di istruzioni Tutte le revisioni e gli aggiornamenti sono disponibili nella sezione Manuali sul sito www musiclights it ...

Страница 3: ...mento 3 2 Impostazione base 3 3 Struttura menu 3 4 Dimmer STAT 3 5 Modalità Master Slave 3 6 Collegamento 3 7 Configurazione canali DMX 3 8 Modalità DMX 3 9 Indirizzamento DMX 3 10 Collegamenti della linea DMX 3 11 Costruzione del terminatore DMX 3 12 Tabella canali DMX 3 13 Motor reset 3 14 Funzioni speciali 3 15 Calibrazione 4 Manutenzione 4 1 Manutenzione e pulizia del sistema ottico 4 2 Sostit...

Страница 4: ...rti in luoghi a temperatura superiore ai 45 C o inferiori a 20 C Evitare che nell unità penetrino liquidi infiammabili acqua o oggetti metallici Non smontare e non apportare modifiche all unità Tutti gli interventi devono essere sempre e solo effettuati da personale tecnico qualificato Rivolgersi al più vicino centro di assistenza tecnica autorizzato Se si desidera eliminare il dispositivo definit...

Страница 5: ...lle Condizioni Generali di Garanzia Si prega dopo l acquisto di procedere alla registrazione del prodotto sul sito www musiclights it In alternativa il prodotto può essere registrato compilando e inviando il modulo riportato alla fine del manuale A tutti gli effetti la validità della garanzia è avallata unicamente dalla presentazione del certificato di garanzia Music Lights constata tramite ve rif...

Страница 6: ... risulta essere la produzione calore EVO160F infatti offre un funzionamento a freddo riducendo i costi di condizionamento e rendendo l ambiente più conforte vole sia per i tecnici dietro il set che per i talents 1 2 SPECIFICHE TECNICHE I vantaggi della tecnologia offerta da EVO160F Risparmio energetico significativo in fase di funzionamento Risparmio nei cablaggi collegamento in serie di alimentaz...

Страница 7: ...te IP20 Connessioni di alimentazione Input Output Neutrik NAC3MPA NAC3MPB Connessioni di segnale Input output XLR3p 5p Staffa di sospensione maniglie posteriori e leve di serraggio ideate per facilitare e velocizzare le fasi di montaggio e puntamento Alimentazione 100 240V 50 60Hz Condizioni di esercizio 20 45 Output alimentazione per connessione di più unità in serie fino a 10 proiettori a 230V C...

Страница 8: ...F 6 ALLOGGIAMENTO FUSIBILE in caso di rottura del fusibile sostituire sempre con uno dello stesso tipo e dello stesso valore 7 DMX OUT XLR a 5 poli 1 massa 2 DMX 3 DMX 4 N C 5 N C 8 DMX OUT XLR 3 poli 1 massa 2 DMX 3 DMX 9 DMX IN XLR a 5 poli 1 massa 2 DMX 3 DMX 4 N C 5 N C 10 DMX IN XLR 3 poli 1 massa 2 DMX 3 DMX 11 POWER IN connettore di potenza Neutrik per il collegamento ad una presa di rete 1...

Страница 9: ...uppor tare almeno 10 volte il peso dell unità Inoltre assicurarsi di rispettare tutte le avvertenze in materia di sicurezza Fissare il proiettore attraverso l apposita staffa 1 ad una collocazione idonea È assolutamente necessario assicurare il proiettore contro la caduta utilizzando un cavo di sicurezza in particolare collegare il cavo in un punto adatto in modo che la caduta del proiettore non p...

Страница 10: ...NE BASE Il proiettore EVO160F dispone di un display LED e 4 pulsanti per accesso alle funzioni del pannello di controllo fig 3 Fig 3 MENU ENTER UP DOWN Per scorrere il menu principale o tornare ad una opzione del menu precedente Per entrare nel menu selezionato o confermare il valore attuale della funzione o l opzione all interno di un menu Per scorrere attraverso le diverse funzioni in ordine dis...

Страница 11: ... STAT DIM D 000 100 ZOOM Z 000 100 DMX Slave RUN DMX SLAV DMX Address ADDR D 001 D 512 Motor reset MOTR NO YES Special settings SET KEY Off Password UP DOWN UP DOWN On DIM OFF DIM1 DIM2 DIM3 DIM4 CURV Off CV1 CV2 CV3 REST REST OK PERS UNO 1 Ch DOS 2 Ch STD P 5 Ch SLCK OFF ON DERR SAVE BLAK ...

Страница 12: ...cevuti si torna automaticamente al menu principale dopo 2 minuti senza premere alcun tasto 3 5 MODALITÀ MASTER SLAVE Questa modalità consente di collegare in linea più unità EVO160F senza un controller La prima unità sarà impostata come master e le altre funzioneranno come slave con lo stesso effetto Premere il MENU fino a quando sul display non appare RUN quindi premere ENTER per confermare Preme...

Страница 13: ...rare nella modalità ADDR e selezionare il valore desiderato 001 512 tenere premuto per lo scorrimento veloce Al termine dell impostazione il valore verrà salvato automaticamente 3 9 INDIRIZZAMENTO DMX Per poter comandare l EVO160F con un unità di comando luce occorre impostare l indirizzo di start DMX per il primo canale DMX Se per esempio sull unità di comando è previsto l indirizzo 33 per comand...

Страница 14: ...i dati di controllo DMX Collegare l uscita DMX del controller con l ingresso DMX della prima unità Collegare quindi l uscita DMX con l ingresso DMX della successiva unità l uscita di quest ultima con l ingresso di quella successiva e via dicendo finchè tutte le unità sono collegate formando una catena Per installazioni in cui il cavo di segnale deve percorrere lunghe distanze è consigliato inserir...

Страница 15: ... 0 100 000 255 STD P CH Function in STD P mode Value 1 DIMMER 0 100 000 255 2 FINE DIMMER 0 100 000 255 3 STROBE No strobe Strobe slow to fast No strobe Lightning strobe slow to fast No strobe Random strobe slow to fast 000 009 010 099 100 109 110 179 180 189 190 255 4 FOCUS 0 100 000 255 5 MOTOR RESET No function Motor reset No function 000 200 201 220 221 255 ...

Страница 16: ...vamente abilitare o disabilitare la password Quando l unità è impostata su ON dopo 30 secondi o al prossimo riavvio bisognerà immettere la password di accesso NOTA Le impostazioni di fabbrica relative alla password di accesso corrispondono alla combina zione dei tasti UP DOWN UP DOWN Premere ENTER per confermare DIMM Selezionare la funzione DIMM per entrare nella modalità dimmer e scegliere e simu...

Страница 17: ...amente l impostazione PERF Selezionando la funzione PERF è possibile impostare le caratteristiche di prestazione del proiettore LIVE è la modalità predefinita del proiettore e permette di bilanciare i requisiti di uscita e la rumo rosità del dispositivo STDO è la modalità che consente di ridurre molto il rumore del proiettore e di operare a un livello di potenza moderato POWR è la modalità che con...

Страница 18: ... momento in cui anche un piccolo problema viene rilevato Si dovrebbe procedere ad intervalli regolari alla pulizia della parte frontale per asportare polvere fumo e altre particelle Solo così la luce può essere irradiata con la luminosità massima Per la pulizia usare un panno morbido pulito e un detergente per vetri come si trovano in commercio Quindi asciu gare le parti delicatamente Attenzione c...

Страница 19: ...ncanza di alimentazione di rete Cavo di alimentazione danneggiato Alimentatore interno difettoso Verificarelapresenzadellatensionealimentazione Controllare il cavo di alimentazione Sostituire l alimentatore interno Il proiettore non risponde al DMX Indirizzamento DMX errato Cavo di segnale DMX difettoso Rimbalzo segnale DMX Controllare il pannello di controllo e l indirizzamento delle unità Contro...

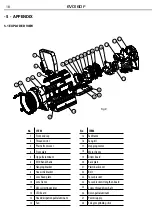
Страница 20: ... shank 7 Hanging bracket 8 Heat sink bracket 9 Lens head plate 10 Lens frame 11 Ø52 collecting mirror 12 LED board 13 Head dissipation pull aluminum 14 Fan No ITEM 15 Fan frame 16 Fan grill 17 Stepping motor 18 Motor frame 19 Driver board 20 Back plate 21 Plasti back cover 22 Belt 23 Focus bracket 24 Focus bracket strengthen board 25 Screw thread drive shaft 26 Down pull aluminum 27 Power supply 2...

Страница 21: ......

Страница 22: ...r by any means for any commercial use In order to improve the quality of products Music Lights S r l reserves the right to modify the characteristics stated in this instruction manual at any time and without prior notice All revisions and updates are available in the manuals section on site www musiclights it ...

Страница 23: ...nctions and settings 3 1 Operation 3 2 Basic 3 3 Menu structure 3 4 Dimmer 3 5 Master Slave mode 3 6 Linking 3 7 DMX configuration 3 8 DMX mode 3 9 DMX addressing 3 10 Connection of the DMX line 3 11 Construction of the DMX termination 3 12 DMX control 3 13 Motor reset 3 14 Special functions 3 15 Calibration 4 Maintenance 4 1 Maintenance and cleaning the unit 4 2 Fuse replacement 4 3 Troubleshooti...

Страница 24: ... or 20 C Make certain that no inflammable liquids water or metal objects enter the fixture Do not dismantle or modify the fixture All work must always be carried out by qualified technical personnel Contact the nearest sales point for an inspection or contact the manufacturer directly If the unit is to be put out of operation definitively take it to a local recycling plant for a disposal which is ...

Страница 25: ...e www musiclights it Please remember to register the piece of equipment soon after you purchase it logging on www musiclights it The product can be also registered filling in and sending the form available on your guarantee certificate For all purposes the va lidity of the guarantee is endorsed solely on presentation of the guarantee certificate Music Lights will verify the validity of the claim t...

Страница 26: ...at generation it is characterized by cold working operations reducing need and cost of air conditioning in studios and implying a more comfort able environment for both talents and technicians 1 2 TECHNICAL SPECIFICATIONS Advantages of EVO160F technology Considerable energy saving during operation Simplified wiring up to 10 Fresnel in a daisy chain for both power and signal connection No need for ...

Страница 27: ... Input Output Power connections Neutrik NAC3MPA NAC3MPB Input Output Signal connections 3p 5p XLR Suspension bracket rear handles and clamp levers designed for fast and easy mounting and pointing Power supply 100 240V 50 60Hz Operating conditions 20 45 C Power output for daisy chain connection of more units up to 10 projectors at 230V Max output consumption 180W Weight 6 6 kg Dimensions WxHxD 286x...

Страница 28: ... event of breakage always replace the fuse with the same type and rating 7 DMX OUT 5 pole XLR 1 ground 2 DMX 3 DMX 4 N C 5 N C 8 DMX OUT 3 pole XLR 1 ground 2 DMX 3 DMX 9 DMX IN 5 pole XLR 1 ground 2 DMX 3 DMX 4 N C 5 N C 10 DMX IN 3 pole XLR 1 ground 2 DMX 3 DMX 11 POWER IN Neutrik connector for connection to a socket 100 240V 50 60Hz via the supplied mains cable 1 3 OPERATING ELEMENTS AND CONNEC...

Страница 29: ...lously with all the regulations particularly re garding safety currently in force in the country in which the fixture s being used Install the projector at a suitable location by means of the mounting bracket 1 Always additionally secure the projector with the safety rope from falling down For this purpose fas ten the safety rope at a suitable position so that the maximum fall of the projector wil...

Страница 30: ...n switch off the unit with the power switch 3 2 BASIC Access control panel functions using the four panel buttons located directly underneath the LED Display fig 3 MENU ENTER UP DOWN Used to access the menu or to return a previous menu option Used to select and store the current menu or confirm the current function value or option within a menu Navigates downwards through the menu list and increas...

Страница 31: ...STAT DIM D 000 100 ZOOM Z 000 100 DMX Slave RUN DMX SLAV DMX Address ADDR D 001 D 512 Motor reset MOTR NO YES Special settings SET KEY Off Password UP DOWN UP DOWN On DIM OFF DIM1 DIM2 DIM3 DIM4 CURV Off CV1 CV2 CV3 REST REST OK PERS UNO 1 Ch DOS 2 Ch STD P 5 Ch SLCK OFF ON DERR SAVE BLAK ...

Страница 32: ... the first unit in line other units will work as slave with the same effect Press the button MENU so many times until the display shows RUN and press the button ENTER Press UP DOWN to set the unit as slave SLAV Use standard DMX cables to daisy chain your units together via the DMX connector on the rear of the units For longer cable runs we suggest a terminator at the last fixture see page 12 3 6 L...

Страница 33: ...nd press the button ENTER to confirm Press UP DOWN button to select the desired value 001 512 After the setting value is automatically saved 3 9 DMX ADDRESSING To able to operate the EVO160F with a light controller adjust the DMX start address for the first a DMX channel If e g address 33 on the controller is provided for controlling the function of the first DMX channel adjust the start address 3...

Страница 34: ... unit Connect the DMX output to the DMX input of the following unit Connect again the output to the input of the following unit until all the units are connected in chain When the signal cable has to run longer distance is recommended to insert a DMX termination on the last unit 3 11 CONSTRUCTION OF THE DMX TERMINATION The termination avoids the risk of DMX 512 signals being reflected back along t...

Страница 35: ...100 000 255 STD P CH Function in STD P mode Value 1 DIMMER 0 100 000 255 2 FINE DIMMER 0 100 000 255 3 STROBE No strobe Strobe slow to fast No strobe Lightning strobe slow to fast No strobe Random strobe slow to fast 000 009 010 099 100 109 110 179 180 189 190 255 4 FOCUS 0 100 000 255 5 MOTOR RESET No function Motor reset No function 000 200 201 220 221 255 ...

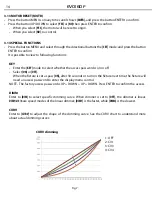
Страница 36: ...KEY mode to select whether the access password is on or off Select ON or OFF When the fixture is set as pass ON after 30 seconds or turn on the fixture next time the fixture will need an access password to enter the display menu control NOTE The factory access password is UP DOWN UP DOWN Press ENTER to confirm the access DIMM Enter to DIM to select specific dimming curve When dimmer is set to OFF ...

Страница 37: ...cs of the fixture LIVE mode is the default mode which balances the requirements of output and noise STDO mode maintains extremely low noise at all times and operates at a moderated power level POWR mode operates at high power for long periods of time without making considerations for noise levels MCON The function MCON allows the user to select whether the fixture will send DMX data to other fixtu...

Страница 38: ...en when a small problem is detected It is recommended to clean the front at regular intervals from impurities caused by dust smoke or other particles to ensure that the light is radiated at maximum brightness For cleaning disconnect the main plug from the socket Use a soft clean cloth moistened with a mild detergent Then carefully wipe the part dry For cleaning other housing parts use only a soft ...

Страница 39: ...gularly Install lens assembly properly Fixture does not power up No power Loose or damaged power cord Faulty internal power supply Check for power on power outlet Check power cord Replace internal power supply Fixture does not respond to DMX Wrong DMX addressing Damaged DMX cables Bouncing signals Check control panel and unit addressing Check DMX cables Install terminator as suggested Contact an a...

Страница 40: ... shank 7 Hanging bracket 8 Heat sink bracket 9 Lens head plate 10 Lens frame 11 Ø52 collecting mirror 12 LED board 13 Head dissipation pull aluminum 14 Fan No ITEM 15 Fan frame 16 Fan grill 17 Stepping motor 18 Motor frame 19 Driver board 20 Back plate 21 Plasti back cover 22 Belt 23 Focus bracket 24 Focus bracket strengthen board 25 Screw thread drive shaft 26 Down pull aluminum 27 Power supply 2...

Страница 41: ...chi conseguenti sono a carico del possessore dell apparecchio A tutti gli effetti la validità della garanzia è avallata unicamente dalla presentazione del certificato di garanzia The guarantee covers the unit in compliance with existing regulations You can find the full version of the General Guarantee Conditions on our web site www musiclights it Abstract General Guarantee Conditions Please remem...

Страница 42: ...date Data acquisto FORM TO BE FILLED IN AND MAILED CEDOLA DA COMPILARE E SPEDIRE FORM TO BE FILLED IN AND KEPT CEDOLA DA COMPILARE E CONSERVARE PROV ZIP CODE C A P MODEL MODELLO SERIAL N SERIE N Purchased by Acquistato da SURNAME COGNOME Dealer s stamp and signature Timbro e firma del Rivenditore NAME NOME ADDRESS VIA N CITY CITTà Purchasing date Data acquisto PROV ZIP CODE C A P ...

Страница 43: ......

Страница 44: ...39 0771 721955 www musiclights it info musiclights it Music Lights S r l entertainment technologies ISO 9001 2008 Certified Company 2012 Music Lights S r l PROLIGHTS è un brand di proprietà della Music Lights S r l PROLIGHTS is a brand of Music Lights S r l company ...

Отзывы: