background image

7

CROMOWASH100

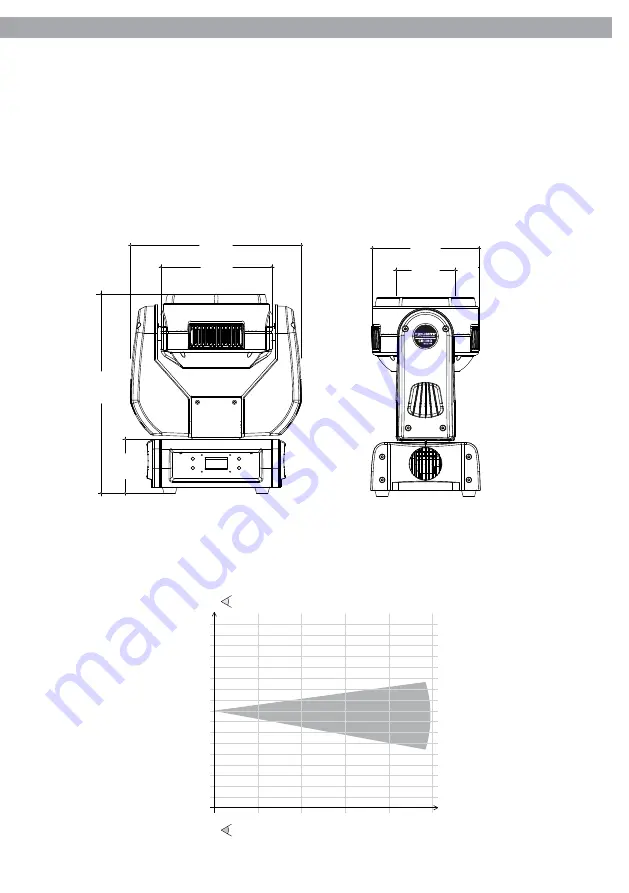
Fig.2

296
192

344

93

184
102

Beam Diameter (mt.)

0

2

4

6

8

Dist.(mt)

Diam.(mt)

Lux Center

0,26

0,53

0,79

1,06

33984

8496

3776

2124

10
1,32

975

4

3

2

1

0

1

2

3

4

Photometric data

• 

Suspension and fixing: any possible working position by means of omega kit (included).

Power supply

• 

Power unit: 100-240V 50/60Hz

• 

Max power consumption: 130W.

Weight and dimensions

• 

Weight: 6,5kg.

• 

Dimensions: 296x344x184mm.

Содержание Cromowash100

Страница 1: ...I GB Manuale Utente User Manual CROMOWASH100 MOVING HEADS ...

Страница 2: ...REV 002 10 11 ...

Страница 3: ...ando e collegamenti 1 2 Descrizione 1 3 Specifiche tecniche 2 Installazione 2 1 Montaggio 3 Funzioni e impostazioni 3 1 Funzionamento 3 2 Impostazione base 3 3 Struttura del menu 3 4 Funzionamento in modalità Stand Alone 3 5 Modalità Master Slave 3 6 Collegamento 3 7 Configurazione canali DMX 3 8 Modalità DMX 3 9 Collegamenti della linea DMX 3 10 Costruzione del terminatore DMX 3 11 Impostazione d...

Страница 4: ...re e solo effettuati da personale tecnico qualificato Rivolgersi al più vicino centro di assistenza tecnica autorizzato Se si desidera eliminare il dispositivo definitivamente consegnarlo per lo smaltimento ad un istituzione locale per il riciclaggio Attenzioni e precauzioni per l installazione Non guardare direttamente il fascio luminoso Tenete presente che i veloci cambi di luce possono provo ca...

Страница 5: ...genti normative Sul sito www musiclights it è possibile consultare il testo integrale delle Condizioni Generali di Garanzia Si prega dopo l acquisto di procedere alla registrazione del prodotto sul sito www musiclights it In alternativa il prodotto può essere registrato compilando e inviando il modulo riportato alla fine del manuale A tutti gli effetti la validità della garanzia è avallata unicame...

Страница 6: ...00 6 1 DESCRIZIONE E SPECIFICHE TECNICHE 1 1 Elementi di comando e collegamenti DMX OU T DMX IN POWER IN FUSE F3 15A ON 0 I OFF Welcome ADD 001 MENU ENTER DOWN UP Fig 1 1 2 B A Vista B Vista A 3 5 6 8 9 10 11 4 7 ...

Страница 7: ...scente o aumentare il valore della funzione stessa 7 Tasto DOWN per scorrere attraverso le diverse funzioni in ordine decrescente o diminuire il valore della funzione stessa 8 DMX IN XLR a 3 poli 1 massa 2 DMX 3 DMX 9 DMX OUT XLR a 3 poli 1 massa 2 DMX 3 DMX 10 POWER IN spina da pannello VDE per il colle gamento ad una presa di rete 100 240V 50 60Hz tramite il cavo rete in dotazione Sotto la spina...

Страница 8: ...ori più vividi e minore assorbimento energetico delle lampade tra dizionali Sistema di sintesi colore miscelazione RGB 16 milioni di colori per possibilità cromatiche illimitate Gruppo ottico ad altissima resa luminosa concepito per ottimizzare la direttività del fascio Vita media sorgente LED 50 000h Dimmer shutter strobo Dimmer lineare 0 100 Regolazione curva dimmer 4 configurazioni selezionabil...

Страница 9: ...ione Alimentazione 100 240V 50 60Hz Consumo ad emissione massima 130W Peso e dimensioni Peso 6 5kg Dimensioni 296x344x184mm Fig 3 Fig 2 296 192 344 93 184 102 Beam Diameter mt 0 2 4 6 8 Dist mt Diam mt Lux Center 0 26 0 53 0 79 1 06 33984 8496 3776 2124 6 6 10 1 32 6 975 4 3 2 1 0 1 2 3 4 Photometric data ...

Страница 10: ...nserire nelle apposite sedi della piastra dove vengono bloccati con una rotazione in senso orario fino all arresto L area di collocazione deve avere una stabilità sufficiente e supportare almeno 10 volte il peso dell unità Inoltre assicurarsi di rispettare tutte le avvertenze in materia di sicurezza È assolutamente necessario assicurare il proiettore contro la caduta utilizzando un cavo di sicurez...

Страница 11: ...e CROMOWASH100 dispone di un display LCD e di 4 pulsanti per l accesso alle funzioni del pan nello di controllo e la loro gestione fig 4 Fig 4 Tasto Istruzioni MENU Per scorrere il menu principale o tornare ad una opzione del menu precedente UP Per scorrere attraverso le diverse funzioni in ordine discendente o aumentare il valore della funzione stessa DOWN Per scorrere attraverso le diverse funzi...

Страница 12: ...isplay 60 Close Bright Keylock Yes No Run DMX512 Auto1 Auto2 Custom Test Slave Dimmer Dimmer 4 Dimmer 3 Dimmer 2 Dimmer 1 Dimmer 0 Fans High Normal Low Auto Invert Pan Normal Reverse Tilt Normal Reverse Dimmer Normal Reverse Use No Yes P Start 000 255 T Start 000 255 P Finish 000 255 T Finish 000 255 Use No Yes Range ...

Страница 13: ...X System Power Normal High Uc Rgb to w Off Color Fan DMX System Dmxerror Save Black Edit Step 001 255 Tilt 000 255 Pan 000 255 Speed 000 255 Red 000 255 Green 000 255 Blue 000 255 Dimmer 000 255 Strobe 000 255 Time 000 255 Use No Yes Password 0000 Extra ...

Страница 14: ...to come indicato nel paragrafo 3 4 Servirsi dei connettori DMX del CROMOWASH100 e di un cavo XLR per formare una catena di unità In certe condizioni e lunghezze si consiglia di effettuare una terminazione come mostrato a pagina 15 3 6 COLLEGAMENTO Si possono collegare più unità affinché tutte le unità secondarie abbiano lo stesso effetto luce dell unità principale Master 1 Collegare l uscita DMX O...

Страница 15: ... di controllo DMX Collegare l uscita DMX del controller con l ingresso DMX della prima unità Collegare quindi l uscita DMX con l ingresso DMX della successiva unità l uscita di quest ultima con l ingresso di quella successiva e via dicendo finchè tutte le unità sono collegate formando una catena Per installazioni in cui il cavo di segnale deve percorrere lunghe distanze è consigliato inserire sull...

Страница 16: ...li DMX Indirizzo di start esempio Indirizzo DMX occupati Prossimo indirizzo di start possibile per unità n 1 Prossimo indirizzo di start possibile per unità n 2 Prossimo indirizzo di start possibile per unità n 3 9 33 33 41 42 51 60 12 33 33 44 45 57 69 Premere il tasto MENU fino a quando sul display non appare Intro quindi premere il tasto ENTER per confermare la scelta Premere i tasti UP e DOWN ...

Страница 17: ...0 031 050 051 070 071 090 091 110 111 130 131 150 151 170 171 200 201 205 206 210 211 215 216 220 221 225 226 230 231 235 236 240 241 245 246 250 251 255 7 DIMMER 0 100 000 255 8 STROBE No function 1 20 Hz 000 009 010 255 Channel Function in BASIC mode DMX value 9 CONTROL No function Pan tilt black activated activated after 3 secs Pan tilt black deactivated activated after 3 secs Fan Auto Fan Slow...

Страница 18: ...White 9 8000 K White 10 8500 K White 11 10000 K 000 005 006 010 011 030 031 050 051 070 071 090 091 110 111 130 131 150 151 170 171 200 201 205 206 210 211 215 216 220 221 225 226 230 231 235 236 240 241 245 246 250 251 255 Channel Function in ADVANCED mode DMX value 10 DIMMER 0 100 000 255 11 STROBE No function 1 20 Hz 000 009 010 255 12 CONTROL No function Pan tilt black activated activated afte...

Страница 19: ...stand alone Step001 Time 005 Use Yes Questo step crea un ciclo continuo Step002 Time 004 Use Yes Step003 Time 006 Use Yes Step004 Time 000 Use Yes Step005 Time 000 Use No Questi step non sono usati Step255 Time 000 Use No 3 14 IMPOSTAZIONI DISPOSITIVO È possibile modificare i parametri relativi al dispositivo Funzione Invert Premere il tasto MENU fino a quando sul display non appare Invert quindi ...

Страница 20: ... il tasto ENTER per confermare la scelta Con i tasti UP e DOWN selezionare il parametro che si desidera modificare fra BlackD Reset Power Color Fan e DMX error e premere ENTER Quindi scegliere il valore desiderato per la funzione e confermare l impostazione con il tasto ENTER Attiva funzione blackout immediato Attiva ritardo di 3 secondi Yes No Gestione funzione blackout dispositivo BlackD System ...

Страница 21: ... display non appare Intro quindi premere il tasto ENTER per confermare la scelta Premere i tasti UP e DOWN per selezionare nel menu la voce Keylock e confermare la scelta premendo il tasto ENTER Selezionare Yes oppure No a seconda che si voglia rispettivamente attivare o disattivare la password di accesso Quando l unità è impostata su ON dopo 30 secondi o al prossimo riavvio è necessario immet ter...

Страница 22: ...si La frequenza con la quale effettuare le operazioni sotto indicate dipende da diversi fattori quali la quantità di movimenti degli effetti e la qualità dell ambiente di lavoro umidità dell aria presenza di polvere salsedine ecc Per rimuovere lo sporco dal riflettore dalle lenti e dai filtri usare un panno morbido inumidito di un qualsiasi liquido detergente per la pulizia del vetro Annualmente s...

Страница 23: ...mall gear 13 Arm board 14 Base cover 1 15 IEC power socket 16 DMX connection board 17 Base cover 2 18 Fan 19 Pan belt 20 Power supply 21 Display PCB 22 Display support No ITEM 23 U frame 24 Y motor support 25 Y large gear 26 Pan belt 27 Driver PCB 28 Head structure 29 LED PCB 30 Capture lens 31 Capture lens plate 2 32 Capture lens plate 1 1 2 3 4 5 6 7 8 9 10 11 12 13 14 15 16 17 18 19 20 21 22 23...

Страница 24: ......

Страница 25: ...cifications 1 1 Operating elements and connections 1 2 Description 1 3 Technical specifications 2 Installation 2 1 Mounting 3 Functions and settings 3 1 Operation 3 2 Basic 3 3 Menu structure 3 4 Operation in Stand alone mode 3 5 Master slave mode 3 6 Linking 3 7 DMX configurations 3 8 DMX mode 3 9 Connection of the DMX line 3 10 Construction of the DMX termination 3 11 Adjusting the start address...

Страница 26: ...in that no inflammable liquids water or metal objects enter the fixture Do not dismantle or modify the fixture All work must always be carried out by qualified technical personnel Contact the nearest sales point for an inspection or contact the manufacturer directly If the unit is to be put out of operation definitively take it to a local recycling plant for a disposal which is not harmful to the ...

Страница 27: ...ent soon after you purchase it logging on www musiclights it The product can be also registered filling in and sending the form available on your guarantee certificate For all purposes the validity of the guarantee is endorsed solely on presentation of the guarantee certificate Music Lights will verify the va lidity of the claim through examination of the defect in relation to proper use and the a...

Страница 28: ...4 1 DESCRIPTION AND TECHNICAL SPECIFICATIONS 1 1 Operating elements and connections B view A view DMX OU T DMX IN POWER IN FUSE F3 15A ON 0 I OFF Welcome ADD 001 MENU ENTER DOWN UP Fig 1 1 2 B A 3 5 6 8 9 10 11 4 7 ...

Страница 29: ...u list and increases the numeric value when in a function 7 DOWN button navigates downwards through the menu list and decreases the numeric val ue when in a function 8 DMX IN 3 pole XLR 1 ground 2 DMX 3 DMX 9 DMX OUT 3 pole XLR 1 ground 2 DMX 3 DMX 10 POWER IN mains plug for connection to a socket 100 240V 50 60Hz via the supplied mains cable The support for he mains fuse is located near the mains...

Страница 30: ...s and lower power consumption than traditional lamps Colour synthesis RGB colour mixing 16 million colours for a limitless colour range High efficiency optical design with tubular tracks to generate a tight BEAM effect LED average life span 50 000h Dimmer shutter strobe 0 100 linear dimmer 4 different dimming curves available Independent shutter and fading effects with adjustable speed Strobe Elec...

Страница 31: ...26 0 53 0 79 1 06 33984 8496 3776 2124 6 6 10 1 32 6 975 4 3 2 1 0 1 2 3 4 Photometric data Suspension and fixing any possible working position by means of omega kit included Power supply Power unit 100 240V 50 60Hz Max power consumption 130W Weight and dimensions Weight 6 5kg Dimensions 296x344x184mm ...

Страница 32: ...to the figure the bolts of the brackets are placed into the openings provided in the base plate and turned clockwise until they lock to the stop The mount ing place must be of sufficient stability and be able to support a weight of 10 times of the unit s weight Always additionally secure the projector with the safety rope from falling down For this purpose fasten the safety rope at a suitable posi...

Страница 33: ... a LCD display and 4 button used to access the control panel functions and man age them fig 4 Button Instruction MENU Scroll through the main menu or exit from the current sub menu UP Navigates downwards through the menu list and increases the numeric value when in a function DOWN Navigates upwards through the menu list and decreases the numeric value when in a function ENTER Used to access the me...

Страница 34: ...play 60 Close Bright Keylock Yes No Run DMX512 Auto1 Auto2 Custom Test Slave Dimmer Dimmer 4 Dimmer 3 Dimmer 2 Dimmer 1 Dimmer 0 Fans High Normal Low Auto Invert Pan Normal Reverse Tilt Normal Reverse Dimmer Normal Reverse Use No Yes P Start 000 255 T Start 000 255 P Finish 000 255 T Finish 000 255 Use No Yes Range ...

Страница 35: ...X System Power Normal High Uc Rgb to w Off Color Fan DMX System Dmxerror Save Black Edit Step 001 255 Tilt 000 255 Pan 000 255 Speed 000 255 Red 000 255 Green 000 255 Blue 000 255 Dimmer 000 255 Strobe 000 255 Time 000 255 Use No Yes Password 0000 Extra ...

Страница 36: ... 3 4 Use standard DMX cables to daisy chain your units together via the DMX connector on the rear of the units For longer cable runs we suggest a terminator at the last fixture see page 13 3 6 LINKING Several units may be interconnected in order to control all further slave units to the same effect of the master unit 1 Connect the DMX OUT of the master unit via 3 pole XLR cable to the DMX IN of th...

Страница 37: ... the DMX input of the following unit Connect again the output to the input of the following unit until all the units are connected in chain When the signal cable has to run longer distance is recommended to insert a DMX termination on the last unit 3 10 CONSTRUCTION OF THE DMX TERMINATION The termination avoids the risk of DMX 512 signals being reflected back along the cable when they reaches the ...

Страница 38: ...er is provided for controlling the function of the first DMX channel adjust the start address 33 on the CROMOWASH100 The other functions of the light effect panel are then automatically assigned to the following addresses An example with the start address 33 is shown below Press the MENU button and select via the directional buttons the Intro menu choice then press the ENTER button to confirm the ...

Страница 39: ...1 050 051 070 071 090 091 110 111 130 131 150 151 170 171 200 201 205 206 210 211 215 216 220 221 225 226 230 231 235 236 240 241 245 246 250 251 255 7 DIMMER 0 100 000 255 8 STROBE No function 1 20 Hz 000 009 010 255 Channel Function in BASIC mode DMX value 9 CONTROL No function Pan tilt black activated activated after 3 secs Pan tilt black deactivated activated after 3 secs Fan Auto Fan Slow Fan...

Страница 40: ...White 9 8000 K White 10 8500 K White 11 10000 K 000 005 006 010 011 030 031 050 051 070 071 090 091 110 111 130 131 150 151 170 171 200 201 205 206 210 211 215 216 220 221 225 226 230 231 235 236 240 241 245 246 250 251 255 Channel Function in ADVANCED mode DMX value 10 DIMMER 0 100 000 255 11 STROBE No function 1 20 Hz 000 009 010 255 12 CONTROL No function Pan tilt black activated activated afte...

Страница 41: ...te all the steps in the custom program in the stand alone operation mode Go to MENU Intro Enter Run to select the operation mode Custom 3 14 FIXTURE SETTINGS It is possible to change the parameter value in the following way Invert function Press the MENU button select the Invert menu voice and press the ENTER button to confirm the choice Select the parameter to be changed between Pan Tilt and Dimm...

Страница 42: ...utton select the Range menu voice and press the ENTER button to confirm the choice Select the parameter to be changed between P start P finish T start and T finish press the ENTER button to confirm Set the desired parameter value 0 255 using the UP and DOWN buttons and press the ENTER button to confirm the setting Press the MENU button to go back or wait 30 seconds for automatic exit from the menu...

Страница 43: ... a display mode 60close or Bright When in the 60close setting the display backlight will turn off after 60 seconds When in the Bright setting the display backlight will stay on Keylock function Press the MENU button and select via the directional buttons the Intro menu choice then press the ENTER button to confirm the choice Press the UP and DOWN buttons to select Keylock menu voice and confirm th...

Страница 44: ...hich the following operations are to be carried out depends on various factors such as the amount of the effects and the quality of the working environ ment air humidity presence of dust salinity etc Use a soft cloth dampened with any detergent liquid for cleaning glass to remove the dirt from the reflectors from the lenses and filters It is recommended that the projector undergoes an annual servi...

Страница 45: ...e cover 1 15 IEC power socket 16 DMX connection board 17 Base cover 2 18 Fan 19 Pan belt 20 Power supply 21 Display PCB 22 Display support No ITEM 23 U frame 24 Y motor support 25 Y large gear 26 Pan belt 27 Driver PCB 28 Head structure 29 LED PCB 30 Capture lens 31 Capture lens plate 2 32 Capture lens plate 1 1 2 3 4 5 6 7 8 9 10 11 12 13 14 15 16 17 18 19 20 21 22 23 24 25 26 27 28 29 30 31 32 5...

Страница 46: ......

Страница 47: ...chi conseguenti sono a carico del possessore dell apparecchio A tutti gli effetti la validità della garanzia è avallata unicamente dalla presentazione del certificato di garanzia The guarantee covers the unit in compliance with existing regulations You can find the full version of the General Guarantee Conditions on our web site www musiclights it Abstract General Guarantee Conditions Please remem...

Страница 48: ...date Data acquisto FORM TO BE FILLED IN AND MAILED CEDOLA DA COMPILARE E SPEDIRE FORM TO BE FILLED IN AND KEPT CEDOLA DA COMPILARE E CONSERVARE PROV ZIP CODE C A P MODEL MODELLO SERIAL N SERIE N Purchased by Acquistato da SURNAME COGNOME Dealer s stamp and signature Timbro e firma del Rivenditore NAME NOME ADDRESS VIA N CITY CITTA Purchasing date Data acquisto PROV ZIP CODE C A P ...

Страница 49: ......

Страница 50: ......

Страница 51: ......

Страница 52: ... Music Lights S r l PROLIGHTS is a brand of Music Lights S r l company Via Appia Km 136 200 04020 Itri LT ITALY tel 39 0771 72190 fax 39 0771 721955 www musiclights it info musiclights it Music Lights S r l entertainment technologies ISO 9001 2008 Certified Company ...

Отзывы: