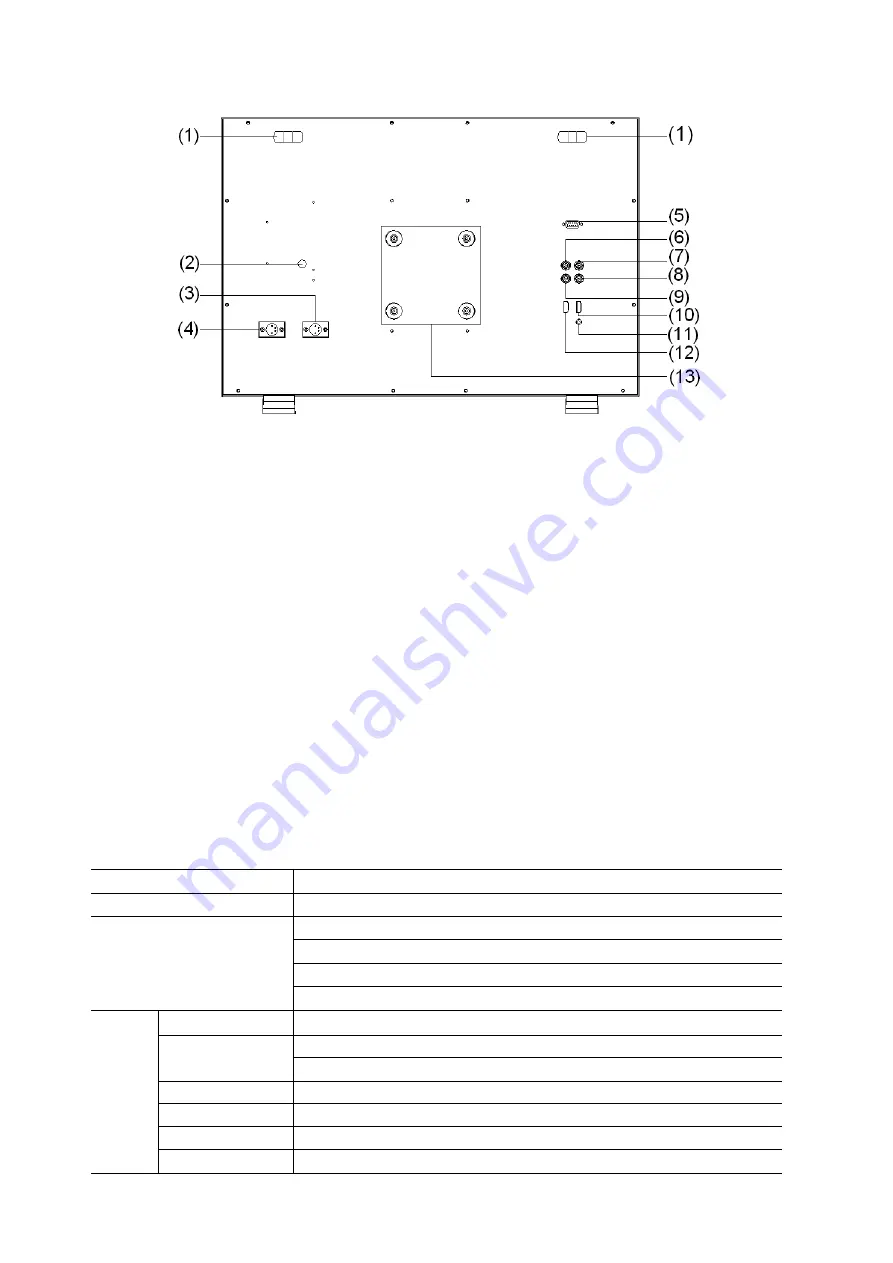
ProHD DT-X24H Скачать руководство пользователя страница 6


Rear view 


⑴ 

Handle   

⑵ 

Reserved battery plate power socket: 

Take off the rub cover to find the power socket, V-mount or Gold 

mount battery plates can be connected to the power socket. 

⑶ 

DC IN 11V-17V BACK UP: 

Connect with 4-pin XLR power adaptor (Pin 1: Negative, Pin 4: Positive)


⑷ 

DC IN 11V-17V MAIN: 

Connect with 4-pin XLR power adaptor (Pin 1: Negative, Pin 4: Positive)


⑸ 

REMOTE:

 DB9 socket, external controlling signal input.   

(See details in “4.REMOTE interface definition”) 

⑹ 

SDI-LOOP:

 3G/HD/SD-SDI loop through output (BNC connector) 

When SDI-IN2 is displayed, the SDI-LOOP outputs the SDI-IN2 signal, and when SDI-IN1 or other input 
sources are displayed, the SDI-LOOP outputs the SDI-IN1 signal. 

⑺ 

CVBS-IN:

 Composite video input (BNC connector) 

⑻ 

SDI-IN1:

 3G/HD/SD-SDI input (BNC connector) 

⑼ 

SDI-IN2:

 3G/HD/SD-SDI input (BNC connector) 

⑽ 

HDMI-IN:

 HDMI input (HDMI-A connector) 

⑾ 

AUDIO-IN: 

Analog stereo audio input (3.5mm) 

  HDMI-LOOP: 

HDMI loop through output (HDMI-A connector) 

⒀ 

VESA installation position

: standard 10

×

10cm VESA thread


Input formats 


Input 

Supported formats 

CVBS 

PAL / NTSC 

HDMI 


480i / 576i / 480p / 576p 

720p (60 / 59.94 / 50) 

1080i (60 / 59.94 / 50), 1080psf (30 / 29.97 / 25 / 24 / 23.98) 

1080p (60 / 59.94 / 50 / 30 / 29.97 / 25 / 24 / 23.98) 

SDI 

SMPTE-425M 

1080p (60 / 59.94 / 50) 

SMPTE-274M 

1080i (60 / 59.94 / 50) 

1080p (30 / 29.97 / 25 / 24 / 23.98) 

SMPTE-RP211 

1080psf (30 / 29.97 / 25 / 24 / 23.98) 

SMPTE-296M 

720p (60 / 59.94 / 50) 

SMPTE-125M 

480i (59.94) 

ITU-R BT.656 

576i (50) 

Содержание DT-X24H

Страница 1: ...Model DT X24H 23 8 Broadcast Studio LCD Monitor User Manual Ver V1 0 0V00 Please read this User Manual throughout before using ...

Страница 2: ...s not cover the following 1 Physical damage to the surface of the products including scratches cracks or other damage to the LCD screen or other externally exposed parts 2 The LCD dot defects are not over three 3 Any damage caused by using third party power adaptors 4 Any damage or breakdown caused by use maintenance or storage not according to the user manual 5 The product is disassembled by anyo...

Страница 3: ...ed or recommended by the manufacturer in order to avoid damage For a third party power adapter please make sure the voltage range supplied power and polarity of power lead are fit Please disconnect the power cable under the following situations 1 If you do not operate this monitor for a period of time 2 If the power cable or power adaptor is damaged 3 If the monitor housing is broken Working Envir...

Страница 4: ...used to check if the image is over exposed or not by showing black and white lines on the monitor It is considered over exposed when luminance value exceeds 90 Blue Only Under Blue Only Mode only blue pixels are used to generate the image because hue and saturation can be adjusted quicker and more accurately Safe Area Adjustable You can select the scale of safe area frame from 80 85 90 and 95 in t...

Страница 5: ...nu system revolve ENTER to adjust settings and press to apply and out of menu system directly revolve ENTER to adjust volume and press ENTER to mute BRIGHT Revolve BRIGHT to adjust brightness value from 0 100 Default value is 50 CONTRAST Revolve CONTRAST to adjust contrast value from 0 100 Default value is 50 SATURATION Revolve SATURATION to adjust saturation value from 0 100 Default value is 50 P...

Страница 6: ...n SDI IN1 or other input sources are displayed the SDI LOOP outputs the SDI IN1 signal CVBS IN Composite video input BNC connector SDI IN1 3G HD SD SDI input BNC connector SDI IN2 3G HD SD SDI input BNC connector HDMI IN HDMI input HDMI A connector AUDIO IN Analog stereo audio input 3 5mm HDMI LOOP HDMI loop through output HDMI A connector VESA installation position standard 10 10cm VESA thread In...

Страница 7: ...NDERSCAN OVERSCAN NATIVE selection ZOOM OFF ZOOM1 and ZOOM2 selection FLIP Select ON to flip the picture by 180 RESET Select YES to recover all to factory setting 3 3 OSD submenu The OSD submenu includes LANGUAGE Menu language selection H POSITION Menu horizontal position 0 100 adjustment real time preview and default value 50 V POSITION Menu vertical position 0 100 adjustment real time preview an...

Страница 8: ... SDI timecode display switch on off 08 AUDIO BAR Audio meter display switch on off 09 FOCUS Peaking focus assist switch on off 10 FLIP Image flip 11 COLOR TEMP Adjust color temperature 12 KEY LED Keyboard backlight switch on off 13 UMD UMD display switch on off 3 7 COLOR submenu The color submenu is to change the color temperature settings User can select color temperature as 6500K 5600K 9300K or ...

Страница 9: ...n connecting the terminal R with GND and goes out when disconnecting The GREEN light is on when connecting the terminal G with GND and goes out when disconnecting The YELLOW light is on when connecting the terminal Y with GND and goes out when disconnecting 485B Rx 485A Rx Note 3 color TALLY light can be remotely controlled by REMOTE port Terminal 1 2 3 4 5 6 7 8 9 Description Y G R 485B Rx 485A R...

Страница 10: ...94 50 SMPTE 274M 1080i 60 59 94 50 1080p 30 29 97 25 24 23 98 SMPTE RP211 1080psf 30 29 97 25 24 23 98 SMPTE 296M 720p 60 59 94 50 SMPTE 125M 480i 59 94 ITU R BT 656 576i 50 HDMI 480I 576I 480P 576P 720p 60 59 94 50 1080i 60 59 94 50 1080psf 30 29 97 25 24 23 98 1080p 60 59 94 50 30 29 97 25 24 23 98 General Working voltage DC battery 11V 17V Power consumption 35W Working temperature 0 40 Working ...

Страница 11: ... plate S 7004A Gold mount battery plate A VS22 Rotatable desktop stand with VESA installation 7 1 Battery plate Installation 1 Take off the rub cover on the rear panel see Fig 1 2 Insert the DC cable of S 7004S A into the hole and plug onto the power socket inside the hole see Fig 2 3 Fix the battery plate onto the rear panel by the supplied screws see Fig 3 S 7004S S 7004A 1 2 3 ...

Страница 12: ...7 2 VESA Desk top stand 10x10cm VESA A VS22 Rear View 8 Installation Dimension 8 1 The main body in mm ...

Страница 13: ...8 2 With desktop stand feet in mm 8 3 With rotatable VESA desktop stand in mm ...

Страница 14: ......

Страница 15: ......

Страница 16: ...istributed in North America by JVC Professional Video Products To obtain service or for further information please contact SWIT Electronics USA LLC Address 4300 Stevens Creek Blvd Suite 230 San Jose CA 95129 Toll free 1 866 986 SWIT 7948 Tel 408 260 8258 Fax 408 228 8438 Email info swit us Website www swit us ...

Отзывы: