8
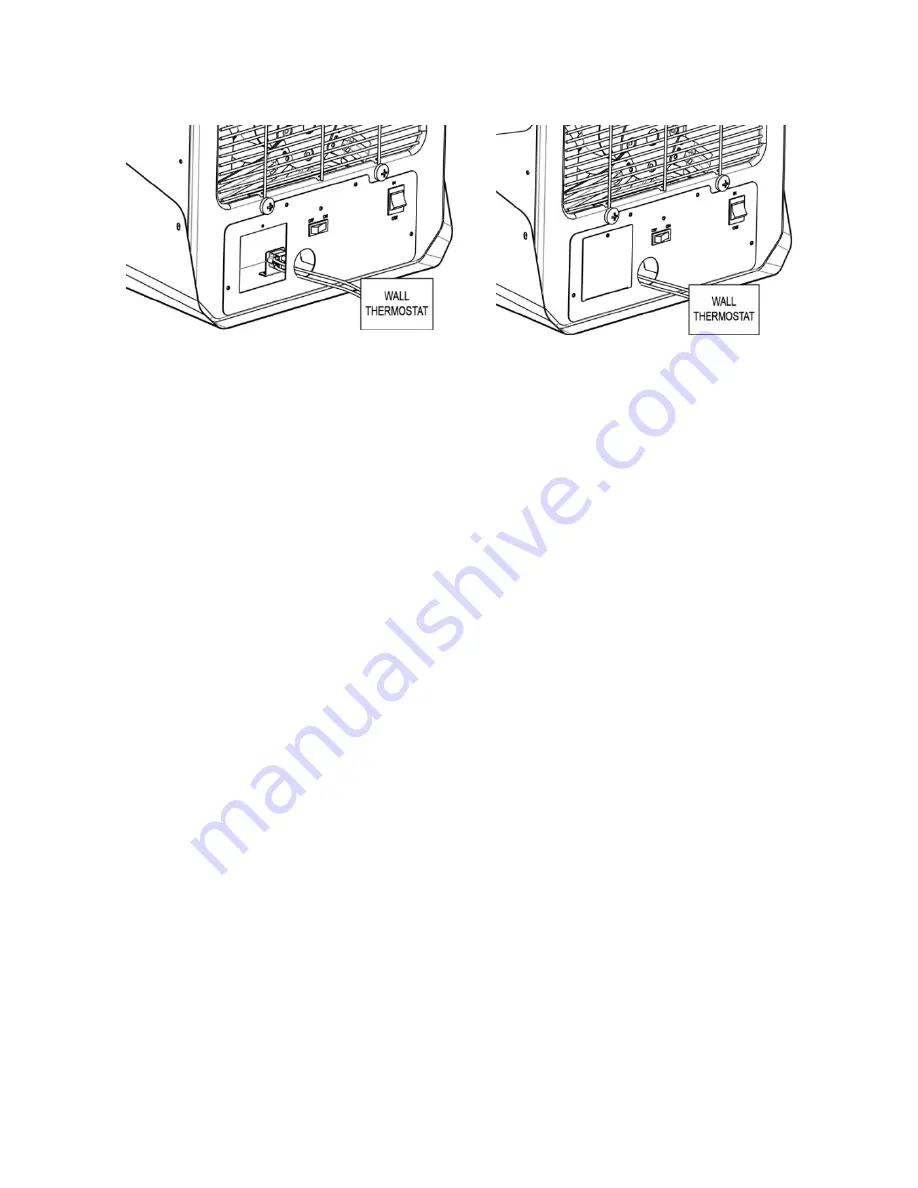
thermostat wire to the Terminal A inside the heater, make sure to tighten the screws in the Terminal A.
18. Replace the wiring compartment/connection cover and lock in place with the screw.
Страница 1: ...he health of some small pets including birds are extremely sensitive to the fumes produced during the first time use of many appliances These fumes are not harmful to humans but we recommended that yo...
Страница 2: ...TABLE OF CONTENTS Important Instructions 3 Installing Instructions 5 Specifications and Wiring Diagram 9 Parts of the heater 10 Operating Instructions 11 Maintenance and Cleaning 14 Troubleshooting 1...
Страница 3: ...PERSONS OR PROPERTY INCLUDING THE FOLLOWING 1 Read all instructions before using this heater 2 This heater is hot when in use To avoid burns do not let bare skin touch hot surfaces Keep combustible m...
Страница 4: ...duce the risk of fire do not use it in areas where gasoline paint or flammable vapors and liquids are used or stored 12 Use this heater only as described in this manual Any other use not recommended b...
Страница 5: ...n cutoff switch of power connection to the heater Wiring compartment for accommodating supply cables and pigtail leads are adequate and measured free space of 2524 67 cm3 CAUTION High temperature risk...
Страница 6: ...positioning the mounting bracket 6 Insert the anchors 7 Attach the mounting bracket to the wall and secure with mounting screws 8 Loose the tilt adjustment knobs remove the cart 9 Align the Hang Brack...
Страница 7: ...k side of the unit 15 Make the connections properly with connectors which are suitable for the conductor size including grounding wirings And after making the connections arrange the pigtail leads of...
Страница 8: ...8 thermostat wire to the Terminal A inside the heater make sure to tighten the screws in the Terminal A 18 Replace the wiring compartment connection cover and lock in place with the screw...
Страница 9: ...NTED GARAGE HEATER WITH ELECTRONIC CONTROLLER AND REMOTE Model PH 9100WRN Voltage 240 V Watts 10000 W Frequency 60 Hz Recommended Heating Capacity 1 25watts ft 0 03m Wiring diagram SPECIFICATIONS PH 9...
Страница 10: ...using D Louver for air direction E Tilt adjustable knob F Lower Housing G Front Exhaust Grill H ON OFF Switch I Inside Wall Thermostat Switch J Control panel K Alarm LED L Power LED M Timer LED N Heat...
Страница 11: ...s to start the Fan and Heater Use the circuit breaker as power ON OFF device The circuit breaker is to be installed by certified electrician and shall be located in line of sight from the heater locat...
Страница 12: ...sired temperature Press the Thermostat button and then press the button to increase the temperature or the button to decrease the temperature You can also press the button until the numeric temperatur...
Страница 13: ...button to set the time to 0 The timer feature will turn off when the LED stops flashing To turn off the heater switch off the circuit breaker The circuit breaker serves as the power disconnection mea...
Страница 14: ...cleaning Regular Cleaning 1 Do not use cleaning liquid or other chemicals to spray on the unit 2 Interior dust can often be removed by using a vacuum cleaner with a crevice tool attachment 3 To clean...
Страница 15: ...10 minutes before turning on the heater Breaker Fuse has been tripped Check your electrical box to confirm the breaker has not been blown This may occur if the receptacle is shared between other high...
Страница 16: ...16 PLEASE DO NOT ATTEMPT TO OPEN OR REPAIR THE HEATER YOURSELF DOING SO COULD CAUSE DAMAGE OR PERSONAL INJURY...