ProForm XP 690T Скачать руководство пользователя страница 15

15

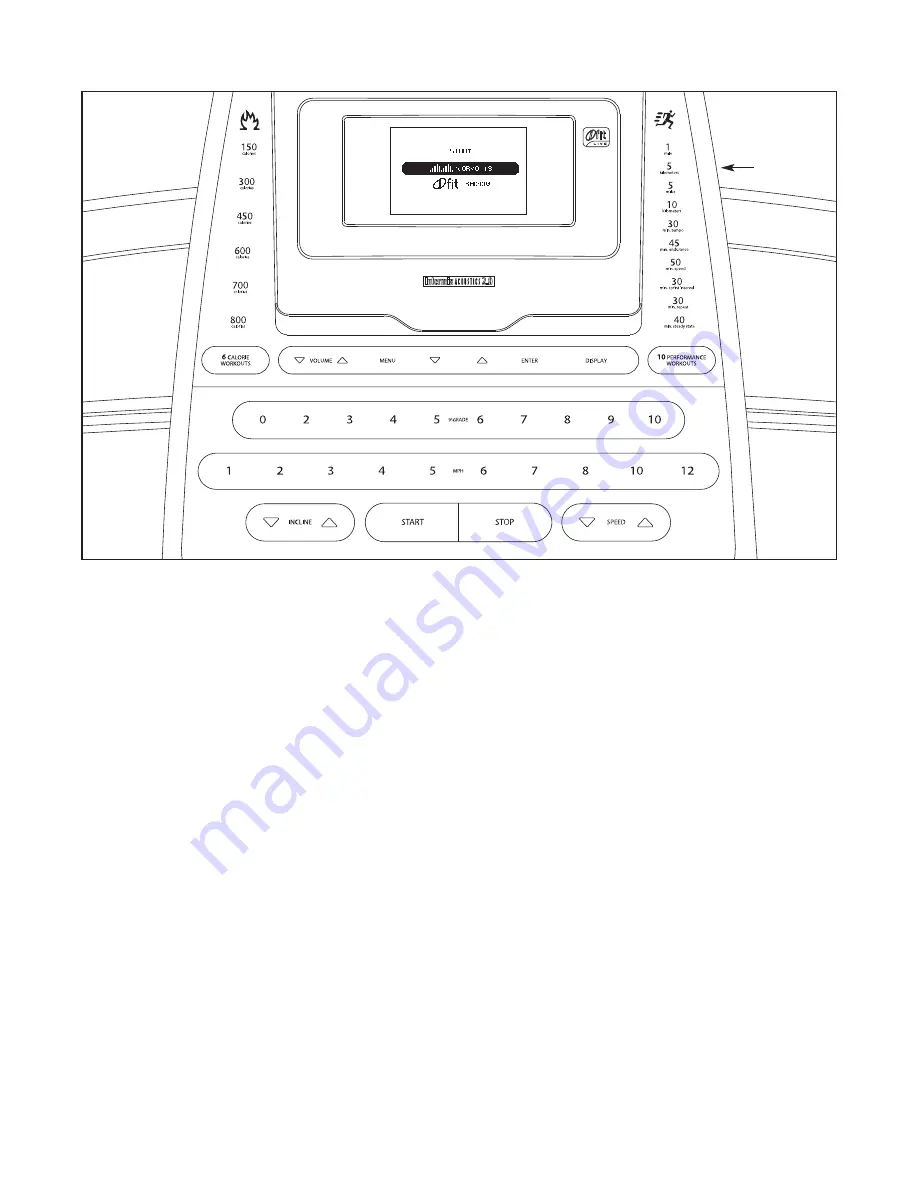
FEATURES OF THE CONSOLE

The treadmill console offers an impressive array of

features designed to make your workouts more effec-

tive and enjoyable. When you use the manual mode of

the console, you can change the speed and incline of

the treadmill with the touch of a button. As you exer-

cise, the console will display continuous exercise feed-

back. You can even measure your heart rate using the

handgrip pulse sensor.

In addition, the console features sixteen preset work-

outs—six calorie workouts and ten performance work-

outs. Each preset workout automatically controls the

speed and incline of the treadmill as it guides you

through an effective exercise session.

The console also features an iFit Live mode that allows

your treadmill to communicate with your wireless net-

work through an optional iFit Live module. The iFit Live

module allows you to download personalized workouts

and to track and analyze your workout results on the

iFit Live website.

To purchase an iFit Live module at

any time, go to www.iFit.com or call

1-888-533-1333.

You can even listen to your favorite workout music or

audio books with the consoleʼs stereo sound system.

To turn on the power,

see page 16.

To use the man-

ual mode,

see page 16.

To use a preset workout,

see page 18.

To use the iFit training mode,

see

page 19.

To use the information mode,

see page 19.

To use the stereo sound system,

see page 19.

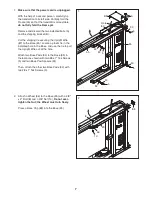
IMPORTANT: If there is a sheet of clear plastic on

the console, remove the plastic. To prevent dam-

age to the walking platform, wear clean athletic

shoes while using the treadmill. The first time the

treadmill is used, observe the alignment of the

walking belt, and center the walking belt if neces-

sary (see page 24).

Note: The console can display speed and distance in

either miles or kilometers. To find which unit of mea-

surement is selected, see THE INFORMATION MODE

on page 19.

For simplicity, all instructions in this

manual refer to miles.

CONSOLE DIAGRAM

Audio

Jack

Содержание XP 690T

Страница 1: ...ace above for reference CAUTION Read all precautions and instruc tions in this manual before using this equipment Save this manual for future reference Assembly Operation Maintenance Part List and Dra...

Страница 2: ...ERCISE GUIDELINES 25 PART LIST 26 EXPLODED DRAWING 28 ORDERING REPLACEMENT PARTS Back Cover ONE YEAR FULL WARRANTY Back Cover This drawing shows the locations of the warning decals If a decal is missi...

Страница 3: ...se an extension cord 12 Use only a single outlet surge suppressor that meets all of the specifications described on page 14 To purchase a surge suppressor see your local Sears store or call the teleph...

Страница 4: ...ition 23 Never insert any object into any opening on the treadmill 24 Inspect and properly tighten all parts of the treadmill regularly 25 DANGER Always unplug the power cord immediately after use bef...

Страница 5: ...treadmill If you have questions after read ing this manual please see the back cover of this manual To help us assist you please note the product model number and serial number before contacting us T...

Страница 6: ...able wrench needlenose pliers and scissors Use the drawings below to identify the assembly hardware The number in parentheses below each drawing is the key number of the part from the PART LIST near t...

Страница 7: ...t the treadmill is more stable do not fully fold the Frame yet Remove and discard the two indicated bolts A and the shipping bracket B Cut the shipping tie securing the Upright Wire 87 to the Base 95...

Страница 8: ...1 14 7 4 3 Identify the Right Upright 85 and the Right Upright Spacer 91 which are marked with Right stickers Align the oval hole in the Right Upright Spacer with the oval hole in the Base 95 If the h...

Страница 9: ...4 Patch Bolts 7 until the heads of the Patch Bolts touch the Left Upright do not fully tighten the Patch Bolts yet With the help of a second person tip the tread mill so that the Base 95 is flat on t...

Страница 10: ...ht Handrails 82 83 Attach the Console Frame with four 1 4 x 1 1 4 Patch Bolts 9 and four 1 4 Star Washers 12 Start all four Patch Bolts before tightening any of them Lift the Console Frame 102 and the...

Страница 11: ...track Be careful not to pinch any wires 9 Ground Wires Track C 102 A B 6 10 Attach the handrail assembly B to the console assembly A with two 8 x 3 4 Washer Head Screws 2 Start both Washer Head Screws...

Страница 12: ...drawing The connec tors should slide together easily and snap into place If they do not turn one connector and try again IF THE CONNECTORS ARE NOT CONNECTED PROPERLY THE CONSOLE MAY BE DAMAGED WHEN YO...

Страница 13: ...ob 52 are oriented as shown Attach the upper end of the Storage Latch 51 to the bracket on the Frame 55 with a 3 8 x 2 Bolt 8 and a 3 8 Nut 10 Attach the lower end of the Storage Latch 51 to the brack...

Страница 14: ...k down grounding provides a path of least resistance for electric current to reduce the risk of elec tric shock This product is equipped with a cord having an equipment grounding conductor and a groun...

Страница 15: ...ized workouts and to track and analyze your workout results on the iFit Live website To purchase an iFit Live module at any time go to www iFit com or call 1 888 533 1333 You can even listen to your f...

Страница 16: ...ust the position of the clip HOW TO USE THE MANUAL MODE 1 Insert the key into the console See HOW TO TURN ON THE POWER at the left 2 Select the manual mode Each time the key is in serted the main menu...

Страница 17: ...y mode you select the speed and incline settings will appear in the display for a few seconds each time you change the setting 6 Measure your heart rate if desired Before using the handgrip pulse sens...

Страница 18: ...rent segment of the workout The height of the flashing segment indicates the speed setting for the current segment At the end of each segment a series of tones will sound If a new speed and or incline...

Страница 19: ...button To view distance in miles se lect ENGLISH To view distance in kilometers select METRIC The console features a display demo mode designed to be used if the treadmill is displayed in a store Whil...

Страница 20: ...the storage position To protect the floor or carpet from damage place a mat under the treadmill Keep the treadmill out of di rect sunlight Do not leave the treadmill in the stor age position in temper...

Страница 21: ...ay be neces sary to push the frame forward as you pull the knob to the left Pivot the frame downward and release the latch knob 2 Hold the metal frame firmly with both hands and lower it to the floor...

Страница 22: ...If the circuit breaker has tripped wait for five minutes and then press the switch back in b Make sure that the power cord is plugged in If the power cord is plugged in unplug it wait for five minutes...

Страница 23: ...i mum incline level and then return to the minimum level This will recalibrate the incline system If the incline does not calibrate press the Stop button again and then press the Incline increase or d...

Страница 24: ...en plug in the power cord insert the key and run the treadmill for a few minutes Repeat until the walking belt is centered b If the walking belt slips when walked on first re move the key and UNPLUG T...

Страница 25: ...our goal is to strengthen your cardiovascular system you must perform aerobic exer cise which is activity that requires large amounts of oxygen for prolonged periods of time For aerobic ex ercise adju...

Страница 26: ...38 2 5 16 Cage Nut 39 2 Foot Rail Decal 40 1 Left Foot Rail 41 1 Latch Warning Decal 42 2 Platform Cushion 43 2 Belt Guide 44 1 Walking Platform 45 2 Frame Cap 46 2 Frame Spacer 47 1 Magnet 48 1 Driv...

Страница 27: ...t Accessory Tray 105 2 Console Clamp 106 1 Console Base 107 4 8 x 1 Screw 108 1 Left Speaker User s Manual Note Specifications are subject to change without notice For information about ordering repla...

Страница 28: ...33 28 32 32 43 43 30 45 30 30 39 40 36 47 45 46 36 44 41 49 48 54 39 60 55 56 56 46 58 59 61 50 57 15 42 10 24 23 15 17 19 19 20 24 30 30 30 28 42 30 30 30 30 10 17 17 17 17 17 28 EXPLODED DRAWING A...

Страница 29: ...15 15 15 15 74 17 73 37 37 37 1 1 1 17 22 22 28 28 69 70 71 68 62 64 76 75 72 65 28 28 31 67 66 77 79 78 EXPLODED DRAWING B Model No 831 24966 1 R0310A 29...

Страница 30: ...7 11 7 11 27 35 89 89 85 95 88 91 92 14 94 90 5 94 87 10 10 8 25 26 35 35 97 98 93 14 86 83 82 81 81 80 38 38 4 4 4 13 13 9 27 35 84 92 7 11 87 63 63 4 13 13 12 9 12 29 2 2 30 EXPLODED DRAWING C Model...

Страница 31: ...99 107 103 101 104 102 106 6 28 3 3 3 1 100 105 53 3 3 3 3 3 3 3 3 3 3 105 3 3 3 3 18 107 108 16 31 EXPLODED DRAWING D Model No 831 24966 1 R0310A...

Страница 32: ...agreement U S A or maintenance agreement Canada on a product serviced by Sears 1 800 827 6655 U S A 1 800 361 6665 Canada Para pedir servicio de reparaci n a domicilio y para ordenar piezas 1 888 SU...

Отзывы: