background image

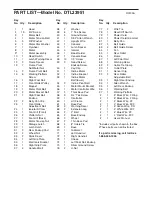
PART LIST—Model No. DTL33951

R0105A

Key 

No.

Qty.

Description

Key 

No.

Qty.

Description

Key 

No.

Qty.

Description

1

1

Hood

2

13

3/4” Screw

3

1

Motor Belt

4

1

Motor Tension Bolt

5

5

3/8” Washer

6

1

Motor Star Washer

7

1

Flywheel

8

1

Motor

9*

1

Motor Assembly

10

1

Reed Switch

11

1

Latch Warning Decal

12

2

Frame Spacer

13

7

Frame Pivot 
Nut/Motor Nut

14

2

Frame Pivot Bolt

15

6

Walking Platform 
Screw

16

1

Right Foot Rail

17

1

Front Roller/Pulley

18

1

Magnet

19

1

Motor Pivot Bolt

20

2

Motor Bracket Bolt

21

1

Right Foot Rail 
Endcap

22

2

Belly Pan Clip

23

1

Front Roller 
Adjustment Bolt

24

1

Isolator SCrew

25

1

Fan Grill (Front)

26

2

Platform Nut

27

1

Fan Grill (Back)

28

1

Motor Tension Nut

29

1

Storage Latch

30

1

Latch Catch

31

2

Rear Endcap Pad 

32

2

Wheel Nut

33

2

Static Decal

34

1

Left Grip Plate

35

1

Electronic Bracket

36

1

Right Grip Plate

37

4

Handrail Bolt

38

2

Washer

39

6

1” Tek Screw

40

2

Ground Screw

41

1

5/32” Allen Wrench

42

1

Upright Wire

43

1

Console

44

1

Latch Spacer

45

4

Isolator

46

1

Book Holder

47

1

Console Base

48

10

1/2” Screw

49

9

Hood Screw/
Endcap Screw

50

1

Key/Clip

51

1

Incline Motor

52

1

Incline Bracket

53

1

Incline Motor 
Bolt (lower)

54

2

Incline Pivot Bolt

55

1

Motor Mount Bracket

56

1

Motor Controller Wire

57

2

Thick Base Pad

58

9

3/4” Tek Screw

59

1

Controller

60

1

Lift Frame

61

2

Base Pad

62

2

Warning Decal

63

2

Extension Leg

64

2

2” Bolt

65

2

Base Endcap

66

2

Wheel

67

2

Thin Base Pad

68

4

8” Cable Tie

69

1

Base

70

1

Grommet

71

1

Left Handrail

72

1

Right Handrail

73

1

Choke

74

1

Left Foot Rail Endcap

75

1

Silver Ground Screw

76

2

U-Nut

77

2

Wire Tie

78

1

Reset/Off Switch

79

1

Power Cord

80

1

Power Cord Grommet

81

1

Belly Pan

82

2

Belt Guide

83

4

Belt Guide Screw

84

1

Fan

85

1

Rear Roller

86

1

Frame

87

1

Left Foot Rail

88

1

Warning Decal

89

2

Cable Tie Clamp

90

1

Outlet Plate

91

1

Sensor Clip

92

2

Rear Roller 
Adjustable Bolt

93

1

Right Rear Endcap

94

1

Allen Wrench

95

1

Left Rear Endcap

96

1

Walking Belt

97

1

Walking Platform

#

1

8” Black Wire, 2 Ring

#

1

6” Black Wire, 2 Ring

#

1

4” Black Wire, 2F

#

1

4” Black Wire, M/F

#

1

6” Green Wire, F/R

#

1

4” White Wire, M/F

#

1

4” Blue Wire, 2F

#

1

4 ” Red Wire, M/F

#

1

User’s Manual

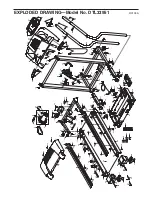
*Includes all parts shown in the box
#These parts are not illustrated 

If a part is missing, call toll-free
1-888-533-1333.

Содержание DTL33951

Страница 1: ...e are missing or damaged parts we will guarantee complete sat isfaction through direct assis tance from our factory TO AVOID DELAYS PLEASE CALL DIRECT TO OUR TOLL FREE CUSTOMER HOT LINE The trained te...

Страница 2: ...MENT 10 HOW TO FOLD AND MOVE THE TREADMILL 13 TROUBLESHOOTING 15 CONDITIONING GUIDELINES 17 ORDERING REPLACEMENT PARTS Back Cover LIMITED WARRANTY Back Cover Note An EXPLODED DRAWING and a PART LIST a...

Страница 3: ...ocal electronics store 12 Failure to use a properly functioning surge suppressor could result in damage to the con trol system of the treadmill If the control sys tem is damaged the walking belt may c...

Страница 4: ...d ser vice representative only 25 This treadmill is intended for in home use only Do not use this treadmill in a commer cial rental or institutional setting WARNING Before beginning this or any exerci...

Страница 5: ...ent toll free at 1 888 533 1333 Monday through Friday 6 a m until 6 p m Mountain Time excluding holidays To help us assist you please note the product model number and serial number before calling The...

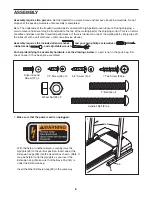
Страница 6: ...aner Assembly requires the included allen wrenches and your own phillips screwdriver rubber mallet and adjustable wrench For help identifying the assembly hardware see the drawings below If a part is...

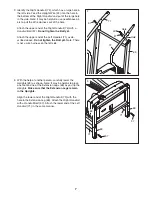
Страница 7: ...the Left Handrail 71 as de scribed above Do not tighten the Bolt yet Note There is not a wire harness on the left side 42 Hole 72 37 37 71 69 Hole 2 3 With the help of another person carefully lower...

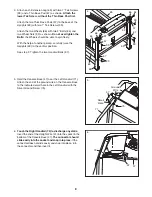
Страница 8: ...s not slide easily and snap into place turn the connector and then insert it 72 47 5 6 4 Attach each Extension Leg 63 with two 1 Tek Screws 39 and a Thin Base Pad 67 as shown Attach the lower Tek Scre...

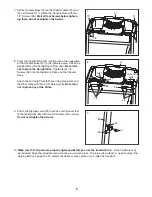
Страница 9: ...round Wire 36 32 47 8 Press the Upright Wire 42 into the slot in the underside of the Console Base 47 in the indicated area Cover the Upright Wire with the Right Grip Plate 36 Be careful not to pinch...

Страница 10: ...grounding provides a path of least resistance for electric current to reduce the risk of elec tric shock This product is equipped with a cord having an equipment grounding conductor and a grounding p...

Страница 11: ...he walking belt will begin to move Hold the handrails and begin walking As you exercise change the speed of the walking belt as desired by pressing the Speed and buttons Each time a button is pressed...

Страница 12: ...t of measurement hold down the Stop button while inserting the key into the console An E for English miles or an M for metric kilometers will appear in the Speed display Press the Speed button to chan...

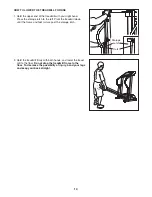
Страница 13: ...l until the storage latch closes over the catch Make sure that the storage latch is fully engaged over the catch To protect the floor or carpet from damage place a mat under the treadmill Keep the tre...

Страница 14: ...to the left Pivot the treadmill down until the frame and foot rail are past the storage latch 2 Hold the treadmill firmly with both hands and lower the tread mill to the floor Do not drop the treadmil...

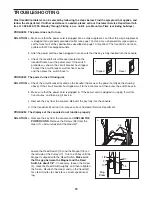
Страница 15: ...ess the switch back in PROBLEM The power turns off during use SOLUTION a Check the circuit breaker located on the treadmill frame near the power cord see the drawing above If the circuit breaker has t...

Страница 16: ...off center or slips when walked on SOLUTION a If the walking belt is off center first remove the key and UNPLUG THE POWER CORD If the walking belt has shifted to the left use the allen wrench to turn...

Страница 17: ...be aerobic Aerobic exercise is activity that requires large amounts of oxygen for prolonged periods of time This increases the demand on the heart to pump blood to the muscles and on the lungs to oxyg...

Страница 18: ...les Stretch With one leg in front of the other reach forward and place your hands against a wall Keep your back leg straight and your back foot flat on the floor Bend your front leg lean forward and m...

Страница 19: ...19 NOTES...

Страница 20: ...10 1 2 Screw 49 9 Hood Screw Endcap Screw 50 1 Key Clip 51 1 Incline Motor 52 1 Incline Bracket 53 1 Incline Motor Bolt lower 54 2 Incline Pivot Bolt 55 1 Motor Mount Bracket 56 1 Motor Controller Wir...

Страница 21: ...57 51 54 13 62 63 64 32 66 58 89 77 68 85 65 42 67 70 15 94 41 49 11 22 22 56 71 35 33 3 4 5 6 7 8 9 55 20 58 30 42 75 58 61 58 61 26 26 59 37 37 48 47 46 67 36 34 88 76 76 50 52 43 1 49 49 13 54 13...

Страница 22: ...of revenues or profits loss of enjoyment or use costs of removal or installation or other consequential damages of whatsoever nature Some states do not allow the exclusion or limitation of in cidenta...

Отзывы: