ProForm 831.288300 Скачать руководство пользователя страница 9

9

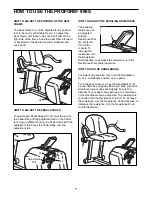
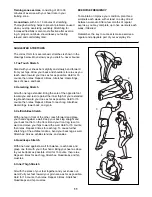
STEP-BY-STEP CONSOLE OPERATION 

Before the console can be operated, two ÒAAÓ bat-
teries must be installed.

(See assembly step 6 on

page 6 for installation instructions.) Follow the steps
below to operate the console.

Turn on the power

To turn on the
power, press
the on/reset
button or 
simply begin
pedaling.
When the
power is turned on, the entire display will appear
for two seconds. The console will then be ready
for use. Note: If batteries were just installed, the
power will already be on.

Select one of the three pacer programs or the
manual mode

To select one of
the pacer 
programs,
repeatedly
press the 
program button.
The program
indicator will
show which
program you
have selected.
To select the
manual mode, press the program button until the
program indicator disappears. The programs will
be selected in the following order: program 1
(Interval), program 2 (Aerobic), program 3 (Fat
Burn), manual mode. 

Begin your workout

If you selected
the manual
mode, go to
step 4. If you
selected one of
the pacer 
programs, two
columns of bars
will appear in
the display. The
left column will
show one bar, showing that the target pace is
about 5 miles per hour. The right column will
show your actual pace. Adjust your pedaling pace
until only one bar appears in the right column. As

the program progresses, the target pace will
change periodically; as the target pace changes,
adjust your pedaling pace to keep both columns
at the same height. 

Important: The target pace

is a 

goal

pace. Your actual pace may be slower

than the target pace, especially during the first
few months of your exercise program. Be sure
to exercise at a pace that is comfortable for
you.

Follow your progress with the monitor modes

To select the
scan mode,

repeatedly
press the mode
button until a
mode indicator
appears under
the word Òscan.Ó
A flashing mode
indicator will
show which
mode is 
currently displayed. 

To select the speed, time, distance, fat calories,
or calories mode for continuous display,

repeatedly press the mode button until the
desired mode indicator appears. (Make sure that
the scan mode is not selected.) 

If desired, the display can be reset by pressing
the on/reset button. 

Turn off the power

To turn off the power, simply wait for about
four minutes.

If the pedals are not turned and

the console buttons are not pressed for four 
minutes, the power will turn off automatically.

1

2

3

4

5

Program Indicator

Mode Indicators

Actual Pace

Target Pace

Содержание 831.288300

Страница 1: ...ESTATES IL 60179 CAUTION Read all precautions and instruc tions in this manual before using this equipment Keep this manual for future reference Model No 831 288300 Serial No _ Write the serial number in the space above for future reference Serial Number Decal ...

Страница 2: ... not apply when the BIKE EXERCISER is used commercially or for rental purposes This warranty gives you specific legal rights and you may also have other rights which vary from state to state SEARS ROEBUCK AND CO DEPT 817WA HOFFMAN ESTATES IL 60179 TABLE OF CONTENTS FULL 90 DAY WARRANTY 2 IMPORTANT PRECAUTIONS 3 BEFORE YOU BEGIN 4 ASSEMBLY 5 HOW TO USE THE PROFORM 990S 7 CONDITIONING GUIDELINES 10 ...

Страница 3: ...ur back straight when using the 990S Do not arch your back 10 If you feel pain or dizziness at any time while exercising stop immediately and begin cooling down 11 Use the 990S only as described in this manual 12 The 990S is intended for in home use only Do not use the 990S in a commercial rental or institutional setting WARNING Before beginning this or any exercise program consult your physician ...

Страница 4: ...u use the PROFORM 990S If you have addition al questions please call our toll free HELPLINE at 1 800 736 6879 Monday through Saturday 7 a m until 7 p m Central Time excluding holidays To help us assist you please note the product model number and serial number before calling The model number is 831 288300 The serial number can be found on a decal attached to the 990S see the front cover of this ma...

Страница 5: ... 36 1 2 1 1 Refer to the inset drawing Loosen the Lock Knob 36 on the right side of the Frame 1 Slide the Seat Frame 2 out until it stops Retighten the Lock Knob 36 2 Attach the Seat Bracket 58 to the Seat Frame 2 with the two Seat Bracket Bolts 59 and 3 8Ó Nylon Locknuts 37 3 Set the two Seat Spacers 46 on the Seat Frame 2 Attach the Seat 53 and the Seat Spacers to the Seat Frame with the four Se...

Страница 6: ...ebar Make sure that the Handlebars are on the correct sidesÑthe ends should bend outward slightly Slide the Star Washer 11 onto the Long Carriage Bolt and tighten the Resistance Knob 7 onto the Long Carriage Bolt Make sure that the head of the Long Carriage Bolt is resting in the square hole in the left bracket Note To attach the Resistance Knob 7 on the left side reverse the positions of the Long...

Страница 7: ...RESISTANCE The pedaling resistance can be adjusted with the Resistance Dial 8 located in front of the console To increase the resistance turn the Resistance Dial clockwise to decrease the resistance turn the Resistance Dial counterclockwise HOW TO USE THE HANDLEBARS For lower body exercise only hold the Handlebars 5 6 in a stationary position as you pedal For a full body workout move the Handlebar...

Страница 8: ...age 10 ScanÑThis mode displays the calories fat calories speed time and distance modes for 5 seconds each in a repeating cycle HOW THE PACER PROGRAMS OPERATE When you use a pacer program two columns of bars will appear in the display The left column will show a target pace the right column will show your actual pedaling pace The target pace will change periodically during the program as the target...

Страница 9: ...arget pace is about 5 miles per hour The right column will show your actual pace Adjust your pedaling pace until only one bar appears in the right column As the program progresses the target pace will change periodically as the target pace changes adjust your pedaling pace to keep both columns at the same height Important The target pace is a goal pace Your actual pace may be slower than the targe...

Страница 10: ...ust the intensity of your exercise until your heart rate is near the middle number in your training zone as you exercise Aerobic Exercise If your goal is to strengthen your cardiovascular system your exercise must be Òaerobic Ó Aerobic exercise is activity that requires large amounts of oxygen for prolonged periods of time This increases the demand on the heart to pump blood to the muscles and on ...

Страница 11: ... leg as well Stretches Calves achilles tendons and ankles 4 Quadriceps Stretch With one hand against a wall for balance reach back and grasp one foot with your other hand Bring your heel as close to your buttocks as possible Hold for 15 counts then relax Repeat 3 times for each leg Stretches Quadriceps and hip muscles 5 Inner Thigh Stretch Sit with the soles of your feet together and your knees ou...

Страница 12: ...ure that they are in the positions shown CRANK ADJUSTMENT If the arms of the Crank 14 become loose they should be tightened in order to prevent excessive wear Loosen the crank nut on the left arm of the Crank Place the end of a standard screwdriver in one of the slots in the slotted crank nut Lightly tap the screwdriver with a hammer to turn the slotted crank nut counterclockwise until the arms ar...

Страница 13: ...13 NOTES ...

Страница 14: ...Hub Key Part No Qty No Description 34 2 134268 Wheel 35 2 134269 Wheel Bushing 36 1 134272 Lock Knob 37 3 012149 3 8Ó Nylon Locknut 38 4 012042 M8 Nylon Locknut 39 1 106106 Extension Spring 40 1 013225 M5 Screw 41 2 134534 Grip 42 2 134276 Stabilizer Endcap 43 4 133918 Handlebar Endcap 44 1 134277 Seat Frame Bushing 45 1 134278 Frame Bushing 46 2 137911 Seat Spacer 47 1 134367 Right Pedal w Strap ...

Страница 15: ...6 38 18 64 28 22 52 26 45 26 36 38 18 49 32 23 23 37 3 4 51 40 52 38 26 44 6 41 5 10 12 11 7 10 12 13 43 43 9 57 33 34 35 2 35 34 33 57 43 54 59 37 56 56 58 62 62 53 55 55 63 17 26 26 46 60 60 21 20 20 41 43 16 19 EXPLODED DRAWINGÑModel No 831 288300 R0497A 15 ...

Страница 16: ... left When requesting help or service or ordering parts please be prepared to provide the following information The NAME OF THE PRODUCT PROFORM 990S The MODEL NUMBER OF THE PRODUCT 831 288300 The PART NUMBER OF THE PART see page 14 The DESCRIPTION OF THE PART see page 14 Model No 831 288300 QUESTIONS If you find that you need help assembling or operating the PROFORM 990S a part is missing or you n...

Отзывы: