1
2
1
2
1
2
3
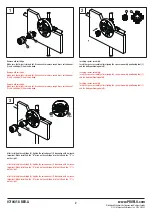
Remove old cartridge.
Make sure that water is turned off. Use wrench to remove rough brass valve bonnet
(1) and cartridge (2) from valve body.
After installing the cartridge (2), tighten the valve bonnet (1) clockwise with a wrench.
Important: When installing, the "H" mark on the cartridge is to the left and the "C" is
on the right.
After installing the cartridge (2), tighten the valve bonnet (1) clockwise with a wrench.
Important: When installing, the "H" mark on the cartridge is to the left and the "C" is
on the right.
After installing the cartridge (2), tighten the valve bonnet (1) clockwise with a wrench.
Important: When installing, the "H" mark on the cartridge is to the left and the "C" is
on the right.
Inserting spacer assembly.
Insert the spacer assembly after aligning the spacer assembly positioning foot (1)
and the body positioning hole (2).
Inserting spacer assembly.
Insert the spacer assembly after aligning the spacer assembly positioning foot (1)
and the body positioning hole (2).
Inserting spacer assembly.
Insert the spacer assembly after aligning the spacer assembly positioning foot (1)
and the body positioning hole (2).
Remove old cartridge.
Make sure that water is turned off. Use wrench to remove rough brass valve bonnet
(1) and cartridge (2) from valve body.
Remove old cartridge.
Make sure that water is turned off. Use wrench to remove rough brass valve bonnet
(1) and cartridge (2) from valve body.
www.PROFLO.com
07/04/18 REV.A
Distributed Exclusively by Ferguson and Wolseley Canada
© 2018 Ferguson Enterprises, Inc. 0704 252402
2
Left
Right
H
C
1
2


