


29
28
PROCHARGER 10.000 BATTERY CHARGER,
DIAGNOSTIC AND MAINTENANCE DEVICE
1 | Product description
The ProCharger 10.000 is an advanced and intelligent battery charging, diagnosis
and test device for all 6 V and 12 V lead-acid, gel, AGM, calcium, pure lead and
lithium-ion vehicle batteries. State-of-the-art characteristic-controlled charging
technology, in conjunction with an intelligent software controller, ensures optimum
charging and maintenance for your battery at all times. Vehicles with a CAN bus
system can also be conveniently charged with the optional ProCharger charger
plug, via the existing vehicle socket. 19 LED indicators keep you informed as
to the current operating status. The ProCharger 10.000 is protected against
overload, reverse polarity and short-circuit, and connecting it up is spark-free.
These Instructions for Use apply exclusively for the ProCharger 10.000 charger.
They contain important information on safety and handling. Read these
Instructions for Use carefully, in particular the safety instructions, before using
the ProCharger 10.000 charger. Failure to follow these instructions may lead to
serious injury or damage. Keep the Instructions for Use for future reference. If
you pass the ProCharger 10.000 on to a third party, you must also hand over
these Instructions for Use. The Instructions for Use are based on the standards
and regulations applicable in the European Union and refl ect the current state of
technology. If abroad, observe country-specifi c guidelines and laws.
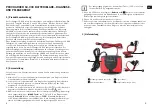
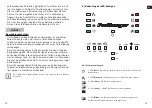
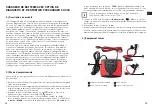
2 | Quick-start guide
Beforehand, read the safety instructions and the section "Preparation, connection
and operation".
1. Connect one of the charging cables (with charging clamps or ring terminals) to
the charger using the quick connector.
2. Connect the charging clamps or ring terminals to the battery with the correct
polarity (if the battery is in the vehicle, connect the black clamp (negative) to
the vehicle chassis or the engine block).
3. Connect the power plug to the power socket. The LED lights up. If the
charger detects the connected battery the
LED indicator will light up.
4. Press the relevant buttons (charging current, voltage, battery type) to select a
charging current with the
"MODE button"
from 1.5 to 10 A, battery voltage
"6 V
or 12 V"
and battery type
"TYPE"
(standard lead battery, Li-ion, winter/AGM
mode or CAN bus). Once you have selected the battery type, charging begins
automatically and the relevant LEDs light up.
Charging will only begin if you have selected a suitable battery type with
the "TYPE" button.
Contents
1 | Product description
29
2 | Quick-start guide
29
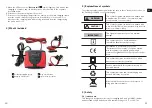
3 | What's included
30
4 | Explanation of symbols
31
5 | Safety
31
5.1 | Intended use
31
5.2 | Warnings
32
5.3 | Safety instructions
32
5.4 | Safety instructions – Handling of batteries
35
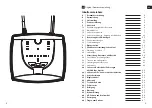
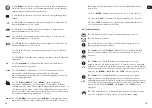
6 | Explanation of the LED indicators
37
6.1 | Functional messages
37
6.2 | Error indicators
39
7 | Features
40
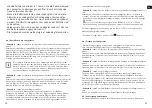
8 | Functional description/charging process
41
8.1 | Explanation of steps 1 – 7
41
8.2 | Charging process
42
9 | Preparation, connection and operation
43
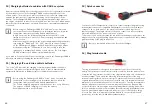
9.1 | Connecting the charger
44
9.2 | Disconnecting the charger
45
9.3 | Interrupting the charging process
45
9.4 | Charging time
45
10 | Charging batteries on motorcycles
with CAN-bus system
46
11 | Charging LiPo and Li-ion vehicle batteries
46
12 | Quick connector
47
13 | Ring terminal cable
47
14 | Fuse
48
15 | Specifications
48
16 | Troubleshooting
49
17 | Cleaning
49
18 | Maintenance
49
19 | Warranty
49
20 | CE marking and conformity
50
21 | Disposal
50
22 | Questions about the product
51
Translation of original instructions for use
Содержание 10020103
Страница 82: ...163 162 5 3 2 220 240 AC 50 60 5...
Страница 83: ...165 164 15 C 45 C...
Страница 84: ...167 166 5 4 5...
Страница 88: ...175 174 U2 Li Ion 9 2 9 1 A EN...