


4
•
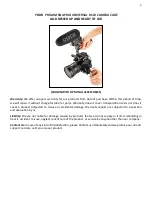
The button heads have been properly
removed from both sides of the camera cage
and remove the camera cage's existing side
sliding bar.
NOTE
:
The existing slide bar is comparatively
larger than the given slide bar; you can use them
according to your size requirements.
•
Insert the slide bars from both sides by sliding
them on the camera cage.
•
By aligning the slide bars properly, insert the
Allen bolt matching the thread of the sliding
bars.
•
Tighten the button head properly (front and
back) using a 4mm Allen key.
•
Adjust the height of the camera cage
according to your camera's height.
•
Match the wooden side handle with the side
thread of the camera cage and insert the
wooden side handle and tighten it properly
with its knob.


