Pro-Line Boats 2009 26 Super Sport Скачать руководство пользователя страница 17


11

Shift / Throttle / Trim 

 
Your Pro-Line can be ordered with different shift/throttle systems based upon motor type.  Refer to the owner's 
packet to find the manual pertaining to your particular installation.  Each motor has an individual tilt/trim switch 
located on the port throttle lever.  Separate shift and throttle controls are available for each outboard motor. 
 
The throttle lever has three range positions:  “Forward”, “Neutral”, and “Reverse”.  The shift function occurs in the 
first portion of the lever travel.  After the transmission is shifted into gear, further movement of the lever advances 
the throttle. 
 
Push the throttle lever ahead to move forward and pull it back for reverse.  Centralize the lever to the detent 
position for neutral.  The throttle lever is equipped with a neutral safety switch to prevent the motor from starting in 
gear.  The initial short movement of the lever to engage the transmission should be made firmly to avoid causing 
gear clash. 
 

CAUTION:  Use care in shifting to avoid advancing the throttle more than intended.


Steering 

 
Steering systems will differ depending upon your selection of engine package.  Please carefully read the owner’s 
manual provided by the specific manufacturer. 
 
Check your particular engine specifications for details specific to your engine package.  Always follow the engine 
manufacturers recommendations relating to the care and maintenance of their product. 
 

Hydraulic Steering (Verado – Power) 

Your Pro-Line is equipped with a self-contained hydraulic steering system when your engine package is factory 
installed.  When the steering wheel is turned, the helm pump pumps fluid to the steering cylinder causing it to 
extend or retract.  Periodically, check the fluid level and fill as necessary.  Beware of adding too much fluid, 
especially if the ambient temperature is cold because subsequent expansion could cause leaking or damage to 
your system.  Refer to the owner’s manual that was provided by your engine manufacturer. 
 
After every 24 hours of operation check all nuts, caps, and hose fittings for tightness.  Make sure the hoses are 
not chafing or kinking on sharp corners.  Also, check that hose ends are not damaged or distorted.  The fluid 
should be changed annually under normal conditions and every six months during times of heavy usage.  If your 
steering does not operate properly, check the following: 
 

• 

Drive entanglements 

• 

Level of the hydraulic steering fluid 

• 

Hoses and/or fittings for leaks 

• 

Air in the steering system. 

 
To properly check the steering system, start by turning the steering wheel port to starboard.  If the engine does 
not respond the same time as the steering wheel is being turned, this means that there is air in the steering 
system and the steering system needs re-bleeding.  When there is air in the steering, the steering wheel will feel 
“loose”.  Contact your dealer to have them bleed the steering system. 
 

Hydraulic Tilt Upgrade (Optional) 

Tilt steering is available when your engine package includes hydraulic steering. 
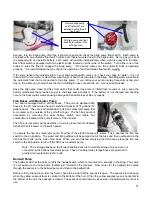
 

Power Trim


The power trim unit is located on the engine and can be operated by using the trim button on the engine or by 
using the trim toggle switch on the binnacle.  To ensure the power trim is working, start by pressing the toggle trim 
switch in the up position and trim the engine to the full up position.  Repeat the same process by pressing the trim 
toggle switch down and the engine will go into the full down position.  See the Trim and Tilt information in the 
Operations section of this manual. 

Содержание 2009 26 Super Sport

Страница 1: ...r s Manual Specifications subject to change without notice Actual boats may vary from drawings and or photos Copyright 2005 Pro Line Boats Inc PO Box 1348 Crystal River FL 34423 All rights reserved Ma...

Страница 2: ...ii...

Страница 3: ...Safety 8 Regulations 8 Rules of the Road 8 Alcohol 9 Controls Throttle and Shift Controls 10 Ignition Binnacle Fwd Neutral and Reverse Gear Operation 10 Key Switch Alarm 10 Lanyard Stop Switch 10 Shi...

Страница 4: ...p 21 Baitwell Pump 21 Washdown Pump 22 Head Waste System 23 What is the Law 23 Console with Enclosed Head Porta Potti 23 Head with Dockside Discharge Optional 23 Fuel Oil Systems 24 Fuel Fill and Vent...

Страница 5: ...the Engines 34 Starting the Engines 34 After Starting the Engines 34 Fueling 34 Before Fueling 34 While Fueling 35 After Fueling 35 Loading 35 Service and Care Fiberglass and Gelcoat 36 Epoxy Barrier...

Страница 6: ...While we endeavor to be as accurate as possible certain changes in standard equipment options and the like may have occurred which would not be included in the Owner s Manual All weights and fuel cap...

Страница 7: ...the water Always use common sense when boating Specifications Length Overall LOA 26 4 Bridge Clearance Beam 8 6 To Top of Windshield 6 10 Draft Hull 18 w Top 9 2 Deadrise 22 degrees Baitwell Capacity...

Страница 8: ...manufacturers whose products have been installed on your boat Manufacturers of certain products i e Stereo TV Stove Refrigerator Microwave Engines Electronics etc provide their own limited warranty an...

Страница 9: ...tification Number Selling dealer s name and location Servicing dealer if different from selling dealer Nature of problem Names of dealership personnel involved with the situation Record of service per...

Страница 10: ...n Year Limited Hull Structural Warranty is transferable to subsequent owners for a nominal fee Please contact your dealer or Pro Line Boats to obtain the applicable transfer form so that the new owner...

Страница 11: ...hrobbing temples inability to think coherently ringing in the ears tightness across the chest headaches drowsiness nausea dizziness fatigue vomiting collapse and convulsions Do not stand or swim near...

Страница 12: ...ack drafting At slow speeds while idling or stopped Be aware that CO can remain in or around your boat at dangerous levels even if your engine or the other boat s engine is no longer running How to Pr...

Страница 13: ...o fight a fire as a last resort after making arrangements to abandon the boat if a fire should get out of control Keep the following in mind if a fire is burning out of control and you must abandon th...

Страница 14: ...se of an emergency Your passengers are aware of propeller dangers and the possibility of sudden maneuvers and jolts The engine is turned off and the key is removed when swimmers are near the prop or u...

Страница 15: ...en completes maneuver When approaching head on both boats give way after giving appropriate horn blast s preferably to starboard When crossing a vessel converging from starboard has the right of way P...

Страница 16: ...epending upon the engine package that was selected Key Switch Alarm The key switch alarm is located in the binnacle and sounds when the ignition key is turned on The key switch alarm is actually a war...

Страница 17: ...nder causing it to extend or retract Periodically check the fluid level and fill as necessary Beware of adding too much fluid especially if the ambient temperature is cold because subsequent expansion...

Страница 18: ...itches forward and hold them down This will engage both trim tabs and will ensure they are working properly while in the full down position The switch on the port side operates the starboard trim tab...

Страница 19: ...staying at the helm The windlass comes with 200 feet of inch line and 6 feet of inch rode The windlass switch is located at the helm and is protected by a 50 amp breaker The The breaker is located on...

Страница 20: ...vent a device stops working check to see if the circuit breaker is tripped or if the fuse is blown Breakers are installed in the following locations The main helm breaker is located at the transom beh...

Страница 21: ...ated in the center of the boat and is accessible via the aft wall panel in the head area The 1500 gph aft bilge pump is located in the bilge and is accessible via the bilge hatch The automatic float s...

Страница 22: ...ll activate the LED light emitting diode light inside your baitwell tub It is a soft white light that will keep your bait moving and lively It will also help you locate your bait on those early mornin...

Страница 23: ...unted at the bow of the boat The red light is installed on the port side and the green light is installed on the starboard side The U S Coast Guard requires that the anchor light be installed at the h...

Страница 24: ...o deactivate the horn Using different sequences of horn blasts indicates different and sometimes dangerous situations to you or someone around you See the Safety Section in this manual for more inform...

Страница 25: ...l trim of the engine When you are finished trimming the engine all the way up the level on the trim gauge should read in the full up position Volts To system check the volt gauge turn the ignition key...

Страница 26: ...the transom behind the aft folding seat Important Fill the tank with potable water only Refilling the tank often will help to keep it a source of clean fresh drinking water Never fill the fresh water...

Страница 27: ...with 2 aft fish boxes The port and starboard fish boxes in the aft cockpit area have a combined capacity of 74 gallons 37 gallons each They are both plumbed to a fish box macerator pump that is mounte...

Страница 28: ...twell pump is turned off if the seacock is open the baitwell tub will continue to fill with water while you are underway Optional Leaning Post Baitwell One of the optional helm seats includes a 25 gal...

Страница 29: ...area Console with Enclosed Head Porta Potti The porta potti is equipped with a 2 8 gallon holding tank To operate the porta potti system Set the portable toilet on its front side so the cap on the hol...

Страница 30: ...alled just below the fuel fill fitting on the inside the cockpit Located below the access pie installed aft of the helm seat Located below the access pie installed forward of the helm seat and aft of...

Страница 31: ...engine manual for verification Make sure that the oil tanks are well stocked with the type of engine oil that is recommended for your engines Refer to your engine manual It is imperative that the oil...

Страница 32: ...ith CD Player Flush mounted in the console Speakers Two speakers installed in the forward cockpit Depending on whether or not you have selected the optional rigid T top the other 2 speakers are either...

Страница 33: ...n helm breaker and the breakers for the aft bilge forward bilge trim tabs and stereo memory are located right next to the tackle box trays When the optional dual battery switches are selected they re...

Страница 34: ...Dry storage in the floor in front of the console seat Release the latches on the top forward edge of the console for access to the backside of the console or dash panel Fresh water pump Fish box pump...

Страница 35: ...t use the bow rail for anchoring or to tie off to the dock or another boat Do not use the bow rail to tow another boat or skier Never stand on the bow rail or use it as leverage when pulling up an anc...

Страница 36: ...e that the drain plug has been installed in the fitting on the transom at the keel If your boat is being transported remove the drain plug once the boat is secured on the trailer so that any excess wa...

Страница 37: ...The anchor not included as standard equipment is held on the line beneath the anchor roller This allows you to move about the bow area safely without tripping over the line or anchor Seating This boa...

Страница 38: ...bove However with the installation of the outriggers we have included mounting pads for additional support When this option is selected and factory installed the outrigger installation includes a pair...

Страница 39: ...speed and economy due to increased drag of hull and drive More spray over bow General trim up or out characteristics are Raises the bow of the boat out of the water resulting in less hull in the water...

Страница 40: ...ructions or swimmers Make sure that the engine cooling water intakes are submerged Lock the helm seat to face straight forward Attach the safety stop switch lanyard Starting the Engines Start the engi...

Страница 41: ...rmance and increase fuel consumption The load positioning greatly affects the performance of your boat If excessive weight is placed too far aft the boat may have difficulty getting on plane and may r...

Страница 42: ...er buff with Mirror Glaze No 1 Then follow up with a good waxing Caution When power buffing use care not to leave swirl marks or burn the surface You may want to leave power buffing to a professional...

Страница 43: ...n which the coats must be applied in order to properly complete the application process therefore we recommend that a qualified professional do this process While barrier coating and bottom painting a...

Страница 44: ...guard against micro corrosion cracking and rust spots Always remove rust and corrosion spots as they appear with an aluminum cleaner Thoroughly wash the aluminum with a soft towel or sponge using lots...

Страница 45: ...ts of electrolysis which causes corrosion Maintain this anode in accordance with the maintenance schedule in your engine manual Head and Transom Doors The head and transom doors are made of a strong p...

Страница 46: ...lukewarm Never more than 100 degrees Use a soft bristle brush to clean Allow soap to soak in Rinse thoroughly Air dry Never apply heat to Sunbrella fabrics If stubborn stains persist you can use a dil...

Страница 47: ...tory If you launch the boat prior to storing it for the winter please complete and or comply with the following check list in order to ensure an easy fitting out in the spring Pre Storage Check List R...

Страница 48: ...r nickel factory gun bluing bonze platinum tin aluminum magnesium anodized aluminum painted surfaces fiberglass Plexiglas and plastics Flitz is available at many marine supply stores marinas and at Ho...

Страница 49: ...t hoses for burned cracked or deteriorated sections All rubber hoses should be pliable and free of kinks Clean the bilge and all bilge components with a mixture of bleach and water Then follow up by m...

Страница 50: ...rtical Clearance Hull Deck Interior Warranty Registration Date Fuel Capacity Gallons Ignition Key Cabin Head Door Key Other Key Radio Call Letters Bat Engine Make Model HP Port Engine S N Port Drive S...

Страница 51: ...ive unit Entangled in lines or weeds Anchor is down Prop cavitates Trim out too far Motor is too high Weeds on prop Bow heavy damage to hull Prop is damaged Excessive vibration Propeller engine or dri...

Отзывы: