background image

19

PART LIST—Model No.  PFICVRW70114.0

  1 

MAIN FRAME

  2 

FRONT BOTTOM TUBE

  3 

FRONT END CAP L

  3 

FRONT END CAP R

  4 

INNER HEX BOLT M8X75

  5 

FLAT WASHER D8X1.5

  6 

GUIDE RAIL

  7 

LEAD RAIL TUBE

  8 

OUTER HEX BOLT M10X125

  9 

FLAT WASHER D10X2

  10 

NYLON NUT M10

  11 

CONNECTED U-SHAPE PLATE

  12 

SCREW M8X20

  13 

FLAT WASHER D12X2.5

  14 

SPRING KNOB

  15 

LIMITING BASE

  16 

AXLE FOR LIMITING BASE 

  17 

FLAT WASHERD6XD16X1.2

  18 

CROSS SCREW M6*15

  19 

BOLT  M10

  20 

ADJUSTABLE KNOB

  21 

L-SHAPED CONNECTED PLATE

  22 

INNER HEX BOLT  M10X110

  23 

INNER HEX BOLT M8X45

  24 

TAIL BOOM

 25  1  SEAT 

  26 

CROSS SCREW M6X20

  27 

GLIDE SADDLE POST

  28 

SCREW M8X28

 29  6  SPACER 

 30  6  ROLLER 

  31 

NYLON NUT M8

 32  1  KNOB 

  33 

LONG BOLT Ф12.5X178

 34  2  PEDAL 

  35 

ROUND BUSHING

  36 

FOAM GRIP

  37 

SENSOR EXTENDED WIRE

 38  1  CONSOLE

 39  4  SCREW 

  40 

26 

SCREW ST4.2X18 

  41 

HOLE PLUG

  42 

CONSOLE BRACKET 

  43 

OUTER HEX BOLT M8*25

 44  1  KNOB

  45 

COMBINATION OF CONSOLE 

BRACKET

 46  1  RECEIVER

 47  1  ADAPTOR

  48 

PHILIPS PAN HEAD SCREW

  49 

DC LINE

  50 

NYLON NUT M12

  51 

EXTENSIBLE COVER 

  52 

U SHAPED WASHER

  53 

HEX NUT

  54 

TENSION SPRING 

 55  1  NUT 

 56  1  FLYWHEEL 

  57 

SPACER BUSH 1

  58 

BIG WASHER 

 59  2  SCREW 

 60  3  PULLEY

  61 

BEARING (608Z) 

  62 

HEX BOLT

  63 

CHAIN COVER L

  63 

CHAIN COVER R

 64  1  BELT 

  65 

HEX BOLT 

  66 

FLAT WASHER 

  67 

NYLON NUT 

  68 

SPACER BUSH 2

  69 

SPACER BUSH 3

 70  1  PULLEY

  71 

RUBBER ROPE

 72  1  BELT 

 73  2  SCREW 

 74  1  SCREW 

  75 

NYLON NUT 

  76 

HEX THIN NUT 

  77 

SPACER BUSH 4

  78 

BELT TRAY

  79 

MIDDLE AXLE 

  80 

SPACER BUSH 5

 81  6  BEARING 

  82 

IDLE WHEEL CONNECTING ROD 

  83 

FLANGE NUT 

  84 

HAND BAR 

  85 

CRASH PAD

 86  1  MOTOR

  87 

TENSION CABLE 

 88  2  SENSOR 

  89 

FIXED BLOCK

  90 

DC LINE 

 91  4  BOLT

  92 

CHEST BELT

  93 

KIT VIS

 Key No.  Qty. 

Description

 Key No.  Qty. 

Description

Содержание PFICVRW70114.0

Страница 1: ...ns in this manual before using this equipment Keep this manual for future reference QUESTIONS If you have questions or if there are missing parts please contact us UK Call 08457 089 009 From Ireland 053 92 36102 Website www iconsupport eu E mail csuk iconeurope com Write the serial number in the space above for reference Serial number decal ...

Страница 2: ...L PLACEMENT 4 ASSEMBLY 5 HOW TO FOLD THE ROWING MACHINE 8 HOW TO OPERATE THE ROWING MACHINE 9 FEATURES OF THE CONSOLE 10 HOW TO MEASURE HEART RATE 13 MAINTENANCEANDTROUBLESHOOTING 14 EXERCISE GUIDELINES 14 EXPLODED DRAWINGS 17 PART LIST 19 ORDERING REPLACEMENT PARTS Last Page ...

Страница 3: ...ental or institutional setting 5 Keep the rower indoors away from moisture and dust Place the rower on a level surface with a mat beneath it to protect the floor or carpet Make sure that there is at least 3 ft 0 9 m of clearance in the front and rear of the bike and 2 ft 0 6 m on each side 6 Inspect and properly tighten all parts regularly Replace any worn parts immediately 7 Keep children under a...

Страница 4: ...rovides an array of features designed to make your workouts at home more effective and enjoyable For your benefit read this manual carefully before you use the exercice rower If you have questions after reading this manual please see the front cover of this manual To help us assist you note the product model number and serial number before contacting us The model number is PFICVRW70114 and the loc...

Страница 5: ...aterials until assembly is completed In addition to the included tool s assembly requires a Phillips screwdriver and an adjustable wrench As you assemble the exercice bike use the drawings below to identify small parts The number in parentheses below each drawing is the key number of the part from the PART LIST near the end of this manual The number following the parentheses is the quantity needed...

Страница 6: ...ructure 6 using a hex head bolt 8 washers 9 and a nut 10 Tighten the knob 32 between the main frame 1 and the structure 6 Unscrew the seat stop bumpers 24 the screws 45 and the plate 44 and slide the sliding seat 18 onto the main frame 22 Attach the seat stop bumpers 24 to the sliding seat 18 Then fix the plate 44 using the screws 45 1 2 4 5 6 9 10 9 8 14 13 32 37 46 1 ...

Страница 7: ...o the guide rail 6 STEP 4 Attach the tail boom 24 to the guide rail 6 using a bolt 22 and a nut 10 Position the pedals 34 to the main frame 1 by using a long bolt 33 Attach the tail boom 24 to the guide rail 6 by using a bolt 23 and a washer 5 plastic caps 70 6 27 16 15 15 17 18 33 33 33 33 34 34 23 5 24 16 15 15 17 18 6 22 10 50 50 50 50 1 ...

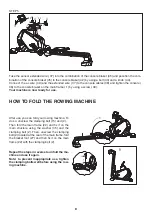
Страница 8: ...Your machine is now ready for use HOW TO FOLD THE ROWING MACHINE B 6 14 14 13 32 After use you can fold your rowing machine To do so unscrew the clamping bolt 15 and 2 Then fold the main frame 22 and fix it on the main structure using the washer 35 and the clamping bolt 2 Then unscrew the clamping bolt 2 located at the rear of the main frame fold the bracket foot 27 and then fix it on the main fra...

Страница 9: ...r legs Keep your back straight Lean back slightly at the hips not at the waist and begin pulling the handle toward your chest Keep your elbows outward 3 The third phase is the finish Your legs should be almost extended straight Continue to pull the handle until your hands are even with your chest After the finish phase extend your arms forward and pull the seat forward using your legs Repeat movin...

Страница 10: ...s resets itself T HOW TO USE THE CONSOLE 1 Turn on the console To turn on the console press any button on the console or simply start to pull on the arm 2 Use the buttons RESET Press this button to clear the value entered in the console Pressing this button for more than 2 seconds will reset all console values UP or DOWN Press this button to set the time distance calories and pulse values Hold dow...

Страница 11: ...TE on page 10 USE THE PROGRAMS 1 Select your program When the console is on press the UP or DOWN buttons to select your program Note that the programs automatically change the resistance For more details on choosing a program please look at the curve that will indicate the maximum level of resistance For a more precise choice please consult a coach or a sports coach Confirm your choice by pressing...

Страница 12: ...st segment of your customizable program then press ENTER to move to the next segment 5 16 Segments to be validated Once the segments are entered or at any time to exit programming press the MODE key You can choose to enter goals such as Resistance Time or Distance Strokes Calories or Pulse Press ENTER to confirm each of your choices 3 Start your exercise Start your exercise by pressing the START k...

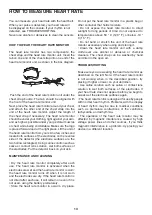
Страница 13: ...des are wet and the heart rate monitor is worn the heart rate monitor turns off when it is not worn and the electrodes are dry If the heart rate monitor is not dried after each use it will remain on even if it is not used using the battery prematurely Store the heart rate monitor in a warm dry place Do not put the heart rate monitor in a plastic bag or other container that holds moisture Do not ex...

Страница 14: ...direct sunlight REPLACING BATTERIES If the console display becomes dim the batteries need to be replaced most console problems are caused by batteries The console requires two 1 5V AA batteries alkaline batteries are recommended Remove the battery compartment cover from the console Insert two batteries into the console first Make sure the batteries are oriented correctly see the or polarity on the...

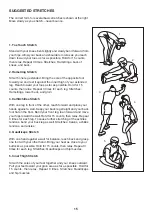
Страница 15: ...3 Calf Achilles Stretch With one leg in front of the other reach forward and place your hands against a wall Keep your back leg straight and your back foot flat on the floor Bend your front leg lean forward and move your hips toward the wall Hold for 15 counts then relax Repeat 3 times for each leg To cause further stretching of the achilles tendons bend your back leg as well Stretches Calves achi...

Страница 16: ...r body uses carbohydrate calories for energy Only af ter the first few minutes of exercise does your body begin to use stored fat calories for energy If your goal is to burn fat adjust the intensity of your exer cise until your heart rate is near the lowest number in your training one For maximum fat burning exercise with your heart rate near the middle number in your training zone Aerobic Exercis...

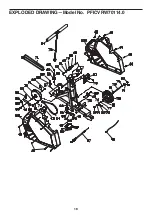
Страница 17: ... 8 11 12 5 14 12 5 15 16 15 17 16 15 15 18 17 18 19 20 21 22 23 10 24 5 13 25 26 27 28 30 31 29 32 33 33 33 33 34 34 35 36 37 38 36 35 39 40 40 50 50 50 50 43 42 44 45 46 40 47 49 48 41 51 EXPLODED DRAWING Model No PFICVRW70114 0 ...

Страница 18: ...18 EXPLODED DRAWING Model No PFICVRW70114 0 ...

Страница 19: ...SOR EXTENDED WIRE 38 1 CONSOLE 39 4 SCREW 40 26 SCREW ST4 2X18 41 1 HOLE PLUG 42 1 CONSOLE BRACKET 43 1 OUTER HEX BOLT M8 25 44 1 KNOB 45 1 COMBINATION OF CONSOLE BRACKET 46 1 RECEIVER 47 1 ADAPTOR 48 1 PHILIPS PAN HEAD SCREW 49 1 DC LINE 50 4 NYLON NUT M12 51 1 EXTENSIBLE COVER 52 4 U SHAPED WASHER 53 4 HEX NUT 54 1 TENSION SPRING 55 1 NUT 56 1 FLYWHEEL 57 1 SPACER BUSH 1 58 1 BIG WASHER 59 2 SCR...

Страница 20: ...e end of this manual IMPORTANT RECYCLING INFORMATION FOR E U CUSTOMERS This electronic product must not be disposed of in municipal waste To preserve the environment this product must be recycled after its useful life as required by law Please use recycling facilities that are authorized to collect this type of waste in your area In doing so you will help to conserve natural resources and improve ...

Отзывы: