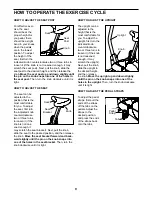
Pro-Form 980 S EKG Скачать руководство пользователя страница 7

7

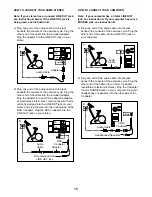
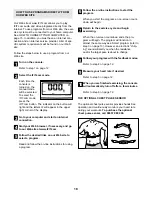
6. Whilst another person holds the Console (16) in the

position shown, connect the wire harness on the
Console to the Upper Wire Harness (36). Insert the
excess wire harness into the Upright (13).

Attach the Console (16) to the Upright (13) with three
M10 x 27mm Button Screws (51) and three M10 Black
Split Washers (50). Be careful to avoid pinching the
Wire Harnesses.

7. Turn the indicated Adjustment Knob (28) counterclock-

wise two or three turns to loosen it. Next, pull the Knob,
insert the Seat Post (5) into the Frame (1), and then
release the Knob. Move the Seat Post up and down
slightly until the pin on the Knob snaps into one of
the holes in the Seat Post. 
Then, turn the Knob clock-
wise until it is tight. 

8. Attach the Seat (12) to the Seat Bracket (6) with four

M8 Nylon Locknuts (10) and four M8 Split Washers
(70). Note: The Nylon Locknuts and the Split Washers
may be pre-attached to the underside of the Seat.

Turn the Seat Adjustment Knob (9) counterclockwise
two or three turns to loosen it. Next, pull the Knob, slide
the Seat Bracket (6) into the top of the Seat Post (5),
and then release the Knob. Move the Seat Bracket
forward and backward slightly until the pin on the
Knob snaps into one of the holes in the Seat
Bracket. 
Then, turn the Knob clockwise until it is tight. 
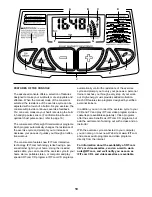
1

5

28

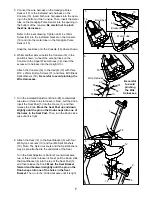
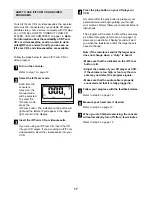
5. Connect the wire harness on the Handgrip Pulse

Sensor (15) to the indicated wire harness on the
Console (16). Insert both wire harnesses into the open-
ing in the bottom of the Console. Then, insert the metal
tube on the Handgrip Pulse Sensor into the opening in
the bottom of the console. Be careful not to pinch
the Wire Harnesses.

Refer to the inset drawing. Tighten an M4 x 16mm
Screw (66) into the indicated bracket on the Console
(16) and into the metal tube on the Handgrip Pulse
Sensor (15).  

Snap the bookrack onto the Console (16) where shown.

15

16

5

7

5

10

70

6

12

70

10

9

Metal Tube

15

16

66

Bracket

6

16

36

51

51

13

Wire Harness

50

50

51

8

Be careful

to avoid

pinching

the Wire

Harnesses.

Bookrack

Содержание 980 S EKG

Страница 1: ...o www proform com Visit our website at QUESTIONS As a manufacturer we are com mitted to providing complete customer satisfaction If you have questions or if there are missing or damaged parts please c...

Страница 2: ...OU BEGIN 4 ASSEMBLY 5 HOW TO OPERATE THE EXERCISE CYCLE 9 MAINTENANCE AND TROUBLE SHOOTING 19 CONDITIONING GUIDELINES 20 PART LIST 22 EXPLODED DRAWING 23 ORDERING REPLACEMENT PARTS Back Cover PROFORM...

Страница 3: ...when using the exercise cycle do not arch your back 9 If you feel pain or dizziness whilst exercising stop immediately and cool down 10 The exercise cycle does not have a freewheel the pedals will con...

Страница 4: ...questions after reading the manual please call our Customer Service Department at 08457 089 009 To help us assist you please note the product model number and serial number before calling The model n...

Страница 5: ...parts used in assembly The number in parenthesis below each drawing refers to the key number of the part from the PART LIST on page 22 The second number refers to the quantity needed for assembly Note...

Страница 6: ...nesses make sure the connectors do not catch on the indicated rod Turn the indicated Adjustment Knob 28 counterclock wise two or three turns to loosen it Next pull the Knob insert the Upright 13 into...

Страница 7: ...ide of the Seat Turn the Seat Adjustment Knob 9 counterclockwise two or three turns to loosen it Next pull the Knob slide the Seat Bracket 6 into the top of the Seat Post 5 and then release the Knob M...

Страница 8: ...djust the Right Pedal Strap not shown in the same way 9 24 42 25 Tab INSTALLING THE RECEIVER FOR THE OPTIONAL CHEST PULSE SENSOR If you purchase the optional chest pulse sensor refer to page 18 follow...

Страница 9: ...it may scratch the seat bracket Next pull the knob slide the seat to the desired position and then release the knob Move the seat bracket forward and back ward slightly until the pin on the knob snap...

Страница 10: ...can connect the exercise cycle to your home stereo portable stereo or computer and play special iFIT com CD programs IFIT com CD programs automatically control the resistance of the exercise cycle an...

Страница 11: ...ee page 3 F Feedback mode indicators These indicators show which feedback mode scan speed time distance resistance level calories fat calories or heart rate is currently shown Note When the distance i...

Страница 12: ...he elapsed time In addition the left pace indicator will appear in the display to show your exercise pace As you increase or decrease your pace the indicator will increase or decrease in height If des...

Страница 13: ...g the and buttons However when the current period of the program is completed the resistance level will automatically change if a different resistance setting is programmed for the next period The tar...

Страница 14: ...ores Plug the Y adapter into the PHONES jack on your CD player Plug your headphones into the other side of the Y adapter HOW TO CONNECT YOUR PORTABLE STEREO Note If your stereo has an RCA type AUDIO O...

Страница 15: ...RCA Y adapter Plug the RCA Y adapter into the LINE OUT jack on your stereo HOW TO CONNECT YOUR COMPUTER Note If your computer has a 3 5mm LINE OUT jack see instruction A If your computer has only a PH...

Страница 16: ...he adapter into the AUDIO OUT jack on your VCR B Plug one end of the audio cable into the jack beneath the console of the exercise cycle Plug the other end of the cable into the included adapter Plug...

Страница 17: ...cassette insert the videocassette into your VCR Press the play button on your CD player or VCR A moment after the play button is pressed your personal trainer will begin guiding you through your worko...

Страница 18: ...essary and go to our Web site at www iFIT com Follow the desired links on our Web site to select a program Read and follow the on line instructions for using a program Follow the on line instructions...

Страница 19: ...th of the leveling feet under the front stabiliser until the rocking motion is eliminated HANDGRIP PULSE SENSOR TROUBLE SHOOTING Avoid moving your hands whilst using the handgrip pulse sensor Excessiv...

Страница 20: ...you exercise Aerobic Exercise If your goal is to strengthen your cardiovascular sys tem your exercise must be aerobic Aerobic exer cise is activity that requires large amounts of oxygen for prolonged...

Страница 21: ...lles Stretch With one leg in front of the other reach forward and place your hands against a wall Keep your back leg straight and your back foot flat on the floor Bend your front leg lean forward and...

Страница 22: ...eft Crank Arm 43 1 Reed Switch Wire 44 2 Crank Bearing 45 2 M5 Nut 46 1 Adjustment Cable 47 1 Return Spring 48 1 Idler Arm 49 1 Idler Wheel w Bearing 50 3 M10 Black Split Washer 51 3 M10 x 27mm Button...

Страница 23: ...4 64 63 59 23 52 66 71 69 45 45 66 63 11 60 21 29 65 65 2 31 32 39 40 40 61 61 62 68 63 63 63 22 66 43 52 52 66 66 52 51 50 50 35 36 12 70 28 44 15 34 33 48 26 27 57 56 5 20 4 23 65 58 28 58 7 8 10 10...

Страница 24: ...ial Estate Beeston Leeds LS11 8JG UK Tel Outside the UK 0 044 113 387 7133 Fax 0 044 113 387 7125 When ordering parts please be prepared to give the following information the MODEL NUMBER of the produ...

Отзывы: