background image

2

TABLE OF CONTENTS

IMPORTANT PRECAUTIONS  . . . . . . . . . . . . . . . . . . . . . . . . . . . . . . . . . . . . . . . . . . . . . . . . . . . . . . . . . . . . . 2
BEFORE YOU BEGIN . . . . . . . . . . . . . . . . . . . . . . . . . . . . . . . . . . . . . . . . . . . . . . . . . . . . . . . . . . . . . . . . . . . 4
ASSEMBLY . . . . . . . . . . . . . . . . . . . . . . . . . . . . . . . . . . . . . . . . . . . . . . . . . . . . . . . . . . . . . . . . . . . . . . . . . . . 5
OPERATION AND ADJUSTMENT . . . . . . . . . . . . . . . . . . . . . . . . . . . . . . . . . . . . . . . . . . . . . . . . . . . . . . . . . . 7
HOW TO FOLD AND MOVE THE TREADMILL  . . . . . . . . . . . . . . . . . . . . . . . . . . . . . . . . . . . . . . . . . . . . . . . 10
MAINTENANCE AND TROUBLE-SHOOTING  . . . . . . . . . . . . . . . . . . . . . . . . . . . . . . . . . . . . . . . . . . . . . . . . 12
CONDITIONING GUIDELINES  . . . . . . . . . . . . . . . . . . . . . . . . . . . . . . . . . . . . . . . . . . . . . . . . . . . . . . . . . . . 14
ORDERING REPLACEMENT PARTS  . . . . . . . . . . . . . . . . . . . . . . . . . . . . . . . . . . . . . . . . . . . . . . . Back Cover

Note: A PART LIST and an EXPLODED DRAWING are attached in the centre of this manual. Remove the PART
LIST and EXPLODED DRAWING before beginning assembly.

1. It is the responsibility of the owner to ensure

that all users of this treadmill are adequately
informed of all warnings and precautions.

2. Use the treadmill only as described in this

manual.

3. Place the treadmill on a level surface, with 8

feet (2 m) of clearance behind it. Do not place
the treadmill on a surface that blocks any air
openings. To protect the floor or carpet from
damage, place a mat under the treadmill.  

4. Keep the treadmill indoors, away from mois-

ture and dust. Do not put the treadmill in a
garage or covered patio, or near water. 

5. Do not operate the treadmill where aerosol

products are used or where oxygen is being
administered. 

6. Keep children under the age of 12 and pets

away from the treadmill at all times.

7. The treadmill should not be used by persons

weighing more than 250 pounds (115 kg). 

8. Never allow more than one person on the

treadmill at a time. 

9. Wear appropriate exercise clothing when

using the treadmill. Do not wear loose 
clothing that could become caught in the
treadmill. Athletic support clothes are recom-

mended for both men and women. 

Always

wear athletic shoes. Never use the treadmill
with bare feet, wearing only stockings, or in
sandals. 

10. When connecting the power cord (see HOW

TO PLUG IN THE POWER CORD on page 7),
plug the power cord into an earthed circuit.
No other appliance should be on the same
circuit. When replacing the fuse, an ASTA
approved BS1362 type should be fitted to the
fuse carrier; a 13 amp fuse should be used. 

11. If an extension cord is needed, use only a 14-

gauge cord of 5 feet (1,5 m) or less in length.  

12. Keep the power cord away from heated sur-

faces.

13. Never move the walking belt whilst the power

is turned off. Do not operate the treadmill if
the power cord or plug is damaged, or if the
treadmill is not working properly. (See
BEFORE YOU BEGIN on page 4 if the tread-
mill is not working properly.)    

14. Never start the treadmill whilst you are stand-

ing on the walking belt. Always hold the
handrails whilst using the treadmill.

15. The treadmill is capable of high speeds.

Adjust the speed in small increments to
avoid sudden jumps in speed. 

IMPORTANT PRECAUTIONS

WARNING:

To reduce the risk of burns, fire, electric shock, or injury to persons, read

the following important precautions and information before operating the treadmill.

Содержание 325E

Страница 1: ...re reference Serial Number Decal QUESTIONS As a manufacturer we are committed to providing complete customer satisfaction If you have questions or if there are missing or damaged parts we will guarantee complete satis faction through our Customer Service Department Please CALL 0345 089009 Or WRITE ICON Fitness Lifestyle Ltd Greenwich House 223 North Street Sheepscar Leeds LS7 2AA West Yorkshire Cl...

Страница 2: ...son on the treadmill at a time 9 Wear appropriate exercise clothing when using the treadmill Do not wear loose clothing that could become caught in the treadmill Athletic support clothes are recom mended for both men and women Always wear athletic shoes Never use the treadmill with bare feet wearing only stockings or in sandals 10 When connecting the power cord see HOW TO PLUG IN THE POWER CORD on...

Страница 3: ...ocedures described in this manual Never remove the motor hood unless instructed to do so by an authorised service representa tive Servicing other than the procedures in this manual should be performed by an authorised service representative only 25 This treadmill is intended for in home use only Do not use this treadmill in any com mercial rental or institutional setting WARNING Before beginning t...

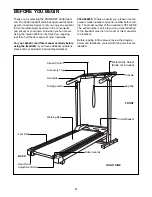
Страница 4: ...tional questions please call our Customer Service Department at 0345 089009 To help us assist you please note the product model number and serial number before call ing The model number of the treadmill is PETL32570 The serial number can be found on a decal attached to the treadmill see the front cover of this manual for the location Before reading further please review the drawing below and famil...

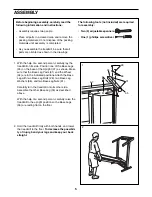
Страница 5: ...osition so the Base Legs 55 are resting flat on the floor 2 Hold the treadmill firmly with both hands and lower the treadmill to the floor To decrease the possibili ty of injury bend your legs and keep your back straight 2 1 5 ASSEMBLY Before beginning assembly carefully read the following information and instructions Assembly requires two people Place all parts in a cleared area and remove the pa...

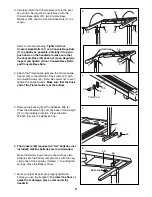
Страница 6: ...ul not to over tighten the Guide Screws Make sure that the thick end of the Frame Guide is at the bottom 5 Remove the backing from the Adhesive Clip 2 Press the Adhesive Clip onto the base of the Upright 37 in the indicated location Press the Allen Wrench 35 into the Adhesive Clip 6 The Console 49 requires two AA batteries not included alkaline batteries are recommended Open the Battery Cover 48 a...

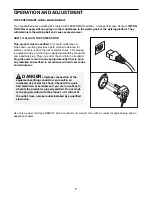
Страница 7: ...quipment earthing conductor and a earthing plug Plug one end of the cord into the treadmill Plug the power cord into an appropriate outlet that is prop erly installed and earthed in accordance with all local codes and ordinances Use only a power cord type H05VV F with a conductor of at least 1mm2 with a country recognised plug and an appliance coupler DANGER Improper connection of the equipment ea...

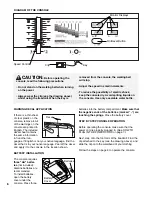
Страница 8: ...the decal that is in your native language Peel off the decal and apply it to the console in the location shown BATTERY INSTALLATION The console requires three AA batter ies not included Alkaline batteries are recommended To install batteries open the battery cover under the console Press three batteries into the battery compartment Make sure that the negative ends of the batteries marked ÒÐÓ are t...

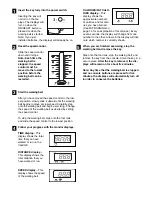
Страница 9: ...n Follow your progress with the monitor displays TIME displayÑThis display shows the total time that you have walked or run on the treadmill DISTANCE displayÑ This display shows the total distance that you have walked or run SPEED displayÑThis display shows the speed of the walking belt CALORIES FAT CALO RIES displayÑThis display shows the approximate numbers of calories and fat calo ries you have...

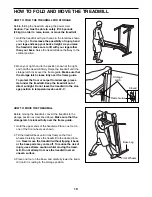
Страница 10: ...e floor or carpet from damage place a mat under the treadmill Keep the treadmill out of direct sunlight Do not leave the treadmill in the stor age position in temperatures above 34o C HOW TO MOVE THE TREADMILL Before moving the treadmill convert the treadmill to the storage position as described above Make sure that the storage latch is locked fully over the frame guide 1 Hold the upper ends of th...

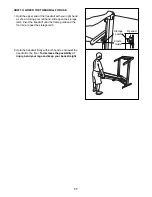
Страница 11: ...eft hand slide open the storage latch Pivot the treadmill until the frame guide and the foot rail are past the storage latch 2 Hold the treadmill firmly with both hands and lower the treadmill to the floor To decrease the possibility of injury bend your legs and keep your back straight Opened Storage Latch Frame Guide ...

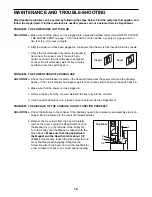
Страница 12: ... on the treadmill frame near the power cord see the drawing above If the circuit breaker has tripped wait for five minutes and then press the switch back in b Make sure that the power cord is plugged in c Remove the key from the console Reinsert the key fully into the console d If the treadmill still will not run please call our Customer Service Department PROBLEM THE DISPLAYS OF THE CONSOLE DO NO...

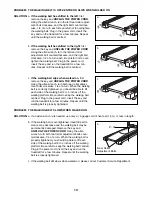
Страница 13: ...t bolts clockwise 1 4 of a turn When the walking belt is correctly tightened you should be able to lift each side of the walking belt 2 to 3 inches off the walking platform Be careful to keep the walking belt centred Plug in the power cord insert the key and run the treadmill for a few minutes Repeat until the walking belt is properly tightened PROBLEM THE WALKING BELT SLOWS WHEN WALKED ON SOLUTIO...

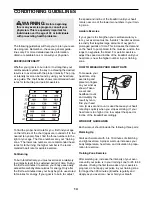
Страница 14: ...rcise If your goal is to strengthen your cardiovascular sys tem your exercise must be Òaerobic Ó Aerobic exercise is activity that requires large amounts of oxygen for prolonged periods of time This increases the demand on the heart to pump blood to the muscles and on the lungs to oxygenate the blood For aerobic exercise adjust the speed and incline of the treadmill until your heart rate is near t...

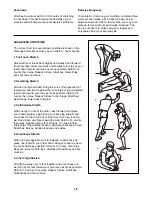
Страница 15: ...r 15 counts then relax Repeat 3 times for both legs To cause further stretching of the achilles tendons bend your back leg as well Stretches Calves achilles tendons and ankles 4 Quadriceps Stretch With one hand against a wall for balance reach back and grasp one foot with your other hand Bring your heel as close to your buttocks as possible Hold for 15 counts then relax Repeat 3 times for both leg...

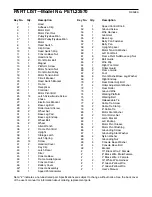
Страница 16: ... Key Clip 43 1 Latch Decal 44 1 Filter 45 1 Console Base 46 1 Frame Guide Spacer 47 1 Console Cover 48 1 Battery Cover 49 1 Console Assembly 50 1 Speed Potentiometer Key No Qty Description 51 1 Speed Control Knob 52 5 Ground Screw 53 1 Wire Harness 54 1 Grommet 55 2 Base Leg 56 7 Belly Pan Fastener 57 1 Belly Pan 58 2 Upright Spacer 59 1 Motor Tension Washer 60 1 Left Foot Rail 61 6 Frame Pivot Nu...

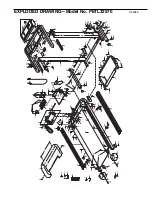
Страница 17: ...56 56 57 64 40 58 61 62 52 15 12 74 15 40 12 16 18 17 15 14 13 40 8 12 75 15 25 66 67 40 69 70 71 72 40 67 70 71 83 15 25 66 15 60 6 21 37 53 61 77 78 79 76 61 55 35 52 73 2 43 65 29 68 68 82 71 71 81 63 59 88 50 40 40 31 40 31 40 85 85 84 88 88 46 87 89 10 20 9 40 44 40 9 9 26 23 22 12 27 80 81 13 9 92 90 11 91 91 11 90 EXPLODED DRAWINGÑModel No PETL32570 R0598A ...

Страница 18: ... Leeds LS7 2AA West Yorkshire Tel Country Code 0345 089009 Fax 0113 2411120 To help us assist you please be prepared to give the following information The NAME of the product PROFORM 325E treadmill The MODEL NUMBER of the product PETL32570 The PART NUMBER of the part see the EXPLODED DRAWING and PART LIST attached in the centre of this manual The DESCRIPTION of the part see the EXPLODED DRAWING an...

Отзывы: