background image

19

These guidelines will help you to plan your exercise
program. For detailed exercise information, obtain a
reputable book or consult your physician. Remember,
proper nutrition and adequate rest are essential for
successful results. 

EXERCISE INTENSITY

Whether your goal is to burn fat or to strengthen your
cardiovascular system, exercising at the proper inten-
sity is the key to achieving results. You can use your
heart rate as a guide to find the proper intensity level.
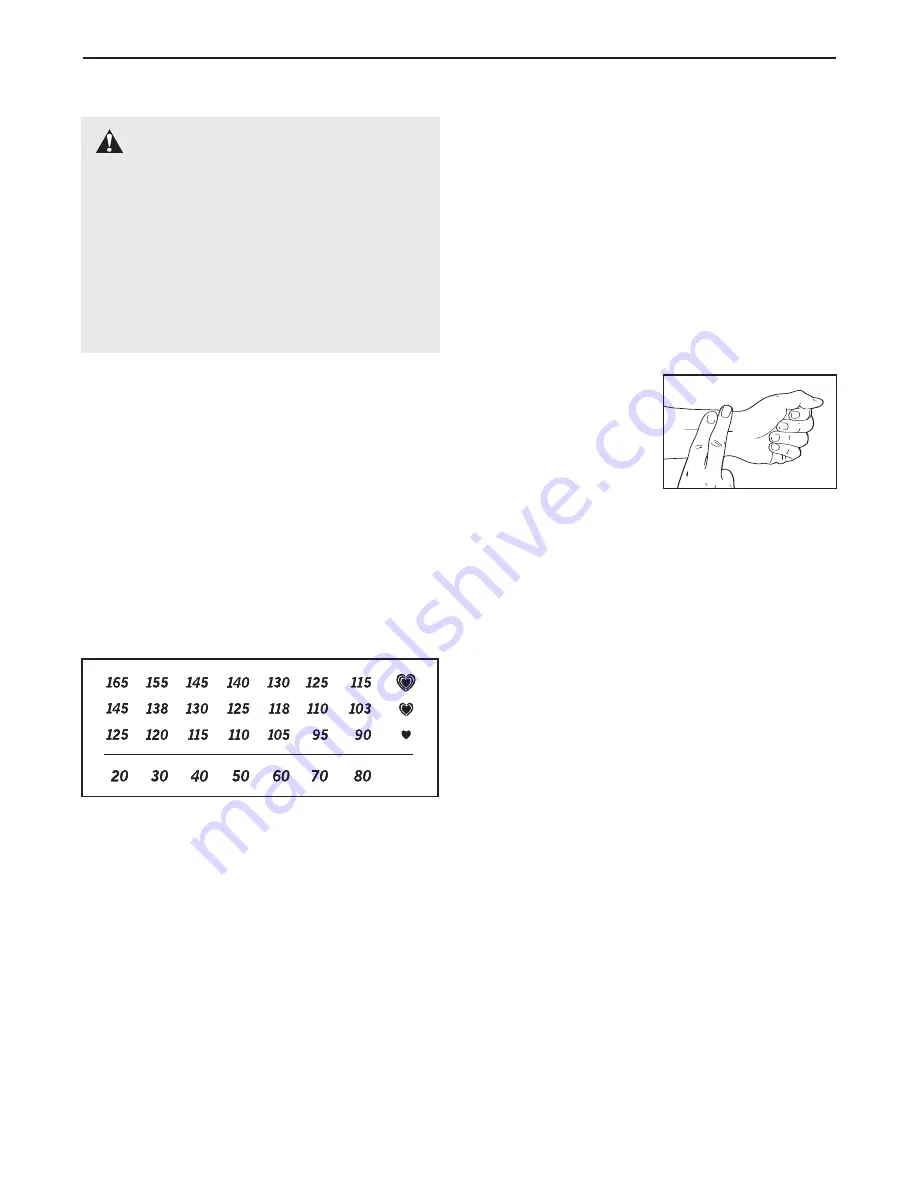
The chart below shows recommended heart rates for
fat burning, maximum fat burning, and aerobic exer-
cise.

To find the proper intensity level, first find your age at
the bottom of the chart (ages are rounded off to the
nearest ten years). The three numbers listed above
your age define your “training zone.” The lowest num-
ber is the heart rate for fat burning, the middle number
is the heart rate for maximum fat burning, and the
highest number is the heart rate for aerobic exercise.

Burning Fat—

To burn fat effectively, you must exer-

cise at a low intensity level for a sustained period of
time. During the first few minutes of exercise, your
body uses 

carbohydrate calories

for energy. Only after

the first few minutes of exercise does your body begin
to use stored 

fat calories

for energy. If your goal is to

burn fat, adjust the intensity of your exercise until your
heart rate is near the lowest number in your training

zone. For maximum fat burning, exercise with your
heart rate near the middle number in your training
zone.

Aerobic Exercise—

If your goal is to strengthen your

cardiovascular system, you must perform aerobic exer-
cise, which is activity that requires large amounts of
oxygen for prolonged periods of time. For aerobic ex-
ercise, adjust the intensity of your exercise until your
heart rate is near the highest number in your training
zone. 

HOW TO MEASURE YOUR HEART RATE

To measure your heart
rate, exercise for at least
four minutes. Then, stop
exercising and place two
fingers on your wrist as
shown. Take a six-sec-
ond heartbeat count,
and multiply the result
by 10 to find your heart rate. For example, if your six-
second heartbeat count is 14, your heart rate is 140
beats per minute. Note: If your exercise equipment in-
cludes a pulse sensor, you can use the pulse sensor to
measure your heart rate.

WORKOUT GUIDELINES

Warm-up—

Start with 5 to 10 minutes of stretching and

light exercise. A warm-up increases your body temper-
ature, heart rate, and circulation in preparation for ex-
ercise. 

Training Zone Exercise—

Exercise for 20 to 30 min-

utes with your heart rate in your training zone. (During
the first few weeks of your exercise program, do not
keep your heart rate in your training zone for longer
than 20 minutes.) Breathe regularly and deeply as you
exercise–never hold your breath. 

Cool-down

—Finish with 5 to 10 minutes of stretching.

Stretching increases the flexibility of your muscles and
will help to prevent post-exercise problems.

EXERCISE FREQUENCY

To maintain or improve your condition, complete three
workouts each week, with at least one day of rest be-
tween workouts. After a few months of regular exer-
cise, you may complete up to five workouts each
week, if desired. Remember, the key to success is to
make exercise a regular and enjoyable part of your
everyday life.

EXERCISE GUIDELINES

WARNING:

Before beginning this

or any exercise program, consult your physi-
cian. This is especially important for persons
over the age of 35 or persons with pre-exist-
ing health problems.

The pulse sensor is not a medical device.
Various factors may affect the accuracy of
heart rate readings. The pulse sensor is in-
tended only as an exercise aid in determining
heart rate trends in general.

Содержание 30753.0

Страница 1: ...QUESTIONS As a manufacturer we are com mitted to providing complete cus tomer satisfaction If you have questions or if parts are damaged or missing PLEASE DO NOT CONTACT THE STORE For assis tance contact our Customer Service Department CALL TOLL FREE 1 888 936 4266 Mon Fri 8 00 until 17 00 EST excluding holidays OR E MAIL US customerservice iconcanada ca Serial Number Decal www proform com Visit o...

Страница 2: ...ENT PARTS Back Cover LIMITED WARRANTY Back Cover Note An EXPLODED DRAWING and a PART LIST are attached in the center of this manual 2 The decals shown here have been placed on the treadmill If a decal is missing or illegible call the telephone number on the front cover of this manual and order a free replacement decal Apply the decal in the location shown Note The decal may not be shown at actual ...

Страница 3: ... grounded circuit capable of carrying 15 or more amps No other appliance should be on the same circuit Do not use an extension cord 12 Use only a single outlet surge suppressor that meets all of the specifications described on page 10 13 Failure to use a properly functioning surge suppressor could result in damage to the con trol system of your treadmill If the control system is damaged the walkin...

Страница 4: ...ed 23 Inspect and properly tighten all parts of your treadmill regularly 24 Never insert any object into any opening on your treadmill 25 DANGER Always unplug the power cord immediately after use before cleaning your treadmill and before performing the maintenance and adjustment procedures de scribed in this manual Never remove the motor hood unless instructed to do so by an authorized service rep...

Страница 5: ...e questions after read ing this manual please see the front cover of this man ual To help us assist you note the product model number and serial number before contacting us The model number and the location of the serial number decal are shown on the front cover of this manual Before reading further please review the drawing below and familiarize yourself with the labeled parts BEFORE YOU BEGIN Ha...

Страница 6: ...ntity needed for assembly Note If a part is not in the parts bag first check to see if it has been pre assembled To avoid damaging plastic parts do not use power tools for assembly 1 Make sure that the power cord is unplugged With the help of a second person carefully tip the treadmill onto its left side as shown Partially fold the Frame 86 so the treadmill is more stable Do not fully fold the tre...

Страница 7: ...rge hole in the left side Remove the wire tie holding the Upright Wire 42 inside the right Upright 69 Feed the Upright Wire into the hole in the bottom of the Right Handrail and out of the large hole in the side Note It may be helpful to use needlenose pliers to pull the Wire Harness out of the hole Set the Right Handrail 72 on the right Upright 69 Attach the Right Handrail with two Handrail Bolt ...

Страница 8: ...sole Base with four 3 4 Screws 2 Start all four Screws before tightening them do not over tighten the Screws See the lower drawing Make sure that the Upright Wire 42 is routed below the two indicated round posts A Next press the Upright Wire into the slot be tween the square post B and the Console Base 47 2 2 72 71 6 48 42 Ground Wire 36 34 47 7 Cover the Upright Wire 42 with the Right Grip Plate ...

Страница 9: ...protect the floor or carpet place a mat under the treadmill 8 Attach the Latch Housing 29 to the left Upright 69 with two 3 4 Screws 2 Make sure that the large hole in the Latch Housing is on the side shown Remove the knob from the pin Make sure that the col lar and the spring are on the pin as shown Insert the pin into the Latch Housing 29 and tighten the knob back onto the pin Pin Collar Spring ...

Страница 10: ...duce the risk of elec tric shock This product is equipped with a cord having an equipment grounding conductor and a grounding plug Plug the power cord into a surge suppressor and plug the surge suppressor into an appropriate outlet that is properly installed and grounded in accordance with all local codes and ordinances Important The treadmill is not compatible with GFCI equipped outlets This prod...

Страница 11: ...ute Challenge program automatically controls the speed of the treadmill as it guides you through an effective workout To use the manual mode of the console and to pro gram a calories goal follow the steps beginning on page 12 To use the 5K Run program see page 13 To use the 30 minute Challenge program see page 14 HOW TO TURN ON THE POWER IMPORTANT If the treadmill has been exposed to cold temperat...

Страница 12: ...if a button is held down the speed setting will change in increments of 0 5 mph To stop the walking belt press the Stop button The time will begin to flash in the left display To restart the walking belt press the Start button or the Speed increase button Note The first time you use the treadmill periodi cally inspect the alignment of the walking belt and center the walking belt if necessary see p...

Страница 13: ... button and adjust the incline of the treadmill to the lowest setting The incline must be at the lowest setting when you fold the treadmill to the storage posi tion or you may damage the treadmill Next re move the key from the console and put it in a secure place When you are finished using the treadmill switch the reset off circuit breaker to the off position and unplug the power cord IMPORTANT I...

Страница 14: ... HOW TO TURN ON THE POWER on page 11 2 Select the 30 minute Challenge program Press the Program Select button repeatedly until P2 appears in the center display and the right display begins to flash The left display will show that the program will last for 30 minutes Note If the walking belt is moving when the Program Select button is pressed the walking belt will slow to a stop 3 Press the Start b...

Страница 15: ...tion mode insert the key into the console while holding down the Stop button and then release the Stop button When the information mode is selected the following information will be shown The left display will show the total number of hours that the treadmill has been used and the total number of miles or kilometers that the walk ing belt has moved An E for English or an M for metric will appear i...

Страница 16: ...ct sunlight Do not leave your treadmill in the storage posi tion in temperatures above 85 Fahrenheit 30º C HOW TO MOVE THE TREADMILL Before moving your treadmill convert the treadmill to the stor age position as described above Make sure that the latch pin is fully inserted into the frame 1 Hold the upper ends of the handrails and place one foot against one of the wheels 2 Tilt the treadmill back ...

Страница 17: ...e If the circuit breaker has tripped wait for five minutes and then press the switch back in b Make sure that the power cord is plugged in If the power cord is plugged in unplug it wait for five minutes and then plug it back in c Remove the key from the console Reinsert the key into the console d If the treadmill still will not run see the front cover of this manual PROBLEM The displays of the con...

Страница 18: ... off center or slips when walked on SOLUTION a If the walking belt is off center remove the key and UNPLUG THE POWER CORD If the walking belt has shifted to the left use the hex key to turn the left rear roller bolt clockwise 1 2 of a turn if the walk ing belt has shifted to the right turn the bolt coun terclockwise 1 2 of a turn Be careful not to over tighten the walking belt Then plug in the pow...

Страница 19: ... of your exercise until your heart rate is near the highest number in your training zone HOW TO MEASURE YOUR HEART RATE To measure your heart rate exercise for at least four minutes Then stop exercising and place two fingers on your wrist as shown Take a six sec ond heartbeat count and multiply the result by 10 to find your heart rate For example if your six second heartbeat count is 14 your heart...

Страница 20: ... 40 1 Ground Wire 41 1 4 Cable Tie 42 1 Upright Wire 43 1 Console 44 2 Rear Roller Plate 45 4 U Nut 46 4 Extension Leg Nut 47 1 Console Base 48 4 1 2 Screw 49 3 Wire Clamp 50 1 Key Clip 51 1 Incline Motor 52 1 Front Roller Nut 53 1 Static Decal 54 3 Incline Pivot Bolt 55 1 Right Footrail 56 1 Incline Motor Wire 57 4 Round Base Pad 58 9 3 4 Tek Screw 59 1 Controller 60 1 Lift Frame 61 2 Base Pad 62...

Страница 21: ...51 54 13 62 63 64 13 66 26 40 87 68 27 65 26 15 94 73 11 2 56 3 6 8 24 20 85 84 84 83 30 42 75 58 61 58 61 83 59 57 36 34 45 45 50 1 22 22 13 54 13 54 22 73 31 83 77 58 58 91 2 2 26 49 28 4 21 77 77 77 77 77 77 77 77 77 9 9 44 74 44 84 85 93 46 65 93 63 46 71 2 2 37 37 2 37 16 16 47 43 4 28 20 5 88 88 88 2 2 33 33 89 89 21 21 25 2 2 90 52 6 2 53 78 64 66 13 67 67 7 41 EXPLODED DRAWING Model No 307...

Страница 22: ...CON is not responsible or liable for indirect special or consequential damages arising out of or in con nection with the use or performance of the product or damages with respect to any economic loss loss of property loss of revenues or profits loss of enjoyment or use costs of removal or installation or other consequential damages of whatsoever nature Some provinces do not allow the exclusion or ...

Отзывы: