22
7
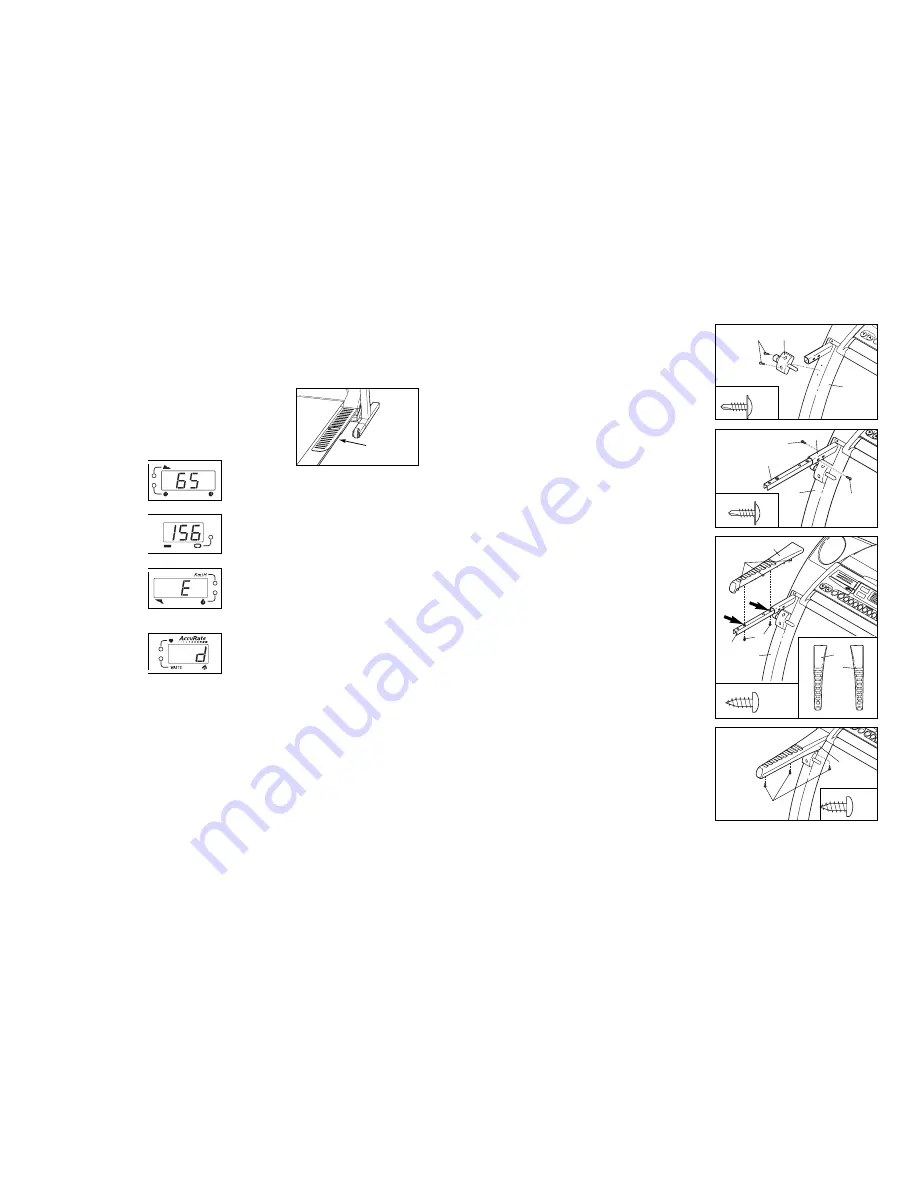
THE INFORMATION MODE/DEMO MODE
The console features an information mode that keeps
track of the total number of hours that the treadmill has
been operated and the total number of miles that the
walking belt has moved. The information mode also al-
lows you to switch the console from miles per hour to
kilometres per hour. In addition, the information mode
allows you to turn on and turn off the demo mode.
To select the information mode, hold down the Stop
button whilst inserting the key into the console. When
the information mode is selected, the following informa-
tion will be shown:
The Time/Incline/Segment
Time display will show the
total number of hours the
treadmill has been used.
The Distance/Laps display
will show the total number of
miles (or kilometres) that the
walking belt has moved.
An E for english miles or an M
for metric kilometres will ap-
pear in the Speed/Pace dis-
play. Press the Speed
▲
▲
but-
ton to change the unit of mea-
surement.
IMPORTANT: The Calories/
Watts/Heart Rate display
should be blank.
If a “d” ap-
pears in the display, the con-
sole is in the “demo” mode.
This mode is intended to be
used only when a treadmill is displayed in a store.
When the console is in the demo mode, the power cord
can be plugged in, the key can be removed from the
console, and the displays and indicators on the console
will automatically light in a preset sequence, although
the buttons on the console will not operate.
If a “d” ap-
pears in the Calories/Watts/Heart Rate display when
the information mode is selected, press the Speed
▼
▼
button so the display is blank.
To exit the information mode, remove the key from the
console.
HOW TO ADJUST THE CUSHIONING SYSTEM
The treadmill features a cushioning system that reduces
the impact as you walk or run on the treadmill. The
firmness of the cushioning system is controlled by the
adjustable cushions at the centre of the treadmill (there
is one ad-
justable cush-
ion on each
side). To se-
lect the maxi-
mum firmness
setting, turn
the cushions
to level 3; to
decrease the
firmness, turn
the cushions to level 2 or 1. It may be helpful to lift on
the walking platform as you rotate the cushion.
Note:
The faster you run on the treadmill, or the heavier
your weight, the firmer the cushioning system
should be. Make sure that both cushions are at the
same setting.
Adjustable
Cushion
7.
Make sure that all parts are properly tightened before you use the treadmill.
Keep the included allen
wrench in a secure place; the allen wrench is used to adjust the walking belt (see page 24). To protect the
floor or carpet from damage, place a mat under the treadmill.
5. See the inset drawing. Identify the Left Top Handgrip (31)
(there are identifying marks inside the Handgrips). Set the
Left Top Handgrip on the left Handgrip Extension (34).
Insert two 1/2” Screws (121)
into the two holes in the
Handgrip Extension indicated by the arrows. Tighten
the Screws into the Left Top Handgrip.
Important: Do not insert the two 1/2” Screws (121)
into the wrong holes in the Handgrip Extension (34),
or tighten the Screws into the plastic bosses on the
bottom of the Left Top Handgrip (31).
31
Bosses
64
121
34
5
31
43
6
6. Attach the matching Left Bottom Handgrip (119) with
three 1/2” Screws (121).
Attach the Right Top Handgrip and the Right Bottom
Handgrip (not shown) as described above.
121
119
121
3
3. With the help of a second person, carefully tip the
Uprights (64) back to the vertical position.
Attach the Latch Assembly (32) to the left Upright (64)
with two Extension Screws (35).
32
35
64
35
4
4. Orient one of the Handgrip Extensions (34) as shown and
insert it as far as possible into the post on the left Upright
(64). If necessary, tap the Handgrip Extension with a rub-
ber mallet to fully insert it. Attach the Handgrip Extension
with
two
Extension Screws (35), one towards the front of
the post, and the other towards the back.
Attach the other Handgrip Extension to the post on the
right Upright (not shown) in the same way.
34
35
35
64
35
Post
121


