background image

EN-32

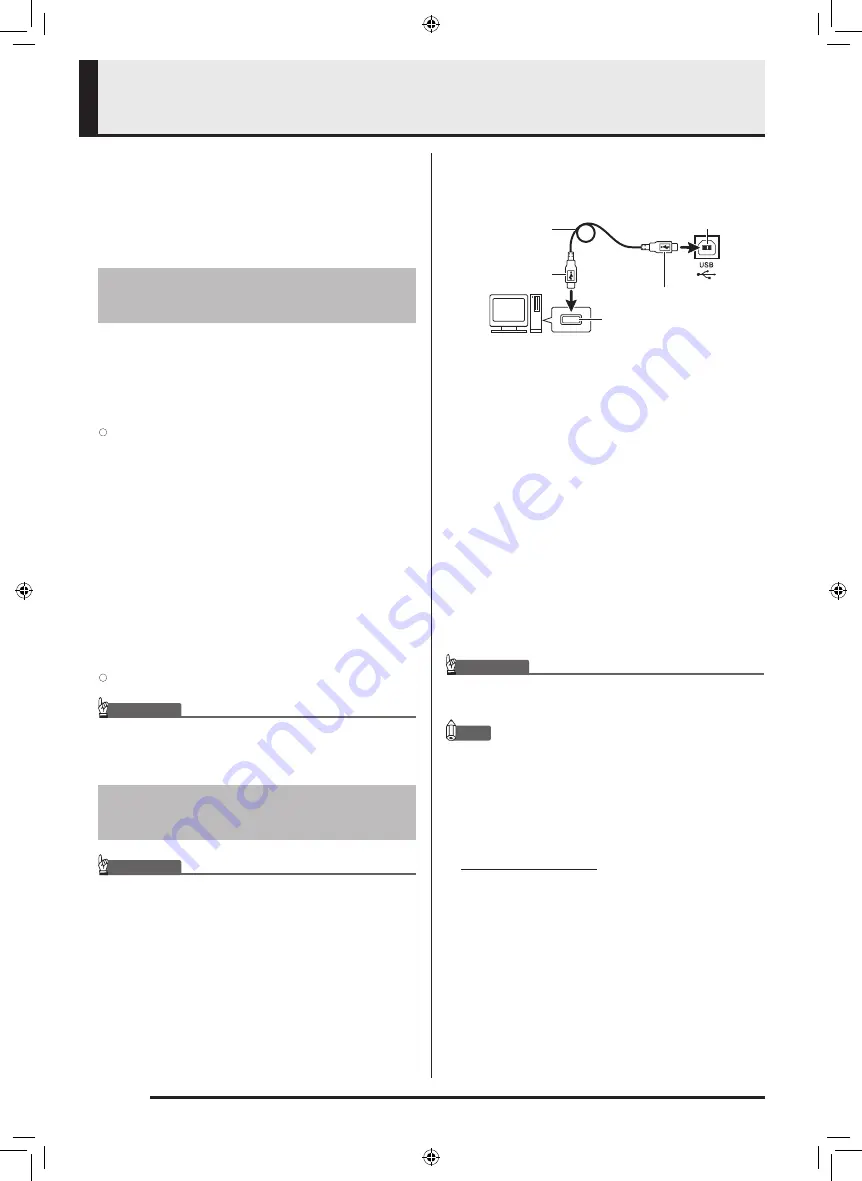
Connecting to a Computer

You can connect the Digital Piano to a computer and 
exchange MIDI data between them. You can send play 
data from the Digital Piano to commercially available 
music software running on your computer, or you can 
send MIDI data from your computer to the Digital 
Piano for playback.

The following shows the minimum computer system 
requirements for sending and receiving MIDI data. 
Check to make sure that your computer complies with 
these requirements before connecting the Digital Piano 
to it.

z

Operating System

z

USB port

IMPORTANT!

• Never connect to a computer that does not conform 

to the above requirements. Doing so can cause 
problems with your computer.

IMPORTANT!

• Make sure you follow the steps of the procedure 

below exactly. Connecting incorrectly can make data 
send and receive impossible.

1.

Turn off the Digital Piano and then start up 
your computer.

Do not start up the music software on your computer 
yet!

2.

After starting up your computer, use a 
commercially available USB cable to connect 
it to the Digital Piano.

3.

Turn on the Digital Piano.

If this is the first time you are connecting the Digital 
Piano to your computer, the driver software required 
to send and receive data will be installed on your 
computer automatically.

4.

Start up commercially available music 
software on your computer.

5.

Configure the music software settings to 
select one of the following as the MIDI device.

For information about how to select the MIDI device, 
see the user documentation that comes with the 
music software you are using.

IMPORTANT!

• Be sure to turn on the Digital Piano first before 

starting up your computer’s music software.

NOTE

Once you are able to connect successfully, there is no 

problem with leaving the USB cable connected when 

you turn off your computer and/or Digital Piano.

For detailed specifications and connections that 

apply to MIDI data send and receive by this Digital 

Piano, see the latest support information provided 

by the website at the following URL.

http://world.casio.com/

Minimum Computer System 

Requirements

Windows

®

 XP (SP2 or later) 

*

1

Windows Vista

®


*

2

Windows

®

 7 

*

3

Windows

®

 8 

*

4

Windows

®

 8.1

*

5

Mac OS

®

 X (10.3.9, 10.4.11, 10.5.X, 10.6.X, 10.7.X, 

10.8.X, 10.9.X)

*

1: Windows XP Home Edition

Windows XP Professional (32-bit)

*

2: Windows Vista (32-bit)

*

3: Windows 7 (32-bit, 64-bit)

*

4: Windows 8 (32-bit, 64-bit)

*

5: Windows 8.1 (32-bit, 64-bit)

Connecting the Digital Piano 

to Your Computer

CASIO USB-MIDI: For Windows Vista, Windows 7, 

Windows 8, Windows 8.1, 
Mac OS X

USB Audio Device: For Windows XP

Computer USB port

A connector

Digital Piano USB port

B connector

USB cable

(A-B type)

PX760-ES-1A.indd   34

2014/06/24   10:35:15

Содержание Privia PX-760

Страница 1: ...Precautions Precauciones de seguridad Antes de intentar usar el piano aseg rese de leer las Precauciones de seguridad separadas English Espa ol PX 760 This recycle mark indicates that the packaging co...

Страница 2: ...ble specified by the manufacturer or sold with the apparatus When a cart is used use caution when moving the cart apparatus combination to avoid injury from tip over 13 Unplug this apparatus during li...

Страница 3: ...s with the keyboard EN 25 Keyboard Keys Used for Configuring Settings EN 27 Parameter List EN 28 Reverb REVERB EN 28 Tone selection EN 28 Chorus CHORUS EN 28 Brilliance BRILLIANCE EN 28 Layer balance...

Страница 4: ...fications EN 42 Operating Precautions EN 43 Appendix A 1 Tone List A 1 Concert Play List A 1 Music Library List A 1 MIDI Implementation Chart Company and product names used in this manual may be regis...

Страница 5: ...EN 3 English General Guide 2 1 3 4 5 6 8 9 7 bk bl bm bo bn Bottom Front Rear PX760 ES 1A indd 5 2014 06 24 10 35 11...

Страница 6: ...tails about operations and settings see Configuring Settings with the Keyboard on page EN 25 z The following table shows how pressing the FUNCTION button changes the operation of certain buttons FUNCT...

Страница 7: ...ION button depressed as the Digital Piano performs the operation described below 1 The GRAND PIANO CONCERT GRAND PIANO MODERN and ELEC PIANO 1 button indicator lamps start to flash in sequence 2 The f...

Страница 8: ...f malfunction Make sure the Digital Piano is turned off before plugging in or unplugging the AC adaptor The AC adaptor will become warm to the touch after very long use This is normal and does not ind...

Страница 9: ...set the volume to a low level After connecting you can adjust the volume to the level you want Connecting headphones to either of the PHONES jack cuts off output to the speakers which means you can pr...

Страница 10: ...lifiers shown in Figure 2 Adjust volume using the Digital Piano s VOLUME controller Use only accessories that are specified for use with this Digital Piano Use of unauthorized accessories creates the...

Страница 11: ...ying a Tone START STOP a FUNCTION METRONOME ELEC PIANO 1 GRAND PIANO VOLUME z To select GRAND PIANO CONCERT or MODERN or ELEC PIANO 1 Press one of the GRAND PIANO buttons CONCERT or MODERN or the ELEC...

Страница 12: ...k 2 You can configure settings to sustain reverberation of the BASS LOWER tone while the damper pedal or sostenuto pedal is pressed For more information see Bass damper effect page EN 28 Tone Name Cha...

Страница 13: ...NO button or by using the procedure under Selecting and Playing a Tone page EN 9 NOTE You cannot layer the BASS LOWER tone with another tone You cannot perform the layer operation when recording to Tr...

Страница 14: ...Piano to beep according to which setting is selected as shown in the table below About DSP DSP makes it possible to digitally produce complex acoustic effects The DSP is assigned to each tone whenever...

Страница 15: ...stained until the pedal is released NOTE If pressing the pedal does not produce the desired effect it could mean that the pedal cord is not connected properly Refer to step 1 under To connect the cabl...

Страница 16: ...to specify a tempo value in the range of 20 to 255 beats per minute Each press of the or key raises or lowers the tempo value by 1 You can use the value input keys 0 to 9 to enter a specific tempo val...

Страница 17: ...o configure the keyboard so for example the teacher can play on the left and the student can follow along on the right Or one person can play the left hand part on the left while another plays the rig...

Страница 18: ...ey that you want located at C4 middle C of the left keyboard Keep the FUNCTION and METRONOME buttons depressed as you advance to step 2 below Example Press the keyboard key of the leftmost C C4 will a...

Страница 19: ...o stop 1 While holding down the FUNCTION button press the START STOP a button This will start Concert Play playback from song 1 Songs are played in their Concert Play number sequence You can play alon...

Страница 20: ...reath sounds and performance noises To listen to a Concert Play song LISTEN 1 While holding down the FUNCTION button use the CONCERT PLAY SELECT and keyboard keys to scroll song numbers in sequences f...

Страница 21: ...g down the FUNCTION button press the CONCERT PLAY a keyboard key This starts playback without the part you turned off in step 1 4 Play the missing part on the keyboard 5 To stop playback hold down the...

Страница 22: ...Pressing the and keys at the same time will select song number 1 You also can adjust the playback tempo and volume of the song See Configuring Settings with the Keyboard on page EN 25 for more inform...

Страница 23: ...Temperament and base note settings Track 1 only Octave shift setting Track 1 only Recording Data Storage Starting a new recording deletes any data that was previously recorded in memory If power to t...

Страница 24: ...tone and effects Track 1 only you want to use in your recording Tone page EN 9 Effects page EN 12 NOTE If you want the metronome to sound while you are recording configure the beat and tempo settings...

Страница 25: ...use for your recording 6 Press the START STOP a button or play something on the keyboard This will start both playback of the recorded track and recording to the other track 7 To stop recording press...

Страница 26: ...ete 3 Press the RECORDER button until its lamp is lit This will cause the lamp of the track you selected in step 2 of this procedure to flash Example If you selected Track 2 for deletion 4 Once again...

Страница 27: ...ind the location on the keyboard for configuring the setting you want 3 While holding down the FUNCTION button press the keyboard key for the setting you want to configure The Digital Piano will sound...

Страница 28: ...Piano will beep to let you know which setting is selected A long beep indicates that the applicable setting is turned off Example While chorus is turned off pressing the CHORUS keyboard key twice will...

Страница 29: ...me 1USB device mode 2Local control 3Send channel 7Metronome tempo 8Metronome beat bqTone selection bqTone selection bmPlay brChorus 4Temperament blLesson 9Concert Play song Play Stop bkListen 6Music L...

Страница 30: ...ayer balance 24 to 0 to 24 Default 10 B Specifies the volume balance between the main tone and the layered tone page EN 11 To return the setting to its initial default 10 press and at the same time cq...

Страница 31: ...NCERT PLAY a Play Stop D Toggles a Concert Play song between play and stop page EN 18 This setting cannot be changed while recording bk Listen LISTEN A Enters the Concert Play Listen Mode page EN 18 T...

Страница 32: ...r 3 5 Werckmeister 6 Mean Tone 7 Rast 8 Bayati 9 Hijaz 10 Saba 11 Dashti 12 Chahargah 13 Segah 14 Gurjari Todi 15 Chandrakauns 16 Charukeshi Base notes C C 0 D 1 Eb 2 E 3 F 4 F 5 G 6 Ab 7 A 8 Bb 9 B T...

Страница 33: ...ting Off disables sounding of the operation tone whenever a keyboard key is pressed while the FUNCTION is depressed This setting is retained even when the Digital Piano is turned off The operation ton...

Страница 34: ...be installed on your computer automatically 4 Start up commercially available music software on your computer 5 Configure the music software settings to select one of the following as the MIDI device...

Страница 35: ...on to finish and you will not be able to perform any operation during that time 1 Perform steps 1 through 3 of the procedure under Connecting the Digital Piano to Your Computer on page EN 32 2 Change...

Страница 36: ...Music Library 61 to 70 To transfer Recorder memory data between the Digital Piano and your computer To transfer the Digital Piano s current Recorder memory data to your computer copy the contents of...

Страница 37: ...CERT MODERN and ELEC PIANO 1 button lamps are all lit and all other lamps are unlit Copyrights The rights of creators and copyright holders of music images computer programs databases and other data a...

Страница 38: ...e tape can cause the keyboard cover to open and close during assembly creating the risk of personal injury to your hands and fingers Take care that you do not pinch your fingers between parts when ass...

Страница 39: ...panels A and B Remove the two screws one on the outside of each side panel that hold the brackets and then slide the brackets as shown in the illustration After extending the anti tip brackets reinsta...

Страница 40: ...in step 3 above 6 Mount pedal unit E onto angle brackets H which you installed in step 5 above 7 Use two F screws to secure both ends of the pedal unit E to the angle brackets 8 Cover the heads of th...

Страница 41: ...off the stand IMPORTANT After mounting the piano onto the stand check to make sure the sides of the piano and the side panels of the stand are position relative to each other as shown in the nearby il...

Страница 42: ...the pedal cable to two locations on side panel B 1 Slide the music stand under the two bolts on the top of the Digital Piano as shown in the illustration and then tighten the bolts Protective tape is...

Страница 43: ...hat the correct device is selected with your computer s music software EN 32 2 Turn off the Digital Piano and then exit the music software on your computer Next turn the Digital Piano back on and then...

Страница 44: ...unctions Real time recording playback Number of Song 1 Number of Tracks 2 Capacity Approximately 5 000 notes total Recorded Data Protection Built in flash memory Pedals Damper with half pedal operatio...

Страница 45: ...losing the window and using headphones Any reproduction of the contents of this manual either in part or its entirety is prohibited Except for your own personal use any other use of the contents of th...

Страница 46: ...lectrical load output to exceed the label rating 12 Make sure the surrounding area is dry before plugging into a power source 13 Make sure the product is oriented correctly 14 Unplug the product durin...

Страница 47: ...itaire 1 Duet 13 Fr hlingslied Lieder Ohne Worte Heft 5 14 Fr hlicher Landmann Album f r die Jugend 15 Von fremden L ndern und Menschen Kinderszenen 16 Tr umerei Kinderszenen 17 Tambourin 18 Menuet BW...

Страница 48: ...OFF Mode Mode 3 X Mode 3 X Default Messages Altered 0 32 1 5 6 38 7 10 11 16 17 18 19 64 65 Bank select Modulation Portamento Time Data entry LSB MSB 2 Volume Pan Expression DSP Parameter0 2 DSP Param...

Страница 49: ...ble specified by the manufacturer or sold with the apparatus When a cart is used use caution when moving the cart apparatus combination to avoid injury from tip over 13 Unplug this apparatus during li...

Страница 50: ...Precautions Precauciones de seguridad Antes de intentar usar el piano aseg rese de leer las Precauciones de seguridad separadas English Espa ol PX 760 This recycle mark indicates that the packaging co...

Отзывы: