background image

5


Connecting the monitor and turning the monitor on and off 


CAUTION! 

- When connecting, ensure that both the monitor 

and computer are switched off. 

- Be careful not to overly bend the cable or add 

extension cords as this could lead to a malfunction 


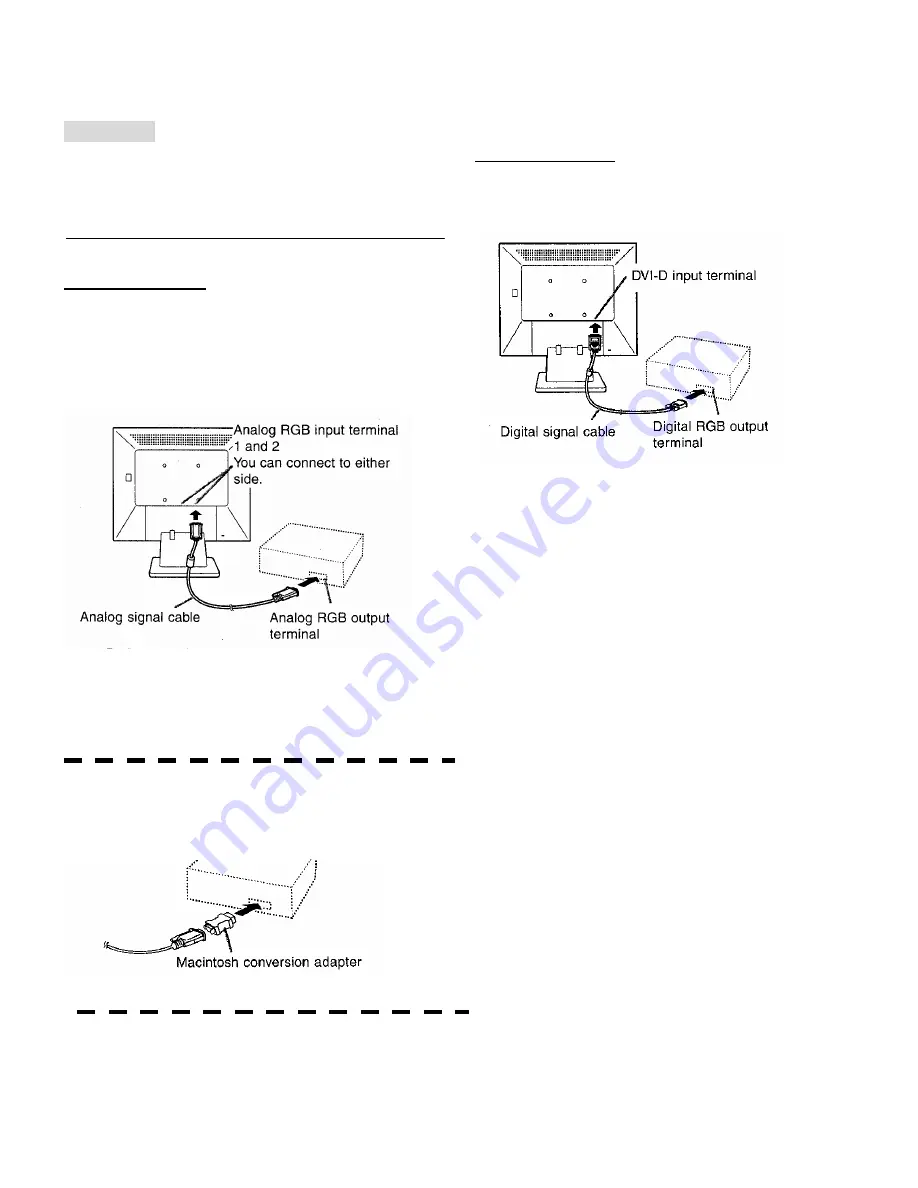
Connecting the monitor to a computer 

Analog connection 

Connect the analog signal cable to the analog RGB 

output terminal of the computer. 
- For analog connection, use the analog signal cable 

accessory or a sold separately one (both ends 

should be mini D-sub 15 pin). 


- Paying attention to connector direction, firmly 

insert the signal cable vertically into the connector, 

and then tighten the screws at both sides. 


If connecting to a D-sub 15 pin 2 rows Apple Power 

Macintosh, attach a Macintosh conversion adapter 

(sold separately) to the analog signal cable.


Note: 

- If connecting to the Sun Ultra series, a conversion 

adapter (sold separately) may be required.   


Digital connection 

Connect the digital signal cable to the digital RGB 

output terminal of the computer.


- Paying attention to connector direction, firmly 

insert the signal cable vertically into the connector, 

and then tighten the screws at both sides 


Содержание SENergy 914

Страница 1: ...914 R E F E R E N C E M A N U A L ...

Страница 2: ...er on 6 Changing between input terminals 7 Turning the power off 7 Adjusting the screen display 8 Adjusting the backlight 8 Setting GAMMA 9 Adjusting the screen display When using an analog signal 10 Automatic screen adjustment 10 Manual screen adjustment 11 Adjusting the screen display When using a digital signal 14 Monitor care and repair 16 Monitor care 16 Storage 16 Troubleshooting 16 Specific...

Страница 3: ...ck Do not place the monitor on top of unstable objects or in unsafe places Do not allow the monitor to come into contact with strong shocks or vibrations Causing the monitor to fall or topple over may damage it Do not use in places where the monitor will be subject to direct sunlight near heating equipment or anywhere else where there is likelihood of high temperature as this may lead to generatio...

Страница 4: ...htness 5 Power button Pressing this button turns the power on Press the button again to turn the power off 6 Power LED This LED is lit green when in use and orange when in power saving Mode 7 Main power switch 8 Power terminal 9 Analog RGB input terminal 1 and 2 The analog signal cable is connected here 10 DVI D input terminal The digital signal cable is connected here 11 Security lock anchor By c...

Страница 5: ...empt to move the monitor beyond its movement range Applying excessive force to move the monitor may damage the product Be careful not to allow your fingers to be pinched Height adjustment When positioning the display higher hold the stand tight so that it does not move together with the display Angle adjustment ...

Страница 6: ... both ends should be mini D sub 15 pin Paying attention to connector direction firmly insert the signal cable vertically into the connector and then tighten the screws at both sides If connecting to a D sub 15 pin 2 rows Apple Power Macintosh attach a Macintosh conversion adapter sold separately to the analog signal cable Note If connecting to the Sun Ultra series a conversion adapter sold separat...

Страница 7: ...orange 3 Turn on the computer When a signal is input from the computer the power LED lights up green and the screen is displayed After power is turned on it may take a little time until the screen is displayed If the input terminal to which the computer is connected has not been selected the screen will not be displayed If necessary perform input terminal switching P7 Notes When using an analog si...

Страница 8: ...ut terminals Analog RGB input terminal 1 Note When there is no input signal NO SIGNAL Is displayed Turning the power off 1 Turn the computer off 2 Press the monitor s POWER button The Power LED will disappear If the monitor will not be used for a long time turn off the main power switch of the monitor and remove the power plug from the outlet ...

Страница 9: ...ory values 1 Turn on the monitor power 2 Press the MENU button and the ebutton simultaneously When RESET appears on the screen the reset is complete Note It is not possible to reset values when the adjustment lock is in place Remove the adjustment lock before attempting to operate control buttons Adjustment lock function By disabling the control buttons i e setting the lock any attempted changes t...

Страница 10: ...han with other modes and saves power GAMMA3 GAMMA3 is color conversion account of liquid crystal s characteristics and represents color tone close to its original image GAMMA4 Displays an image with dynamic and GAMMA4 primary colors How to set Press the d Mode button when the OSD Menu is not displayed Each time the button is pressed the next menu item appears GAMMA1 GAMMA2 GAMMA3 GAMMA4 GAMMA1 On ...

Страница 11: ... not be possible to achieve correct adjustment with the first automatic adjustment In such a case try repeating automatic adjustment 2 or 3 times If necessary due to any of the following manual adjustments P11 can be performed after the automatic adjustment When further fine adjustment is needed When the computer s video input signals are Composite Sync or Sync On Green Automatic adjustments may n...

Страница 12: ...e Press the fbutton to select AUTO To choose a menu option d MODE button To go to the next menu MENU button CLOCK This feature will increase or decrease vertical picture alignments Normally Automatic Adjustment should be used Note This is for advanced users efbuttons PHASE This feature will increase or decrease horizontal picture alignments Normally Automatic Adjustment should be used Note This is...

Страница 13: ...ST is displayed perform manual adjustment When using the Auto Gain Control function set COLOR to other than USER If USER is set the Auto Gain Control function cannot be used BRIGHTNESS This feature changes the brightness level efbuttons CONTRAST This feature changes the contrast level efbuttons COLOR Menu Notes Use the efbuttons to select 9300 6500 5000 or USER Selecting USER will display the sett...

Страница 14: ...own efbuttons SCALING Level of scaling The sharpness of the image can be adjusted Note will only work with resolutions other than 1280 x 1024 efbuttons Note When the display mode is set to less than 1280 1024 pixels the display is enlarged to cover the whole screen i e The side ratio of the display may change LANGUAGE You can choose the language used in OSD Menu 1 Press the fbutton The Language Se...

Страница 15: ... after the last command COLOR Menu Notes Use the efbuttons to select 9300 6500 5000 or USER Selecting USER will display the setting values for CONTRAST in order to make fine adjustments Use the d MODE button to select CONTRAST To go to the next menu MENU button 9300 Color tone bluer than standard 6500 Color tone standard setting 5000 Color tone redder than standard USER R CONTRAST e button for blu...

Страница 16: ...th resolutions other than 1280 x 1024 efbuttons Note When the display mode is set to less than 1280 1024 pixels the display is enlarged to cover the whole screen i e The side ratio of the display may change LANGUAGE You can choose the language used in OSD Menu 1 Press the fbutton The Language Selection Menu will be displayed on the screen 2 Use the d MODE button to choose a language 3 Press the ME...

Страница 17: ...ld lead to color change or change in shape Troubleshooting If you think the monitor may be faulty please check the following points before taking it to be repaired If afterwards it still does not work please contact the shop where you purchased the monitor In the initial period of use due to the characteristics of florescent tubes the screen may flicker This is not a malfunction Should this happen...

Страница 18: ...ite Sync TTL level Expansion compensation Digital scaling Enlarges VGA SVGA XGA etc to full screen size Plug Play VESA DDC2B compatible Power management Energy Star Compliant Input signal terminal Analog 15pin mini D sub 3 rows 2 Digital 24 pin DVI I 1 Screen tilt Upward approx 0 20 downward approx 0 5 Screen swivel Approx 90 from left through right Turn table type Power supply AC100 240 V 50 60 H...

Страница 19: ...rence values To connect another adapter sold separately may be required If the monitor is receiving timing signals that are not compatible OUT OF TIMING will appear Follow your computer s instruction manual to set the timing so that it is compatible with the monitor If the monitor is not receiving any signal synch signal NO SIGNAL will appear Relevant signal timings digital Display mode Hsync Vsyn...

Страница 20: ...TMDS data 0 5 shield 8 N C 20 N C 9 TMDS data 1 21 N C 10 TMDS data 1 22 TMDS clock shield 11 TMDS data 1 3 shield 23 TMDS clock 12 N C 24 TMDS clock Power management Analog RGB Modes Screen Power consumption H sync V sync ON Display on 43W Yes Yes OFF Display off 2 8W No No Digital DVI Modes Screen Power consumption ON Display on 43W OFF Display off 2 8W DDC Plug Play This monitor supports the VE...

Страница 21: ...s pinched between the display and stand nor to let the stand drop These could lead to injury 1 Remove the cables 2 Spread out a soft cloth on a suitable horizontal surface 3 Being careful not to damage the monitor gently lay the monitor on it display side down 4 Remove the cover While pressing the U areas on the sides push it up 5 Remove the six screws and then remove the stand from the monitor No...

Страница 22: ...ct Specifications are subject to change without notice Princeton Digital USA Corp is not responsible for printing or clerical errors Windows is a registered trademark of Microsoft Corporation Apple and MacintoshTM are registered trademarks of Apple Computer Inc Energy Star is a U S registered trademark As an Energy Star Partner Princeton Digital USA Corp has determined that this product meets Ener...

Отзывы: