2
1
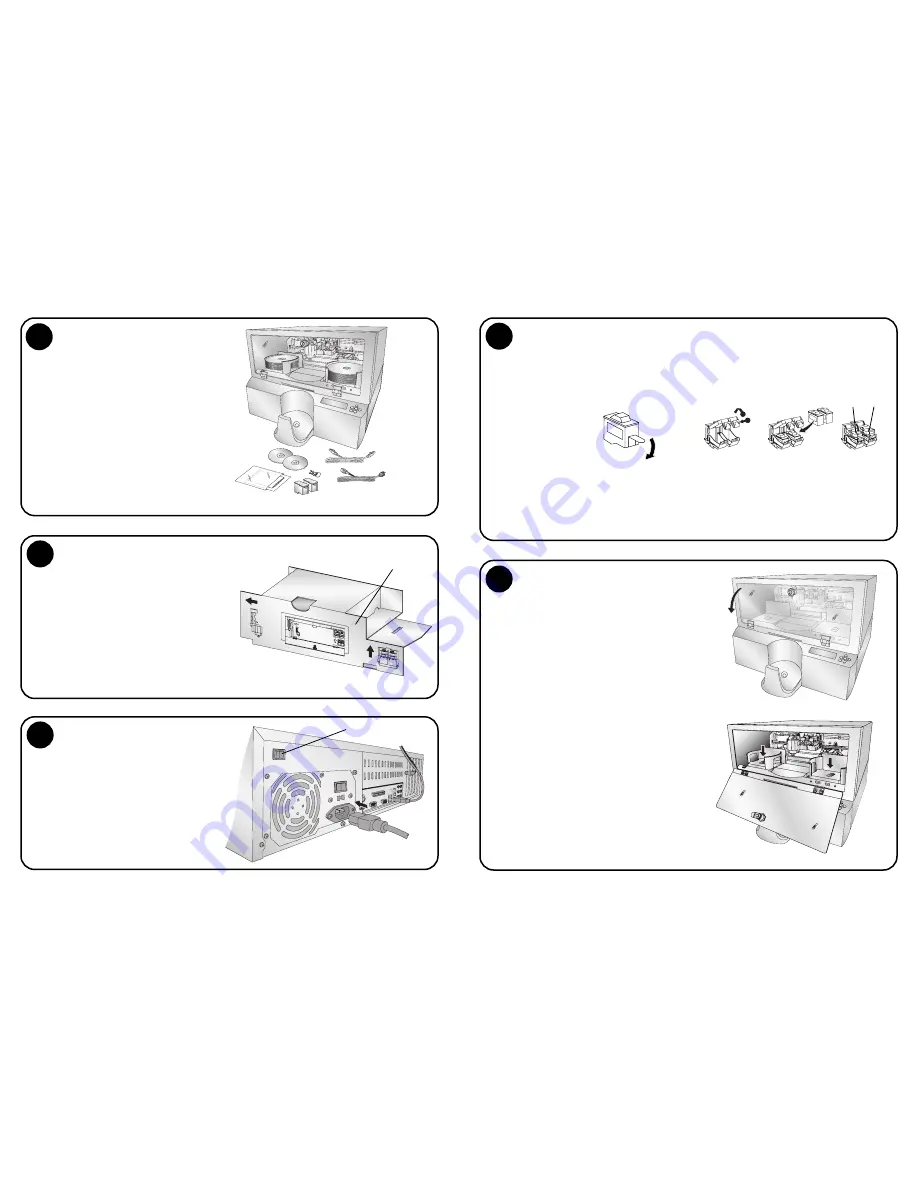
Unpack Your XRn
The following items are inside the box:
• Bravo XRn Network Publisher
• 2 Gray Plastic Input and Output Bins
(Located inside cardboard insert)
• Power Cord
• One Three-Color (CMY) Ink Cartridge
• One Monochrome Black Ink Cartridge
• Client Installation Disc
• 7' Ethernet Cable
• Warranty Card
• 2 Keys
• The Operator's Manual, Quick Start Guide
and Other Printed Information
3
Applying Power
• Locate the power cord supplied with the
unit.
• Place one end of the power cord into the
plug on the back of the unit and the other
end into a surge protected outlet.
• Turn on the power switch located on the
back of the unit above the fan.
• The unit will initialize for approximately
60 seconds.
4
Installing Ink Cartridges
• Remove all packing tape from the unit.
• Open the front cover with the key provided
and remove the cardboard insert by pulling
on the right side first.
• The cardboard insert (pictured to the right)
prevents the cartridge carrier from damaging
movement during shipment.
• Save the shipping box and packing materials.
They will come in handy later if you ever
need to transport the unit.
• Close and lock the cover.
Remove Packing Material
5
Loading Media (Discs)
• Using the key provided, open the front cover
of the unit. The cartridge carrier will move to
the load position.
• Open the ink cartridge covers.
• Remove each ink cartridge from its
packaging.
• Slowly remove the
tape covering the
cartridge's print
head, being careful
to avoid damaging
the barcode label on
the underside of the
cartridge.
DO NOT TOUCH THE COPPER AREA!
• Insert the ink cartridges into the carrier,
copper end first and snap the cartridge cover
in place. Insert the color in the left holder,
monochrome black in the right cartridge
holder.
• Close and lock the unit’s front cover.
• Wait 30 seconds for the unit to check the
cartridges and the bins before continuing
to the next step.
1
2
1. Push in
2. Lift Up
Color
Black
Note:
The unit will not function unless the front
cover is closed and locked! Both LED lights
inside the cover will be lit when the cover is
locked and closed.
Power Switch
Refer to the following steps when loading discs in
to the unit:
• Using the key provided, open the front cover
of the unit.
• The Printer will automatically position the
cartridge carrier and Robotic Disc Transporter
to the center position allowing for easy access
to the bins.
• Place the right and left bins into the unit and
load them with CDs, DVDs, DVD-DL or a
combination. (Each bin can hold only one
type of media) Note the type of media that
you are loading in each bin. You can add this
information to the description of the unit
using the Administrator Utility. If you are
mixing media types you must enable bin
selection using the Administrator Utility. See
Section 4 of the users manual for more infor-
mation about the Administrator Utility.
• Close and lock the cover.
NOTE:
Your Printer can print directly onto virtually any brand
of printable-surface CD/DVD media. However, different
brands of discs have different printable coatings.
Because of this, you may need to adjust the printer
driver settings to accommodate your specific brand of
CD/DVD media. Refer to Section 3B for further printer
driver information.
For maximum print quality, use CD/DVD media
authorized by Primera.
Pull Here!


