
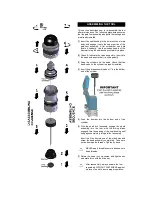

ASSEMBLING THE TOOL
This section describes how to re-assemble the tool
after maintenance. The following procedure assumes
that the gate/foot assembly along with the resting block
are already installed.
[1] Insert the seal bushing in the lower section of main
body and engage it onto the upper portion of the
gate/foot assembly. A flat screwdriver can help
locate it correctly. Use the wooden handle of the
hammer to tap the seal bushing completely in place.
[2] Check & lubricate the valve assembly. Insert into
the head and ensure that it is sliding easily.
[3] Snap the cylinder onto the head. Check that the
band-valve on the cylinder is properly installed.
[4] Insert the piston assembly about 1" into the bottom
end of the cylinder.
[5] Push the bumper into the bottom end of the
cylinder.
[6] With the head lock loosened, engage the whole
assembly into the tool, with the driving blade
engaged thru the opening of the seal bushing until
it engages completely into gate/foot assembly.
Insert the Alen key into one of the side holes and
screw the head assembly completely. Take care
not do damage the threads. Tighten by hand.
NEVER apply threadlocker or adhesive onto
head threads.
[7] Rotate the head lock clockwise and tighten with
moderate force with the Allen key.
After reassembly, always actuate the tool
repeatedly WITHOUT FASTENERS against
a piece of wood to insure proper operation.


