


9
Maintenance
A
C
B
ENGLISH
Start up
Before
each use
Check
Replace
Clean (1)
Clean
Clean
Carry out
Check
Check and change if necessary, each 3 years (2)
limpiar / Readjust
Check / Readjust (2)
Check / Readjust (2)
Clean (2)
Each 20 h or
each month
Each 50 h or
3 months
Each 300 h or
each year
Each 100 h or
6 months
Periodic
Maintenance
1. If the generator is operating in very dusty environments, carry out maintenance more frequently.
2. Go to a Authorized Service Center to carry out this service.
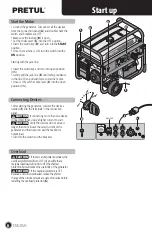
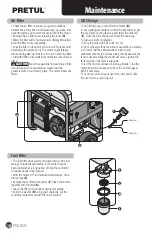
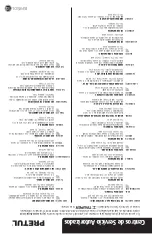
• Turn OFF the breakers (
A
).
• Close the fuel tap (
B
).
• Set the switch (
C
) into the OFF position.
• Disconnect all the devices from the connection panel.
• If during an emergency, the generator has
to be turned off quickly, you can do it in one step setting the
switch (
C
) into the OFF position.
Turning OFF
• In high altitudes, the amount of fuel in the carburetor mix
increase, performance is lower and fuel consumption is
higher.
• Even though the carburetor injection is adequate, the
motor power is lower by 3,5% per each 1000 feet above
6890 feet above sea level. The decrease in power will be
more drastic if no adjustments to the carburetor are carried
out. Consult a Authorized Service
Center to make the adjustments.
Operating in High Altitude
CAUTION
General review
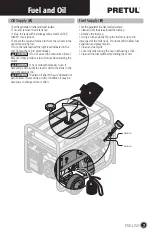
Motor oil
Air filter
Sediment container
Spark plug
Valve clearance
Fuel tank and strainer
Fuel line
Fuel tank cap
• Regular and careful maintenance es
essential to keep the generator optimal security and
performance levels.
• Before cleaning, repairing, inspecting or storing the
generator, turn OFF the motor and wait until the motor
has completely cooled down.
• Keep all the nuts, bolts and screws adjusted to assure
the generator is in a safe working condition.
CAUTION
• Do not modify the safety devices. Verify regularly to
ensure proper operation.
• Any worn or damaged part shall be replaced before
using the generator. Do not try to repair parts. The
generator can get damaged and put your safety at risk.
• Any repairs or maintenance different to those described
in this section, for example, adjusting the carburetor, shall
only be carried out in a Authorized
Service Center.