


Ensure your Tablet is fully turned on and booted-up. Plug the
RECEIVE MICRO
into the micro-USB
socket on your Tablet.
RECEIVE MICRO
will automatically be recognised by the Tablet, and the
Pair LED will light briefly. Turn the Tablet off, and then back on again to complete the process. This
may occur automatically with some Tablets.
To optimise the range of the wireless link do not place the unit behind the Tablet, close to large
metal objects or sources of interference such as wireless hubs, cellular phones etc.
Installation
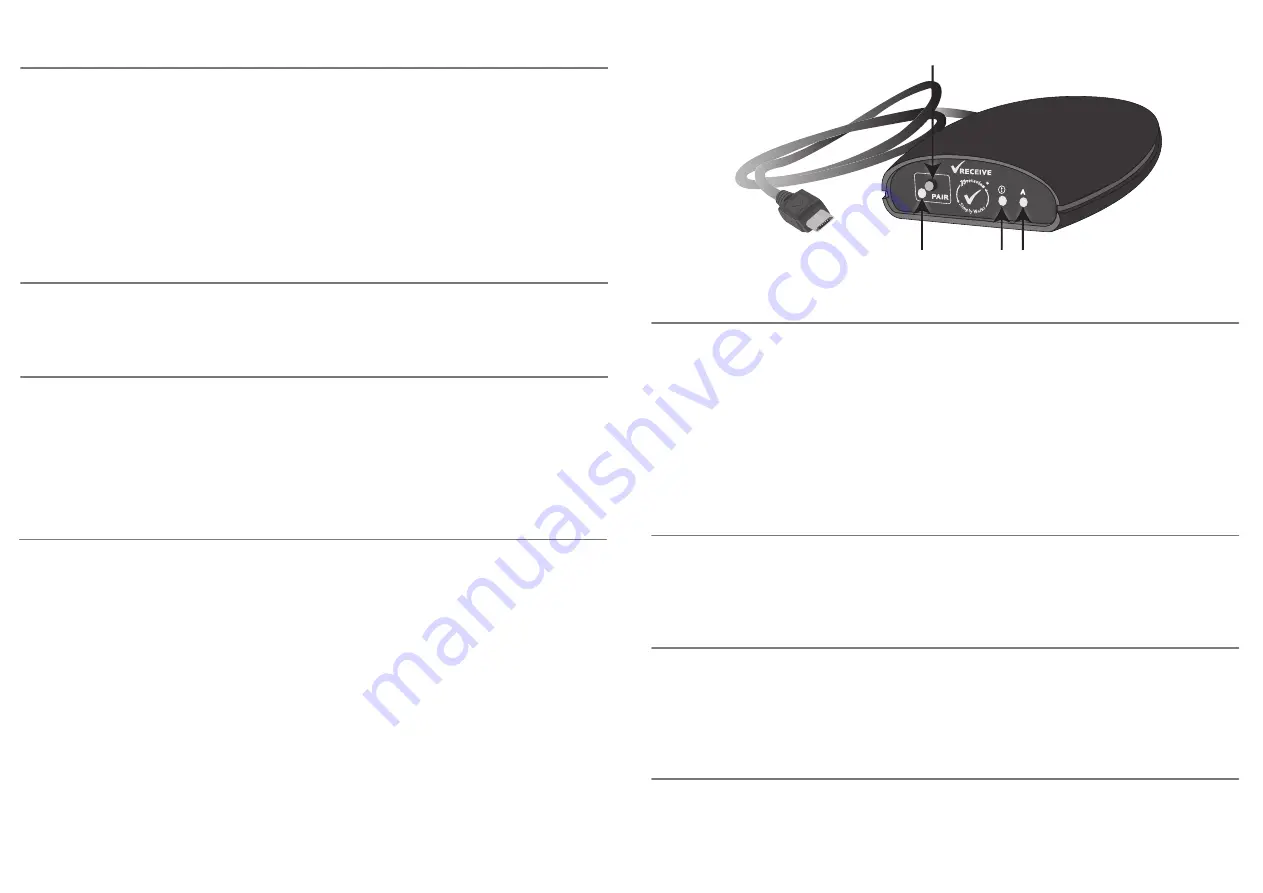
An LED is provided on the front panel of your
RECEIVE MICRO
for both Drag Lock [C] (mouse
latching left click) and Caps Lock [D] (keyboard capitals).
Caps Lock and Drag Lock LEDs
Multiple Transmitters on one RECEIVE MICRO
Your
RECEIVE MICRO
can support up to six
transmitter units simultaneously. Pairing the
second and subsequent transmitters is just like
pairing the first.
If you should attempt to pair a seventh
transmitter unit, the transmitter unit that has
been used least recently will be replaced by the
new one. The other five transmitters are
unaffected. This way, transmitters that are no
longer being used with this
RECEIVE MICRO
are the first to be replaced.
If at any stage you would like to start the
pairing procedure over again, first press and
hold the Pair button [A] for around 3 seconds.
The Pair LED [B] will flash quickly and the
pairing information for all 6 channels will be
erased, allowing you to start over.
Your
RECEIVE MICRO
has no user serviceable parts. If repair is necessary the unit should be
returned to Pretorian Technologies or an authorised distributor.
Maintenance
RECEIVE MICRO
is compatible with most Android Tablets fitted with a micro-USB socket (e.g.
Nexus, Sony, Motorola etc). Some Android Tablets, such as Kindle Fire, do not provide power on
the micro-USB socket and, therefore, are unsuitable for use with
RECEIVE MICRO
.
Compatibility
Before
RECEIVE MICRO
can be used it must be
paired with the SimplyWorks
®
transmitters
that you require it to work with. Irrespective of
the specific product, the procedure is the same:
1 Place the transmitter unit thah is to be
paired close to your
RECEIVE MICRO
.
2 Briefly press the Pair button (A) on the
front panel of
RECEIVE MICRO
. The pair
LED (B) will begin to flash slowly.
3 Within 10 seconds, press the Pair button
on the transmitter.
4 The Pair LED on
RECEIVE MICRO
will
continue to flash for a short time while it
negotiates with the transmitter.
Once complete, the Pair LED will light
steadily for 5 seconds to indicate success.
The transmitter is then ready to use.
Whenever data is successfully
received from a transmitter device, the
Pair LED will flash briefly to give visual
indication that the radio link is operational.
5 If the Pair LED stops flashing after 30
seconds and does not light steadily, repeat
the process from (2). If it is still not
successful, please refer to the
Troubleshooting section.
Pairing information for all six channels is
retained in
RECEIVE MICRO
’s internal memory
even after powering down your tablet.
Pairing
B
C D
A
Features
• USB connectivity.
• No additional drivers required.
• Android Tablet compatibility*
• Compact design.
• State of the art multi-channel wireless
receiver with a range in excess of 10m,
making it ideal for classroom environments.
• Supports up to six transmitters
simultaneously.
• No restriction on the mix of transmitters.
• Caps Lock and Drag Lock LEDs.
When the Tablet screen is turned off to save power the Tablet will also put
RECEIVE MICRO
into a
low power mode, helping to conserve battery life. The Tablet, however, will not go to sleep fully so
long as something is plugged into the micro-USB port. Therefore, it is advisable to unplug
RECEIVE
MICRO
if you don’t intend using it for an extended period.
Maximising Battery Life
*Most Android Tablets with micro-USB sockets


