


First remove the battery cover on the underside of
the unit. Fit two AA style batteries, paying particular
attention to ensure correct orientation (the '+'
symbol indicates the positive terminal location),
then replace the cover. As with all battery powered
products, using good quality batteries such as
Duracell or Energiser is recommended.
If you are not intending to use your
CONTROL PRO
for
an extended period of time, it is advisable to remove
the batteries to prevent leakage, which may damage
the product.
You can pair up to three wireless switches with each channel of CONTROL PRO, allowing collaboration
between several users. If you attempt to pair a fourth switch, the switch that was used least recently will be
replaced with the new one. The other two switches are unaffected.
If at any stage you would like to clear the pairing on either channel, press and hold its respective pairing
button [A] until the pairing LED [B] flashes rapidly. The pairing information for all three switches will be
erased, allowing you to start over.
Fitting the Batteries
In most cases
CONTROL PRO
will be used with
SWITCH 125, SWITCH 75
or
SEND
. It does not matter which Mode
these are set to, it will Simply Work! However, it is best to avoid
~
1 and
~
3 since these send multiple key presses.
Operating with a SWITCH 125, SWITCH 75 or SEND
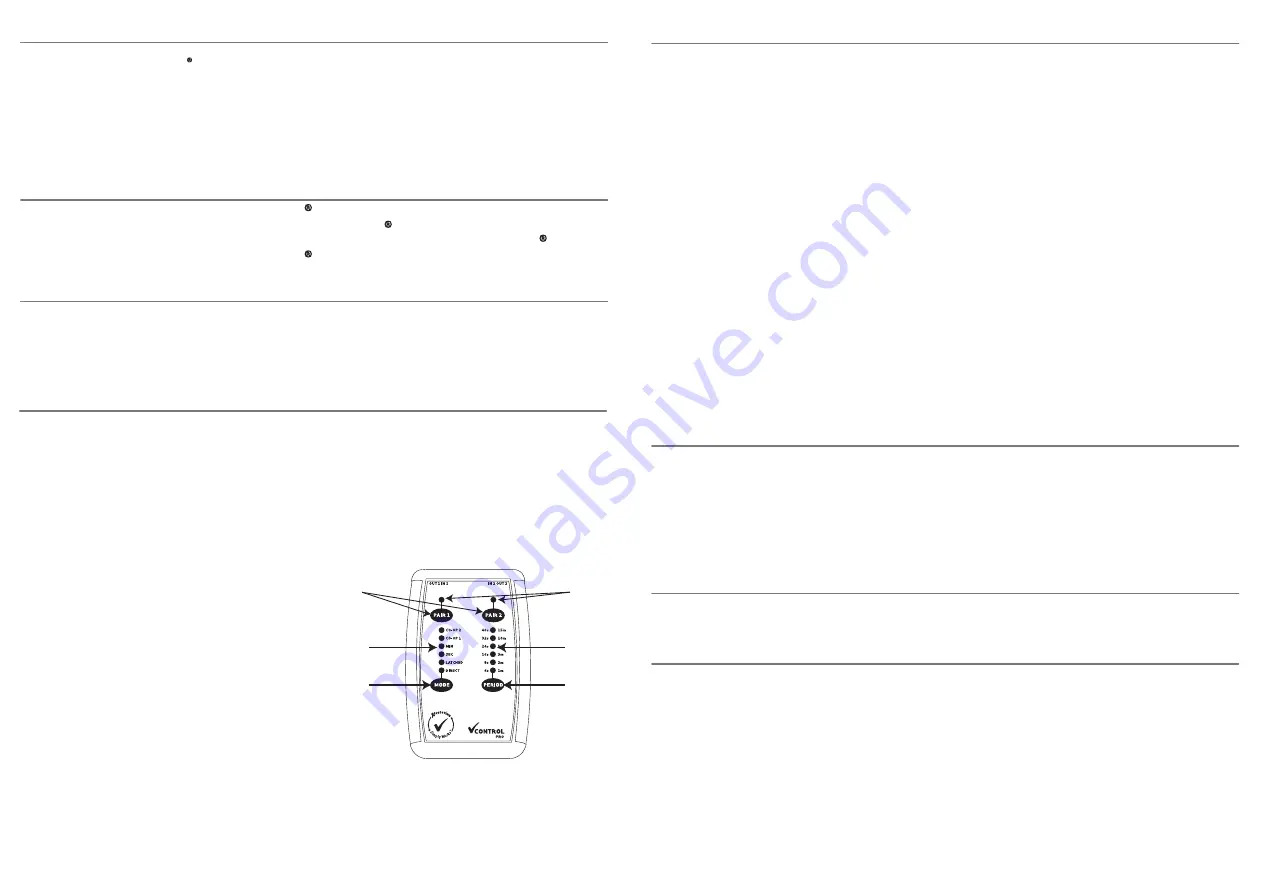
To view the Timer Period setting, briefly press the
Period button [E] and the LEDs [F] are illuminated.
The timer period can simply be read from the legend
adjacent to the LED that is lit, either in seconds or
minutes, dependent on the Mode setting. After 4
seconds the LEDs are extinguished to save power.
To change the Timer Period setting, briefly press the
Period button again while the LEDs are still lit,
repeating until the required period setting is shown on
the LEDs. After a further 4 seconds the LEDs are
extinguished and the Timer Period setting is stored.
Note that the same Timer Period setting is used for
both channels.
Setting The Timer Period
Setting The Operating Mode
CONTROL PRO
offers six modes of operation.
The same mode is used for both channels.
•
Direct
The output is activated when at least one switch
is pressed and deactivated when all switches are
released. Also known as ‘momentary mode’. This is
the default mode.
•
Latched
The output is activated on the first press
of a switch and deactivated on the second press*.
•
Timed (seconds)
The output is activated for the
selected number of seconds when the switch is pressed.
Subsequent presses of the switch during the timer
period do not extend the timer period.
•
Timed (minutes)
The output is activated for the
selected number of minutes when the switch is
pressed. Subsequent presses of the switch during
the timer period do not extend the timer period.
•
Co-Operative 1
Both outputs are activated if at
least one switch on channel 1 AND 2 are activated
simultaneously. Whenever all the switches are
released on either channel, both outputs are
deactivated.
• Co-Operative 2 (also known as on/off
co-operation)
Both outputs are activated when at
least one channel 1 switch is pressed and
deactivated when at least one channel 2
switch is pressed.
Note that no distinction is made between wired and
wireless switches in the above descriptions - both
have the same effect.
Pressing the Mode button [C] briefly allows you to
view the current settings on the associated LEDs [D]
without making a change. After 4 seconds the LEDs
are extinguished to save power.
To change the Mode setting, briefly press the Mode
button again while the LEDs are still lit, repeating
until the required Mode setting is shown on the LEDs.
After a further 4 seconds the LEDs are extinguished
and the Mode setting is stored.
Note that in Timed (seconds) or Timed (minutes)
modes, the output may be turned off during the timer
period simply by pressing the Mode button.
This allows you to curtail a long timer period, for
example. Should both channel outputs be on when
pressing the Mode button in this way, both timer
periods are curtailed.
In both Co-Operative modes both output channels
become active.
* Some toys may incorporate a Latched Mode. In this
case we recommend you turn off Latched Mode on
CONTROL PRO
.
CONTROL PRO
is compatible with any SimplyWorks
transmitter unit. Although primarily designed to be used
with a wired switch,
SWITCH 75
,
SWITCH 125
or
SEND
, it is
possible to pair
CONTROL PRO
with any SimplyWorks
transmitter. For example, if paired with a keyboard, the
Space key becomes the activating key, or if paired with a
SimplyWorks
TRACKBALL
the left button becomes the
activating key. Uniquely, when a SimplyWorks
JOYSTICK
is
used, the stick can also be used as a 'wobble switch'.
Compatibility
Co-Operative mode 1 is very useful in helping users to
interact and co-operate with their peers. Only when
both switches are pressed will the output activate,
encouraging communication between users.
Similarly, Co-Operative mode 2 may be used in rôle
play to encourage users to share tasks. One user has
control of ‘on’ and the other controls ‘off’. Thus users
learn that they cannot create an effect until their peer
has taken their turn.
The timed modes may be used to good effect when
controlling devices such as fans and lamps since the
period for which they are energised is pre-determined
and can be selected to be long enough for the user to
actually feel or see the effect even with a brief press
of the switch.
Pairing
CONTROL PRO
with a SimplyWorks
®
JOYSTICK
also allows the stick to become a ‘wobble-switch’ to
control the toy for users who cannot easily use a
regular switch.
Given the enormous flexibility that the SimplyWorks
®
concept affords you, there are countless other
learning scenarios that you can devise as your
experience grows.
Learning Scenarios
Features
• Selectable time periods in timed modes.
• Two 3.5mm jack plug outputs via
supplied leads.
• 10 Metre (32') operating range
• Automatic power saving mode
- no on/off switch.
• Long battery life.
• Works with any SimplyWorks
transmitter to control battery
operated toys or other output devices.
• Two independent channels.
• Up to three wireless switches and one wired switch may be
connected to each channel
• Choice of Direct, Latched, Timed (seconds), Timed (minutes)
and two Co-Operative modes of operation.
Before your
CONTROL PRO
can be used it must be
paired with the SimplyWorks
®
transmitters that you
require it to work with. To pair the units, use the
following procedure:
1 Place the transmitter unit close to your
CONTROL PRO
.
2 Choose which channel of
CONTROL PRO
you
would like the transmitter to work with.
3 Briefly press the appropriate Pair button (A) on
the front panel of
CONTROL PRO
. The corresponding
Pair LED (B) will begin to flash slowly.
4 Within 10 seconds, briefly press the
Pair button on the transmitter.
5 The Pair LED on
CONTROL PRO
will continue to flash
for a short time while it negotiates with the
transmitter. Once complete, the Pair LED will light
steadily for 5 seconds to indicate success. Your
CONTROL PRO
is then ready to use. Whenever data
is successfully sent to
CONTROL PRO
the Pair LED on
the appropriate channel flashes briefly to give a
visual indication that the wireless link is operational.
6 If the Pair LED stops flashing after 30 seconds and
does not light steadily, repeat the process from (2).
If it is still not successful, please refer to the
Troubleshooting section.
7 If you are using multiple switches, repeat the process
from (2) for the other channel, using a second
transmitter unit.
Note that unless a Co-Operative mode is selected, the
two channels operate completely independently - the
transmitter paired with channel 1 operates the channel
1 output and the transmitter paired with channel 2
operates the channel 2 output.
Pairing information for both channels is retained in
CONTROL PRO
internal memory even after changing
the battery.
Pairing
D
C
F
E
A
B


