background image

8

GENERAL  FEATURES

The  heating  and  cooking  in  electrical  hot
air ovens take place by forced convection.

The  two  elements  which  make  this  pro-
cess  take  place  are:   

-  Grill  element

2000  W 

-  Circular  element

1900  W

NOTE:

Upon  first  use,  it  is  advisable  to  operate
the  oven  at  the  maximum  temperature
(thermostat  knob  on  the  maximum  posi-
tion)  for  60  minutes  in  the  position 

to

eliminate possible traces of grease on the
heating  elements.
Repeat  the  operation  for  another  15  min-
utes with the grill element on as explained
in  the  chapters  GRILLING and  USE  OF
THE GRILL.

OPERATING  PRINCIPLES

Heating  and  cooking  in  the  fan  oven  are
obtained  in  the  following  ways:

a.  by  forced  convection

A  fan  sucks  in  the  air  contained  in  the
oven,  which  circulates  it  through  the  cir-
cular  heating  element  and  then  forced
back into the oven by the fan. Before the
hot  air  is  sucked  back  again  by  the  fan
to repeat the described cycle, it envelops
the  food  in  the  oven,  provoking  a  com-
plete  and  rapid  cooking.  It  is  possible  to
cook  several  dishes  simultaneously.

b.  by  radiation 

The heat is radiated by the infra red grill
element.

c. by  ventilation

The  food  is  defrosted  by  using  the  fan
only  function  without  heat.

WARNING:
The  door  is  hot,  use  the  handle.

During use the appliance becomes hot.
Care  should  be  taken  to  avoid  touch-
ing  heating  elements  inside  the  oven.

Fig.  3.1

Fig.  3.2

Attention: The oven door becomes
very  hot  during  operation.
Keep  children  away.

FAN  OVEN 

(BOTTOM  MAIN  OVEN)

3

Содержание PR1-BU

Страница 1: ...Instructions for use Installation advice BUILT UNDER DOUBLE OVEN PR1 BU Before operating this double oven please read these instructions carefully KEEP IN A SAFE PLACE ...

Страница 2: ...signed to be used only for cooking Any other use such as heating a room is improper and dangerous This double oven has been designed constructed and marketed in compliance with Safety requirements of the Low voltage Directive 2006 95 EC Safety requirements of the EMC Directive 2004 108 EC Requirements of EEC Directive 93 68 IMPORTANT INFORMATION FOR CORRECT DISPOSAL OF THE PRODUCT IN ACCORDANCE WI...

Страница 3: ...ces of grease and smell from the components Let the oven cool down switch off the electrical supply then clean the inside of the oven with a cloth soaked in water and neutral detergent and dry thoroughly BEFORE USING FOR THE FIRST TIME Read the instructions carefully before installing and using the appliance After unpacking the appliance check that it is not damaged In case of doubt do not use the...

Страница 4: ...he rear or the underneath of the appliance as these areas are not designed or intended to be touched and may contain sharp or rough edges that may cause injury Fire Risk Do not store inflammable materials inside the ovens Always use oven gloves when removing the shelves and food trays from the oven whilst hot Do not line the oven walls with aluminium foil Do not place baking trays or the drip tray...

Страница 5: ...een fitted with a cooling fan to achieve optimum efficiency of the controls and to ensure lower surface temperatures are maintained When the top oven is operating the cooling fan motor is always ON When only the bottom main oven is operating the cooling fan motor switches ON OFF depending on temperature Depending on cooking temperatures and times the cooling fan may run on even after appliance ove...

Страница 6: ...her 15 minutes in the mode in order to eliminate any traces of grease from the electrical elements WARNING The door is hot use the handle During use the appliance becomes hot Care should be taken to avoid touching heating elements inside the oven OPERATING PRINCIPLES Heating and cooking in the convention al oven are obtained a by natural convection The heat is produced by the upper and lower heati...

Страница 7: ...and exter nally i e roasts spare ribs meringue etc GRILLING The infra red heating element is switched on The heat is diffused by radiation Use with the oven door closed and the thermostat knob must be regulated between 50 C and 200 C maximum For correct use see chapter USE OF THE GRILL Recommended for Intense grilling browning cooking au gratin and toasting etc It is recommended that you do not gr...

Страница 8: ...d in the following ways a by forced convection A fan sucks in the air contained in the oven which circulates it through the cir cular heating element and then forced back into the oven by the fan Before the hot air is sucked back again by the fan to repeat the described cycle it envelops the food in the oven provoking a com plete and rapid cooking It is possible to cook several dishes simultaneous...

Страница 9: ...mark to the required temperature The elements will turn on or off auto matically which is determined by the thermostat The operation of the heating elements is signalled by a light placed on the con trol panel HOT AIR COOKING The circular element and the fan are on The heat is diffused by forced convection and the temperature must be regulated between 50 C and the maximum position with the thermos...

Страница 10: ...d be placed under the rack to catch the cooking juices and fats Grilling with the oven door closed Grilling with the oven door closed and do not for longer than 30 minutes at any one time Attention the oven door becomes very hot during operation Keep children away COOKING ADVICE STERILIZATION Sterilization of foods to be conserved in full and hermetically sealed jars is done in the following way a...

Страница 11: ... and A flashing Program error The time of day lies between the calculated cooking start and end time Note Select a function by pressing the respective button and in 5 seconds set the required time with the buttons one hand operation A power cut makes the clock go to zero and cancels the set programs Caution If the electricity supply is cut off the display numbers will flash the clock will reset an...

Страница 12: ...figures showing the hour and minutes The first time the oven is connected up to the electricity supply and after a power cut three zeroes will flash on the programmer display To adjust the time the two buttons must be pressed simultaneously and then the button or until the correct time is set Setting speed automatically increases if you keep the setting buttons pressed MANUAL OPERATION To use the ...

Страница 13: ...utton is pressed MINUTE MINDER The minute counter function consists simply of an acoustic signal which can be set for a maximum of 23 hours 59 minutes If the letter A is flashing press the two buttons simultaneously To set the time press button and then button or until the required time appears on the display Fig 4 4 The symbol will come on Countdown will begin immediately and can be seen on the d...

Страница 14: ...mber to turn to the off position the function selector and the thermostat knob If not when pressing two buttons simultaneously for manual use the oven will start to operate Remember to press the two buttons simultaneously to be able to use the oven in manual setting SEMI AUTOMATIC COOKING This automatically switches the oven off after the required cooking time There are two methods of semi automat...

Страница 15: ...ion via the function selector and ther mostat knob see specific chapters The oven is now programmed and everything will work automatically the oven will come on as required and fin ish cooking at the programmed time At the start of the cooking the symbol appear During cooking the letter A and the sym bol remains on press button to display the remaining time until end of cooking or press button to ...

Страница 16: ...ontain sharp or rough edges that may cause injury ENAMELLED PARTS All the enamelled parts must be cleaned with a sponge and soapy water only or other non abrasive products Dry preferably with a microfibre or soft cloth Do not use a steam cleaner because the moisture can get into the appliance thus make it unsafe Do not use harsh abrasive cleaners or sharp metal scrapers to clean the oven door glas...

Страница 17: ... 5 2 Slide in on the guides the shelf and the tray fig 5 3 5 4 The shelf must be fitted so that the safety catch which stops it sliding out faces the inside of the oven To dismantle operate in reverse order BOTTOM MAIN OVEN TOP OVEN Fig 5 1 Fig 5 2 Safety catch Fig 5 4 Fig 5 3 Safety catch ...

Страница 18: ...en the lever A completely on the left and right hinges fig 5 5b Hold the door as shown in fig 5 5 Gently close the door fig 5 5c until left and right hinge levers A are hooked to part B of the door fig 5 5b Withdraw the hinge hooks from their location following arrow C fig 5 5d Rest the door on a soft surface To replace the door repeat the above steps in reverse order ...

Страница 19: ... the electrical supply Unscrew the protective cover fig 5 6 Unscrew and replace the bulb with a new one suitable for high temperatures 300 C having the following specifica tions 230V 50 Hz E14 and same power check watt power as stamped in the bulb itself of the replaced bulb Refit the protective cover REPLACING THE OVEN LIGHTS TOP and BOTTOM OVEN NOTE Oven bulb replacement is not covered by your g...

Страница 20: ...ith the local safety standards Failure to observe this rule will invalidate the warranty Always unplug the appliance before car rying out any maintenance operations or repairs The walls surrounding the oven must be made of heat resistant material Taking care NOT to lift the oven by the door handle ADVICE FOR THE INSTALLER ...

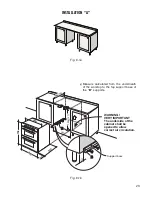
Страница 21: ...ble of resisting temperatures of 75 C above room temperature TO BUILD IN THE DOUBLE OVEN INSTALLATION A BETWEEN EXISTING SIDE CABINETS 560 or 600 mm GAP figs 6 1a 6 2a 6 1b 6 2c Mount the 2 two metal supports B supplied with the appliance in a separate kit as indicated in Figs 6 1b or 6 2c Fig 6 2c only prepare 2 wood uprights A width 20 50 mm thickness 18 mm length 650 mm mount the 2 wood upright...

Страница 22: ...ild in the double oven making it slide on the metal supports B FIXING THE DOUBLE OVEN The double oven should then be secured by 6 screws not supplied fitted into the holes provided at the sides of the oven Fig 6 4 If you open the oven doors you will see some screw holes Remember the housing should not be free standing but be secured to the wall and or adjacent fittings NOTE It is essential that wh...

Страница 23: ...MPORTANT The underside of the cabinet shall be opened to allow correct air circulation 720 min B B Support base 570 min Fig 6 1b Measure calculated from the underneath of the worktop to the top support base of the B supports INSTALLATION A Fig 6 1a ...

Страница 24: ...opened to allow correct air circulation 720 min B B 570 min 20 22 15 20 50 18 A A B B 650 A A Support base Measure calculated from the underneath of the worktop to the top support base of the B supports Fig 6 2c INSTALLATION A INSTALLATION B Fig 6 2a Fig 6 2b Pre existing 600 mm cabinetry ...

Страница 25: ... INSTALLATION C Fig 6 3a Fig 6 3c Cabinet for installing the oven Measure calculated from the underneath of the worktop to the top support base of the B supports Remove single oven shelf if fitted 40 30 600 40 B B 720 min 42 B B Support base Fig 6 3b ...

Страница 26: ...NTROL PANEL HOT AIR WHICH ESCAPES CAN CAUSE BURNS TO HANDS FACE END OR EYES KEEP CHILDREN AWAY Fig 6 6 IMPORTANT If installing a base panel leave a space as indicated in fig 6 5 to allow air circulation 200 10 Fitting the 6 fixing screws to the kitchen base unit Fig 6 4 Fig 6 5 ...

Страница 27: ...correct opening of the oven door To ensure the trim is not damaged due to the appliance being placed on the floor the appliance should be suitably supported as in above illustrations After installation the appliance door should be slowly opened to ensure no damage has occurred No responsibility for lower trim damage will be accepted if these instructions have not been followed Fig 6 7 ...

Страница 28: ...t parts and must be posi tioned so that it does not exceed 75 C at any point Once the appliance has been installed the switch must always be accessible If the power supply cable is damaged it must be substituted by a suitable cable The connection of the appliance to the grounding unit is mandatory The manufacturer declines every responsability for any inconve nience resulting from the inobser vanc...

Страница 29: ...he mains terminal connection block D EARTH N NEUTRAL L LIVE Attention Make sure the wires have been well inserted into the contacts and have been screwed down well Refit the cable clamp so that it clamps the outer sleeving of the cable and screw the screws C Refit the cover plate B and fix it with the screws A A B C P D Green Yellow Earth Brown Live Blue Neutral Fig 7 1 Fig 7 2 WARNING This applia...

Страница 30: ...free of charge any parts of the appliance found to be defective provided this We are promptly informed of the defect The appliance is installed and used in accordance with the written instructions enclosed with the appliance The appliance is used only on an electrical supply as indicated on the rating label fixed to the appliance The appliance has not been altered in any way or subject to misuse o...

Страница 31: ...et are given as simply indicative The manufacturer reserves the right considering the characteristics of the models described here at any time and without notice to make eventual necessary modifications for their construction or for commercial needs ...

Страница 32: ...code 1103704 ß2 Prestige is a registered trademark of Meyer Intellectual Properties Limited and is sold pursuant to a license ...

Отзывы: