background image

21

Minute Minder (if fitted)

Initial display

The digital timer enables you to set the
time  of  day  (24  hour  clock)  and  the
minute minder alarm.

Setting the time of day

1.  Switch  on  the  electricity  supply  to

the appliance.

2. Press and release the function but-

ton.

3. Set the time of day, using the 

plus

and 

minus

buttons.

4. The time will be set 7 seconds after

the last 

plus

or 

minus

operation.

Changing the time of day

1. Press the function button once.
2. Set the time of day, using the 

plus

and 

minus

buttons.

3. The time will be set 7 seconds after

the last 

plus

or 

minus

operation.

Alarm tones

After setting the time of day, you can
select one of three alarm tones.
Press the 

minus

button to listen to the

first tone, then release the 

minus 

button

and press again to listen to the second
tone, etc.
Releasing the 

minus

button after a tone

has sounded will automatically select
that tone.

Setting the minute minder

1. Press and release the 

plus

button, to

change  the  display  from  clock  to
minute minder - the bell symbol will
light.

2. Use the 

plus

and 

minus

buttons to

set  the  length  of  time  before  the
alarm tone will sound.  The display
will increase / decrease in units of
10  seconds  up  to  99  minutes,  50
seconds,  and  in  units  of  1  minute
from  1  hour  40  minutes  upwards.
The maximum period which may be
set is 10 hours.

The  display  format  will  change  after
99 minutes and 50 seconds to 1 hour
and 40 minutes.  
During countdown, the minute minder
has priority on the display, which will
show (in 

minutes : seconds, or hours :

minutes

) the time remaining.  

When  countdown  is  complete,  the
tome will sound for 7 minutes, or it can
be reset with one touch of any button.

To cancel the minute minder at
any time.

Run down the set time with the 

minus

button.  The display will show the time
of day

Minus

button

Plus

button

Function

select

08 27359 00 -Prestige EDO  13/9/07  15:58  Page 22

Содержание E50DO

Страница 1: ... Cooker Electric Double Oven and Grill with Ceramic Hob E50DO 60cm Electric Freestanding Cooker Electric Double Oven and Grill with Ceramic Hob E60DO User Guide Installation Handbook 08 27359 00 Prestige EDO 13 9 07 15 58 Page 1 ...

Страница 2: ...ooking in the fanned oven 15 Defrosting and cooling 16 Main oven conversion guide 17 Baking guide 18 Traditional fruit cakes 19 Roast turkey 19 Roasting guide 20 Minute minder 21 Care and cleaning 22 Installation Instructions 25 Technical Data 27 1 Please keep this handbook for future reference or for anyone else who may use the appliance CONTENTS 08 27359 00 Prestige EDO 13 9 07 15 58 Page 2 ...

Страница 3: ...g the cooker Do not attempt to move the cooker by pulling on the doors or handles Open the oven or grill door and grasp the frame of the cooker taking care that the door does not shut on your fingers Take care to avoid damage to soft or uneven floor coverings when moving the appliance Some cushioned vinyl floor coverings may not be designed to withstand sliding appliances without marking or damage...

Страница 4: ... centre Caution Packaging materials can pose a risk of suffocation keep away from children Electrical connection Please refer to installation instructions for electrical connection In your own interest and that of safety make sure that the installation is carried out by a competent person Disconnection of electric appliances should always be carried out by a competent person Warning This appliance...

Страница 5: ...e flue vents or doors as this creates a fire hazard Switch off the electricity supply before replacing the oven light bulb to avoid the risk of electric shock Do not use aluminium foil to cover the grill pan or put items wrapped in foil under the grill as this creates a fire hazard The high reflectivity can also damage the element Do not use foil on oven shelves or allow it to block the oven flue ...

Страница 6: ...this product Using the hotplate elements To switch on turn the control knob for the selected hob element to the desired setting Note The marked settings on the hob controls do not indicate any set temperature and cannot be used to compare the performance of one ring with another The hob rings will cycle on and off automatically during use as a means of regulating heat output To switch off return t...

Страница 7: ...age the ceramic glass surface Aluminium foil must not be placed on the hob as it will reflect any heat back into the element which can damage it Leaving a hotplate on for a length of time without it being covered by a pan causes overheating of surrounding areas which could damage the glass Be careful when cooking foods in salted water or foods containing large amounts of sugar syrup or jam if they...

Страница 8: ... of pans The choice of cookware is important if you are to achieve maximum benefit from cooking with a ceramic hob Ceramic hobs are not only easy to clean they are also energy efficient if you use the right pans to suit the surface When buying new pans always refer to the manufacturer s guidelines For best results and energy efficiency it is important to use flat bottomed pans of the correct type ...

Страница 9: ...o avoid overflows onto the ceramic hob especially if a pan contains any sugar sugar based substance as this is corrosive and can damage the ceramic glass surface Pan bases should be thick flat and smooth to ensure maximum contact with the hob maximum heat conduction and rapid cooking times Pans with dull or dark coloured bases will give the quickest cooking results Pans with highly polished bases ...

Страница 10: ...n gloves to move it Do not use the handle to pour hot fats from the grill pan Food for grilling should be positioned centrally on the trivet Aluminium foil Using aluminium foil to cover the grill pan or putting items wrapped in foil under the grill can create a fire hazard and the high reflectivity can damage the grill element The cooling fan When the grill is switched on you will hear the cooling...

Страница 11: ...ontrol knobs to the off position Please note that the grill will not oper ate if the top oven is switched on For grilling smaller quantities of food the single element economy grill can be utilised This grill function can be controlled between settings 1 and 8 For grilling larger quantities of food the dual element full grill can be utilised The full grill can also be controlled between settings 1...

Страница 12: ...ommend preheating for yeast mixtures batters soufflés and whisked sponges Preheat the oven until the indicator light switches off for the first time this will take up to 20 minutes depending on the temperature selected If you are not preheating the oven the cooking times in the following guide may need to be extended as they are based on a preheated oven Shelf positions There are 5 shelf positions...

Страница 13: ...ize and type of cooking dish will influence time as personal preferences Shelf positions As a general guide when cooking frozen or chilled food use the highest possible shelf position while allowing some clearance between the food and the top element Follow the instructions given on packaging Cooking temperatures The temperature settings and time given in the Baking Guides are based on dishes made...

Страница 14: ... oven As part of the cooking process hot air is expelled through a vent at the rear of the oven When opening the oven door care should be taken to avoid any possible contact with potentially hot air since this may cause discomfort to people with sensitive skin We recommend that you hold the underneath of the oven door handle Preheating When cooking sensitive items such as souffle and Yorkshire pud...

Страница 15: ...cooking n Make sure that frozen foods are thoroughly THAWED before cooking n Do not slow cook joints of meat or poultry weighing more than 21 4kg 41 2lb n For roasting joints of meat or poultry and for pot roasts preheat the oven to 160 C and cook for 30 minutes then adjust the oven control to the 110 C 120 C slow setting for the remainder of the cooking time n Slow cooking times will be about 3 t...

Страница 16: ...at the same time as mild foods eg milk puddings When batch baking foods that will rise during cooking eg bread always ensure that enough space has been left between the shelves to allow for the rise Notes When 2 or more shelves are being used it may be necessary to increase the cooking time slightly Because the 2 oven shelves are wider than in many ovens it is possible to cook 2 items per shelf eg...

Страница 17: ... for defrosting next to cooked food which is to be cooled as this can lead to cross contamination Defrosting meat poultry and fish can be accelerated using this method but make sure they are completely thawed before cooking thoroughly Place meat and poultry on a trivet in a meat tin To help the air circulate freely Position the shelves evenly within the oven and maintain a clearance from the oven ...

Страница 18: ...um results conventional temperatures need to be converted to A efficiency tempera tures For example an item which would normally cook at a conventional temperature of 180 C will now cook at the A efficiency temperature of 160 C 17 Conventional temperature A Efficiency Oven Gas Mark C C 100 100 1 4 110 110 1 4 130 120 1 2 140 130 1 150 140 2 160 150 3 180 190 160 4 5 200 170 6 220 180 7 230 190 8 2...

Страница 19: ...20 25 mins Madeira 180mm 7 160 1hr 11 4 hrs Semi rich fruit cake 130 21 2 3hrs 205mm 8 Christmas cake depending on depending on 205mm 8 recipe recipe Dundee cake 130 21 2 3hrs 205mm 8 Pastry Flaky Puff 180 depending on Shortcrust 170 recipe and type Choux 170 of filling Plate tarts 170 2 x 180mm 7 Biscuits Shortbread rounds 160 20 25 mins Nut brownies 170 20 25 mins Brandy snaps 160 10 12 mins Fla...

Страница 20: ...recipe n Always use the correct size and shape of tin for the recipe quantities Roast turkey Roasting turkey involves cooking two different types of meat the delicate light breast meat which must not be allowed to dry out and the darker leg meat which takes longer to cook The turkey must be roasted long enough for the legs to cook so frequent basting is necessary The breast meat can be covered onc...

Страница 21: ...weight of the meat plus the stuffing n For joints cooked in foil or covered roasters and for lidded casseroles add 5 minutes per 450g 1lb to the calculated cooking time n Smaller joints weighing less than 1 25kg 21 2lb may require 5 minutes per 450g 1lb extra cooking time n Position the oven shelf so that the meat or poultry will be in the centre of the oven n It is recommended that the appliance ...

Страница 22: ... tone has sounded will automatically select that tone Setting the minute minder 1 Press and release the plus button to change the display from clock to minute minder the bell symbol will light 2 Use the plus and minus buttons to set the length of time before the alarm tone will sound The display will increase decrease in units of 10 seconds up to 99 minutes 50 seconds and in units of 1 minute from...

Страница 23: ...OMPARTMENT MAIN OVEN COMPARTMENT FLOOR Use a mild cream cleaner eg Cif Look for one which has the Vitreous Enamel Development Council s recommendation seal Stubborn marks may be removed with a moistened Brillo pad The grill pan may be cleaned in a dishwasher or with a nylon brush in hot soapy water Easy care surfaces MAIN OVEN SIDES AND BACK We recommend that the appliance is cleaned after open ro...

Страница 24: ...es of the glass and slide out Painted plastic and metal finish parts CONTROL KNOBS DOOR HANDLES DOORS FASCIA PANEL Only use a clean cloth wrung out in hot soapy water Chrome plated parts OVEN SHELVES OVEN SHELF RUNNERS GRILL PAN TRIVET Do not use abrasives or polishes use a moist soap pad eg Brillo Note Oven shelf runners can be removed for cleaning Grasp the runners and slide out of the hanging h...

Страница 25: ...ss only and polish the surface with a clean cloth The conditioner gives a protective covering to the ceramic glass which not only makes the hob easier to clean but also ensures that you will gain maximum life out of this product Occasional use will help prevent the build up of mineral deposits which can cause discolouration of the hob surface Discolouration of the hob Do not use a dishcloth or dis...

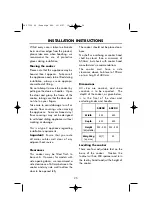
Страница 26: ...s cables well clear of any adjacent heat source Clearances This cooker may be fitted flush to base units However for models with side opening doors we recommend a side clearance of 60mm between the cooker and any side wall to allow the door to be opened fully The cooker should not be placed on a base No shelf or overhang or cooker hood shall be closer than a minimum of 650mm but check with cooker ...

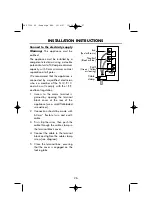
Страница 27: ...ins terminal is gained by opening the terminal block cover at the rear of the appliance use a small flat bladed screwdriver 2 Connection should be made with 6 0mm2 flexible twin and earth cable 3 First strip the wires then push the cable through the cable clamp in the terminal block cover 4 Connect the cable to the terminal block and tighten the cable clamp screw see diagram 5 Close the terminal b...

Страница 28: ...aces provided 27 TECHNICAL DATA Model No Serial No Element E60DO Element Ratings 230V E50DO Element Ratings 230V Front LHS hotplate Rear LHS hotplate Rear RHS hotplate Front RHS hotplate Ceramic 1100W Ceramic 1600W Ceramic 1100W Ceramic 1600W Ceramic 1100W Ceramic 1600W Ceramic 1100W Ceramic 1600W Dual grill Top oven Base Top oven Top Main oven fanned 1655 2575W 700W 590W 2300W 1655 2480W 700W 550...

Страница 29: ...08 27359 00 Prestige EDO 13 9 07 15 58 Page 29 ...

Страница 30: ...08 27359 00 Prestige EDO 13 9 07 15 58 Page 30 ...

Страница 31: ...08 27359 00 Prestige EDO 13 9 07 15 58 Page 31 ...

Страница 32: ... you need a service engineer please phone the number on your sale receipt Calls are charged at standard rates We apologise for any inconvenience caused by minor inconsistencies in these instruc tions which may occur as a result of product improvement and development Prestige is a registered trademark of Meyer Intellectual Properties Limited and is sold pursuant to licencse 08 27359 00 Prestige EDO...

Отзывы: