2
INSTALLING VIA TRUNNION MOUNT
For Trunnion Mount models:
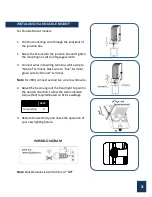
1. Using the trunnion mount holes as a guide, mark
the installation points.
1. Use expansion bolts (included) to secure the fixture
onto the mounting surface at the marked
installation points.
3. Keep enough length wires to ensure adjusting
angle unhindered.
4. Connect wires into wiring terminal; white wire to
“Neutral” terminal, black wire to “Live” terminal,
green wire to “Ground” terminal.
Note
: for 208V, connect second live wire to white wire.
5. Adjust the beam angle of the flood light to point in
the desired direction. Follow the recommended
torque (Nm) required based on fixture wattage.
6. Restore the electricity and check the operation of
your new lighting fixture.
10W
30W
50W
80W
Torque (Nm)
1.8
8
8
8
WIRING DIAGRAM


